指定widget在container的相对位置,包括:android:layout_alignParentTop, android:layout_alignParentBottom, android:layout_alignParentLeft, android:layout_alignParentRight, android:layout_centerHorizontal, android:layout_centerVertical, android:layout_centerInParent,他们的值是false|true。
如果是相对其他widget的位置,可以使用:android:layout_above,
android:layout_below, android:layout_toLeftOf,
android:layout_toRightOf。与其他widget位置对齐,可以使用:android:layout_alignTop,
android:layout_alignBottom, android:layout_alignLeft,
android:layout_alignRigh, android:layout_alignBaseline,
最后一个通常用于label的对齐。语法格式例子:layout_toRightOf="@id/widget_a"
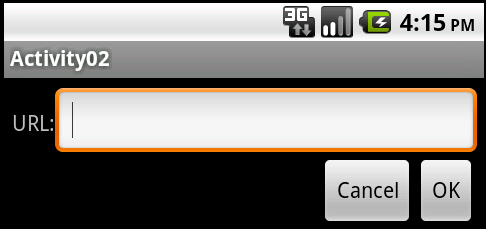
我们将创建下面的Activity,Android XML如下:
<?xml version="1.0" encoding="utf-8"?>
<!-- 我们采用RelativeLayout的布局,并设置了pad的留边,需要注意pad属于widget的有效范围 -->
<RelativeLayout xmlns:android="http://schemas.android.com/apk/res/android"
android:orientation="vertical"
android:layout_width="fill_parent"
android:layout_height="wrap_content"
android:padding="5px"
>
<!-- textview是我们第一个基准widget,我们设置了android:paddingTop="15px"。-->
<TextView android:id="@+id/label"
android:layout_width="wrap_content"
android:layout_height="wrap_content"
android:text="URL:"
android:paddingTop="15px" />
<!-- 在label的右面有一edittext,填满余下的空间,并和label进行对齐
-->
<EditText android:id="@+id/entry"
android:layout_width="fill_parent"
android:layout_height="wrap_content"
android:layout_toRightOf="@id/label"
android:layout_alignBaseline="@id/label"
/>
<!-- 在edittext的下面并对齐最右方有一个OK button
-->
<Button android:id="@+id/ok"
android:layout_width="wrap_content"
android:layout_height="wrap_content"
android:layout_below="@id/entry"
android:layout_alignRight="@id/entry"
android:text="OK"
/>
<!-- 在OK按键的左边增加一个Cancel button,并对齐。如果我们要求和OK的button之间增加间距,我们可以在下面增加设置android:laytou_marginRight="10px"-->
<Button android:id="@+id/cancel"
android:layout_width="wrap_content"
android:layout_height="wrap_content"
android:layout_toLeftOf="@id/ok"
android:layout_alignTop="@id/ok"
android:text="Cancel"
/>
</RelativeLayout>
textview是我们第一个基准widget,我们设置了android:paddingTop="15px",否则由于后面我们按此进行对齐,editiew会向上移并被chip最上端。由于editview上移,也导致了和下面button之间的间距过大。android是根据网格来安排widget的位置,每个widget都有一个确定的高度并匹配网格,如果widget被拉高,因为网格定位的缘故,button的相对位置并不会被抬高。同样的如果我们设置 android:paddingTop="30px",editview的位置下沉,同样由于网格的缘故,下面的button不会随着下沉,将和eidtiew的位置有所重叠,如图所示。

然则,我们怎么知道要给label设置15px,如果布局都需要根据这样的经验值,就相当郁闷,另一个解决方式,就是在定义edittext之前,就将label的对应位置根据其进行调整,然后再定义edittext。这在1.5版本之前有问题,因此我们需要设置AndroidManifest.xml,设定我们的最小运行版本环境,例如2.2,我们在manifest中设置:<uses-sdk android:minSdkVersion="8" /> 并且在default.properties文件中设置target=android-8,在Android的XML文件,处理如下:
<TextView android:id="@+id/label"
android:layout_width="wrap_content"
android:layout_height="wrap_content"
android:text="URL:"
android:layout_alignBaseline="@+id/entry"
android:layout_alignParentLeft="true"
/>
<EditText android:id="@id/entry"
android:layout_width="fill_parent"
android:layout_height="wrap_content"
android:layout_toRightOf="@id/label"
android:layout_alignParentTop="true"
/>
相关链接:我的Android开发相关文章
分享到:


相关推荐
Android学习笔记(九):Activity-RelativeLayout
19Android-02-03-LineaLayout-relativeLayout.mp4
NULL 博文链接:https://sarin.iteye.com/blog/1756332
•Android---UI篇---RelativeLayout(相对布局) • •Android---UI篇---GridView(网格布局) • •Android---UI篇---Gallery(画廊视图) • •Android---UI篇---Spinner(下拉列表) • •Android---UI篇---...
Android应用开发
activity 的布局 <RelativeLayout xmlns:android="http://schemas.android.com/apk/res/android" xmlns:app="http://schemas.android.com/apk/res-auto" xmlns:tools=...
3 9 1 Android中的窗口:Activity 3 9 2 广播接收器:Broadcast Receiver 3 9 3 服务 Service 3 9 4 内容提供者 Content Provider 第4章 对话框 信息提示和菜单 4 1 对话框 4 2 信息提示 4 2 1 Toast信息框 4 2 2 ...
像 RelativeLayout 一样的 RadioGroup
HighlightJs View-Android 语法高亮视图,由提供支持,适用于Android。 演示申请 演示应用程序显示了此库的简单示例用法。 它列出了该存储库提交的文件,并允许您浏览更改的文件。 选择一个文件将显示语法高亮显示...
Android学习笔记2-1~2-5 推荐新手向学习视频:B站https://www.bilibili.com/video/av38409964点我传送 2-1 布局管理器 线性布局(LinearLayout) 相对布局(RelativeLayout) 2-1-1 LinearLayout 常用属性 android...
LinearLayout(线性布局),RelativeLayout(相对布局),TableLayout(表格布局),FrameLayout(帧布局) 10:单元测试 得到单元测试框架: <manifest> <activity/> <uses-library android:name="android.test.runner...
现在一般的android软件都是需要不断更新的,当你打开某个app的时候,如果有新的版本,它会提示你有新版本需要更新。该小程序实现的就是这个...RelativeLayout xmlns:android=http://schemas.android.com/apk/res/and
文档介绍了Android学习指南Layout前言,(1) LinearLayout,Android官方LinearLayout Demo,(2) RelativeLayout,官方的RelativeLayout Demo,(3) TableLayout,官方的TableLayout Demo
android实现自定义RelativeLayout可拖动、缩放、旋转TextView
SpringLayout - RelativeLayout on steroids. The goal of this project is to create more reliable and feature-rich replacement for RelativeLayout. Apart from new features SpringLayout has better error ...
Android 相对布局 RelativeLayout 属性
这是一个新的 Android 开发人员可以用来学习如何在活动之间导航的存储库。 这个例子没有使用 Fragments,因此实现起来非常简单。 使用名为AActivity的空白活动创建一个新项目。 按如下方式编辑activity_a.xml ...
02-03:RelativeLayout 02-04:TableLayout 02-05:ScrollView 02-06:FrameLayout 03-01:布局充气机 03-02:显示其他活动 03-03:意图 03-04:活动标志和捆绑 03-05:活动生命周期 03-06:服务 03-07:广播...
android:layout_height="match_parent" android:paddingLeft="@dimen/activity_horizontal_margin" android:paddingRight="@dimen/activity_horizontal_margin" android:paddingTop="@dimen/activity_...
自定义-Android-ListView-Rows-by-Subclassing 使用 RelativeLayout 的子类来替换持有者模式