在这一篇里记录下在Java sip softphone的基础上添加播放音乐文件的功能。前面介绍了几款sipphone,发现Java sip softphone这款开源软件功能简单易于修改,根据自己的需要选择是否保留其GUI,然后修改少部分代码即可实现在拨号后播放指定的音乐文件。但是仍然有几个问题有待以后解决:1是对整个源码的框架流程的分析,目前我也只是删除了其GUI部分,而底层的sip rtp传输没有涉及;2是我下载的版本在挂断、远端忙等情况时有问题;3是播放声音文件目前只是使用默认支持的wav格式,其它格式可以扩展,但是我实现的方式应该还是有问题,因为获取发送声音数据的间隔还没有确定,只是自己测试的20ms,后面会看到。
要播放声音文件,首先得找到是从哪里获得数据的。在源码书中看到net.sourceforge.peers.media包,类Capture中看到buffer = soundManager.readData();,进而查看类SoundManager,可以发现:openAndStartLines()、 readData() 、writeData()等函数,正是我们需要的麦克风音频数据的捕获和写入扬声器的方法。查看readData()方法如下:
/**
     * audio read from microphone, read all available data
     * @return
     */
    public synchronized byte[] readData() {
        if (targetDataLine == null) {
            return null;
        }
        int ready = targetDataLine.available();
        while (ready == 0) {
            try {
                Thread.sleep(2);
                ready = targetDataLine.available();
            } catch (InterruptedException e) {
                return null;
            }
        }
        if (ready <= 0) {
            return null;
        }
        byte[] buffer = new byte[ready];
        targetDataLine.read(buffer, 0, buffer.length);
        if (mediaDebug) {
            try {
                microphoneOutput.write(buffer, 0, buffer.length);
            } catch (IOException e) {
                logger.error("cannot write to file", e);
                return null;
            }
        }
        return buffer;
    }
去掉调试信息,结合类Capture中的代码,发现这里仅是通过buffer将数据获取,然后通过PipedOutputStream类型的rawData将数据发送出去;因此只要在readData()中使buffer返回需要发送的声音文件数据即可。
根据以上分析,剩下的就是读取声音文件;java默认支持AU、AIFF、WAVE、MIDI 四种声音格式,如果需要更多的格式,需要下载附加包(参考1),然后先从(参考2)常用的JavaSound类图如下:
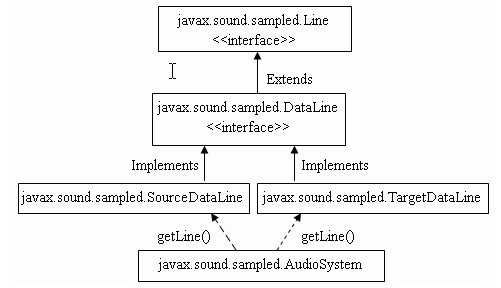
理解下从AudioSystem中获得系统的符合DataLine.info中指定的AudioFormat属性的混频器;从类SoundManager的构造函数和openAndStartLines()函数中看到如下代码:
// linear PCM 8kHz, 16 bits signed, mono-channel, little endian
        audioFormat = new AudioFormat(8000, 16, 1, true, false);
        targetInfo = new DataLine.Info(TargetDataLine.class, audioFormat);
        sourceInfo = new DataLine.Info(SourceDataLine.class, audioFormat);
public void openAndStartLines() {
        logger.debug("openAndStartLines");
        //我删除了调试部分代码
        try {
            targetDataLine = (TargetDataLine) AudioSystem.getLine(targetInfo);


            targetDataLine.open(audioFormat);
        } catch (LineUnavailableException e) {
            logger.error("target line unavailable", e);
            return;
        }
        targetDataLine.start();
        try {
            sourceDataLine = (SourceDataLine) AudioSystem.getLine(sourceInfo);
            sourceDataLine.open(audioFormat);
        } catch (LineUnavailableException e) {
            logger.error("source line unavailable", e);
            return;
        }
        sourceDataLine.start();
    }
虽然看了这么多,但是我们并不需要将数据写入扬声器,只是获得并返回,因此(参考1)我们从文件中获得输入流,代码如下:
if (testNum < 1) {
			File file = new File("test.wav");
			// AudioInputStream audioInputStream = null;// 文件流
			// AudioFormat audioFormat = null;// 文件格式
			// 取得文件输入流
			try {
				audioInputStream = AudioSystem.getAudioInputStream(file);
			} catch (UnsupportedAudioFileException e) {
				// TODO Auto-generated catch block
				e.printStackTrace();
			} catch (IOException e) {
				// TODO Auto-generated catch block
				e.printStackTrace();
			}
			audioFormat = audioInputStream.getFormat();
			// 这里可以加入转换文件编码的代码
			testNum++;
			System.out.println("testNum" + testNum);
		}
		testNum++;
		System.out.println("testNum" + testNum);
		int ready = 0;
		try {
			ready = audioInputStream.available();

			// while (ready == 0) {
			try {
				Thread.sleep(20);
				ready = audioInputStream.available();
			} catch (InterruptedException e) {
				return null;
			}
			// }
		} catch (IOException e1) {
			// TODO Auto-generated catch block
			e1.printStackTrace();
		}
		if (ready <= 0) {
			return null;
		}

		byte[] buffer = new byte[320];//readData是循环读取
		try {
			audioInputStream.read(buffer, 0, buffer.length);
		} catch (IOException e1) {
			// TODO Auto-generated catch block
			e1.printStackTrace();
		}
		System.out.println("ready:" + ready);
		return buffer;
然后,按照原定的采样频率、通道数等利用格式转换器将一个MP3或其它格式文件先转换成一个wav文件,就可以进行测试;特别是注意中间sleep的间隔,如果没有的话会导致数据无法及时处理而造成停顿,而且问题也在这里,这个间隔时间为多少合适,buffer读取的数据定多少呢?这个应该可以根据文件的属性来设置,但是应该有更好的方法吧?继续寻找。
最后,才想起来没有把环境的搭建过程说下,下次整理吧。
转载注明出处:http://blog.csdn.net/w7849516230/article/details/7695912
参考
1.使用Java实现MP3音乐播放器
2.javaSE播放声音原理
分享到:


相关推荐
SipPhone 安装文件 网络电话 SipPhone 安装文件 网络电话 SipPhone 安装文件 网络电话
Manual fonte supplier
开源的SIPPhone, VC6编译通过
sipphone 控件 sipphone 控件 sipphone 控件 sipphone 控件 sipphone 控件 sipphone 控件 sipphone 控件 sipphone 控件 sipphone 控件
SIP Phone IPV6 Debug版
一个MAC平台下的sip phone,使用OSIP, exosip, ortp, mediastreamer, speex
可以通过电脑来拨打国内国际长途电话,需要注册.
SipPhone_Setup_b0305pm
非常好用的sip软终端,可以进行音视频呼叫。
sipPhone SDK;基于 SIP 的用户代理人(IP电话)以所有标准的商务电话的特色;可以按照用户定制功能;
Android 版本SIP phone的源代码,基于osip/exosip/ortp/iLBC/mediastreamer2(mailto: dotphoenix@qq.com)
IPHONE上好用的SIPPHONE软件。。亲测。可以呼入呼出。。。支持后台呼入。
SIPPHONE SOURSECODE sipphone latest sourcecode and you can do some degugging basing it.
sip phone客户端程序。一个sip客户端,运行于xp/2k下,可以拨打pstn。
一个相当不错的软件,对于SIP协议的研究实验很有帮助,总之是相当不错的软件,我当年刚接触SIP时就是用这个软件配合Ethereal一起搞的
Linksys PAP2 SIP 设置说明 Sipphone (STUN) 模式
SipPhone_Setup_b0305pm.msi
软件拨号电话soocall sipphone
BroadWorks分司提供的SIP phone test plan,用于话机等设备的认证通过测试case.