Canny 边缘检测算法
1986年,JOHN CANNY 提出一个很好的边缘检测算法,被称为Canny编边缘检测器[1]。
Canny边缘检测根据对信噪比与定位乘积进行测度,得到最优化逼近算子,也就是Canny算子。类似与 LoG 边缘检测方法,也属于先平滑后求导数的方法。
使用Canny边缘检测器,图象边缘检测必须满足两个条件:
算法大致流程:
1、求图像与高斯平滑滤波器卷积:

2、使用一阶有限差分计算偏导数的两个阵列P与Q:

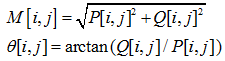
3、幅值和方位角:
4、非极大值抑制(NMS ) :细化幅值图像中的屋脊带,即只保留幅值局部变化最大的点。
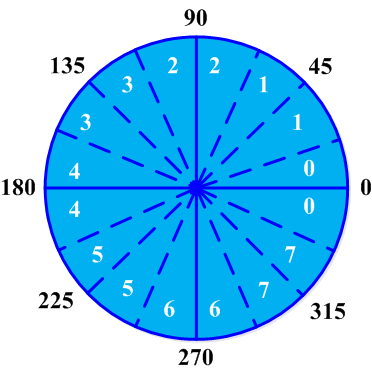
将梯度角的变化范围减小到圆周的四个扇区之一,方向角和幅值分别为:

非极大值抑制通过抑制梯度线上所有非屋脊峰值的幅值来细化M[i,j],中的梯度幅值屋脊.这一算法首先将梯度角θ[i,j]的变化范围减小到圆周的四个扇区之一,如下图所示:
5、取阈值
-
将低于阈值的所有值赋零,得到图像的边缘阵列
- 阈值τ取得太低->假边缘
- 阈值τ取得太高->部分轮廊丢失
- 选用两个阈值: 更有效的阈值方案.
相关代码
Canny算法实现:
- 用高斯滤波器平滑图像(在调用Canny之前自己用blur平滑)
- 用一阶偏导的有限差分来计算梯度的幅值和方向.
- 对梯度幅值应用非极大值抑制 .
- 用双阈值算法检测和连接边缘.
void cv::Canny( InputArray _src, OutputArray _dst,
                double low_thresh, double high_thresh,
                int aperture_size, bool L2gradient )
{
    Mat src = _src.getMat();
    CV_Assert( src.depth() == CV_8U );

    _dst.create(src.size(), CV_8U);
    Mat dst = _dst.getMat();

    if (!L2gradient && (aperture_size & CV_CANNY_L2_GRADIENT) == CV_CANNY_L2_GRADIENT)
    {
        //backward compatibility
        aperture_size &= ~CV_CANNY_L2_GRADIENT;
        L2gradient = true;
    }

    if ((aperture_size & 1) == 0 || (aperture_size != -1 && (aperture_size < 3 || aperture_size > 7)))
        CV_Error(CV_StsBadFlag, "");

#ifdef HAVE_TEGRA_OPTIMIZATION
    if (tegra::canny(src, dst, low_thresh, high_thresh, aperture_size, L2gradient))
        return;
#endif

    const int cn = src.channels();
    cv::Mat dx(src.rows, src.cols, CV_16SC(cn));
    cv::Mat dy(src.rows, src.cols, CV_16SC(cn));

    cv::Sobel(src, dx, CV_16S, 1, 0, aperture_size, 1, 0, cv::BORDER_REPLICATE);
    cv::Sobel(src, dy, CV_16S, 0, 1, aperture_size, 1, 0, cv::BORDER_REPLICATE);

    if (low_thresh > high_thresh)
        std::swap(low_thresh, high_thresh);

    if (L2gradient)
    {
        low_thresh = std::min(32767.0, low_thresh);
        high_thresh = std::min(32767.0, high_thresh);

        if (low_thresh > 0) low_thresh *= low_thresh;
        if (high_thresh > 0) high_thresh *= high_thresh;
    }
    int low = cvFloor(low_thresh);
    int high = cvFloor(high_thresh);

    ptrdiff_t mapstep = src.cols + 2;
    cv::AutoBuffer<uchar> buffer((src.cols+2)*(src.rows+2) + cn * mapstep * 3 * sizeof(int));

    int* mag_buf[3];
    mag_buf[0] = (int*)(uchar*)buffer;
    mag_buf[1] = mag_buf[0] + mapstep*cn;
    mag_buf[2] = mag_buf[1] + mapstep*cn;
    memset(mag_buf[0], 0, /* cn* */mapstep*sizeof(int));

    uchar* map = (uchar*)(mag_buf[2] + mapstep*cn);
    memset(map, 1, mapstep);
    memset(map + mapstep*(src.rows + 1), 1, mapstep);

    int maxsize = std::max(1 << 10, src.cols * src.rows / 10);
    std::vector<uchar*> stack(maxsize);
    uchar **stack_top = &stack[0];
    uchar **stack_bottom = &stack[0];

    /* sector numbers
       (Top-Left Origin)

        1   2   3
         *  *  *
          * * *
        0*******0
          * * *
         *  *  *
        3   2   1
    */

    #define CANNY_PUSH(d)    *(d) = uchar(2), *stack_top++ = (d)
    #define CANNY_POP(d)     (d) = *--stack_top

    // calculate magnitude and angle of gradient, perform non-maxima supression.
    // fill the map with one of the following values:
    //   0 - the pixel might belong to an edge
    //   1 - the pixel can not belong to an edge
    //   2 - the pixel does belong to an edge
    for (int i = 0; i <= src.rows; i++)
    {
        int* _norm = mag_buf[(i > 0) + 1] + 1;
        if (i < src.rows)
        {
            short* _dx = dx.ptr<short>(i);
            short* _dy = dy.ptr<short>(i);

            if (!L2gradient)
            {
                for (int j = 0; j < src.cols*cn; j++)
                    _norm[j] = std::abs(int(_dx[j])) + std::abs(int(_dy[j]));
            }
            else
            {
                for (int j = 0; j < src.cols*cn; j++)
                    _norm[j] = int(_dx[j])*_dx[j] + int(_dy[j])*_dy[j];
            }

            if (cn > 1)
            {
                for(int j = 0, jn = 0; j < src.cols; ++j, jn += cn)
                {
                    int maxIdx = jn;
                    for(int k = 1; k < cn; ++k)
                        if(_norm[jn + k] > _norm[maxIdx]) maxIdx = jn + k;
                    _norm[j] = _norm[maxIdx];
                    _dx[j] = _dx[maxIdx];
                    _dy[j] = _dy[maxIdx];
                }
            }
            _norm[-1] = _norm[src.cols] = 0;
        }
        else
            memset(_norm-1, 0, /* cn* */mapstep*sizeof(int));

        // at the very beginning we do not have a complete ring
        // buffer of 3 magnitude rows for non-maxima suppression
        if (i == 0)
            continue;

        uchar* _map = map + mapstep*i + 1;
        _map[-1] = _map[src.cols] = 1;

        int* _mag = mag_buf[1] + 1; // take the central row
        ptrdiff_t magstep1 = mag_buf[2] - mag_buf[1];
        ptrdiff_t magstep2 = mag_buf[0] - mag_buf[1];

        const short* _x = dx.ptr<short>(i-1);
        const short* _y = dy.ptr<short>(i-1);

        if ((stack_top - stack_bottom) + src.cols > maxsize)
        {
            int sz = (int)(stack_top - stack_bottom);
            maxsize = maxsize * 3/2;
            stack.resize(maxsize);
            stack_bottom = &stack[0];
            stack_top = stack_bottom + sz;
        }

        int prev_flag = 0;
        for (int j = 0; j < src.cols; j++)
        {
            #define CANNY_SHIFT 15
            const int TG22 = (int)(0.4142135623730950488016887242097*(1<<CANNY_SHIFT) + 0.5);

            int m = _mag[j];

            if (m > low)
            {
                int xs = _x[j];
                int ys = _y[j];
                int x = std::abs(xs);
                int y = std::abs(ys) << CANNY_SHIFT;

                int tg22x = x * TG22;

                if (y < tg22x)
                {
                    if (m > _mag[j-1] && m >= _mag[j+1]) goto __ocv_canny_push;
                }
                else
                {
                    int tg67x = tg22x + (x << (CANNY_SHIFT+1));
                    if (y > tg67x)
                    {
                        if (m > _mag[j+magstep2] && m >= _mag[j+magstep1]) goto __ocv_canny_push;
                    }
                    else
                    {
                        int s = (xs ^ ys) < 0 ? -1 : 1;
                        if (m > _mag[j+magstep2-s] && m > _mag[j+magstep1+s]) goto __ocv_canny_push;
                    }
                }
            }
            prev_flag = 0;
            _map[j] = uchar(1);
            continue;
__ocv_canny_push:
            if (!prev_flag && m > high && _map[j-mapstep] != 2)
            {
                CANNY_PUSH(_map + j);
                prev_flag = 1;
            }
            else
                _map[j] = 0;
        }

        // scroll the ring buffer
        _mag = mag_buf[0];
        mag_buf[0] = mag_buf[1];
        mag_buf[1] = mag_buf[2];
        mag_buf[2] = _mag;
    }

    // now track the edges (hysteresis thresholding)
    while (stack_top > stack_bottom)
    {
        uchar* m;
        if ((stack_top - stack_bottom) + 8 > maxsize)
        {
            int sz = (int)(stack_top - stack_bottom);
            maxsize = maxsize * 3/2;
            stack.resize(maxsize);
            stack_bottom = &stack[0];
            stack_top = stack_bottom + sz;
        }

        CANNY_POP(m);

        if (!m[-1])         CANNY_PUSH(m - 1);
        if (!m[1])          CANNY_PUSH(m + 1);
        if (!m[-mapstep-1]) CANNY_PUSH(m - mapstep - 1);
        if (!m[-mapstep])   CANNY_PUSH(m - mapstep);
        if (!m[-mapstep+1]) CANNY_PUSH(m - mapstep + 1);
        if (!m[mapstep-1])  CANNY_PUSH(m + mapstep - 1);
        if (!m[mapstep])    CANNY_PUSH(m + mapstep);
        if (!m[mapstep+1])  CANNY_PUSH(m + mapstep + 1);
    }

    // the final pass, form the final image
    const uchar* pmap = map + mapstep + 1;
    uchar* pdst = dst.ptr();
    for (int i = 0; i < src.rows; i++, pmap += mapstep, pdst += dst.step)
    {
        for (int j = 0; j < src.cols; j++)
            pdst[j] = (uchar)-(pmap[j] >> 1);
    }
}
Canny() 调用接口(C++):
void Canny(InputArray image, OutputArray edges, double threshold1, double threshold2,
                   int apertureSize=3, bool L2gradient=false )
实践示例
Mat src, src_gray;
Mat dst, detected_edges;
int edgeThresh = 1;
int lowThreshold;
int const max_lowThreshold = 100;
int ratio = 3;
int kernel_size = 3;
char* window_name = "Edge Map";

void CannyThreshold(int, void*)
{
    /// Reduce noise with a kernel 3x3
    blur( src_gray, detected_edges, Size(3,3) );
    /// Canny detector
    Canny( detected_edges, detected_edges, lowThreshold, lowThreshold*ratio, kernel_size );
    dst = Scalar::all(0);
    src.copyTo( dst, detected_edges);
    imshow( window_name, dst );
}

int main( )
{
  src = imread( "images\\happycat.png" );
  if( !src.data )
    { return -1; }
  dst.create( src.size(), src.type() );
  cvtColor( src, src_gray, CV_BGR2GRAY );
  namedWindow( window_name, CV_WINDOW_AUTOSIZE );
  createTrackbar( "Min Threshold:", window_name, &lowThreshold, max_lowThreshold, CannyThreshold );
  CannyThreshold(0, 0);
  waitKey(0);
  return 0;
}
原图:

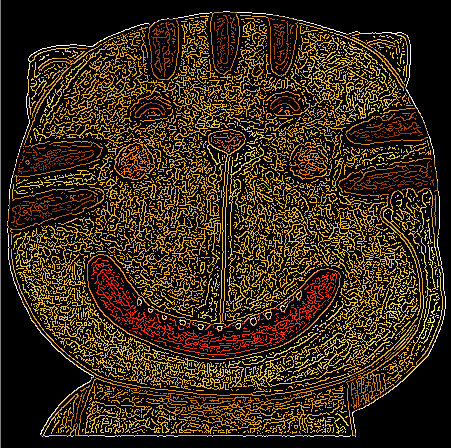
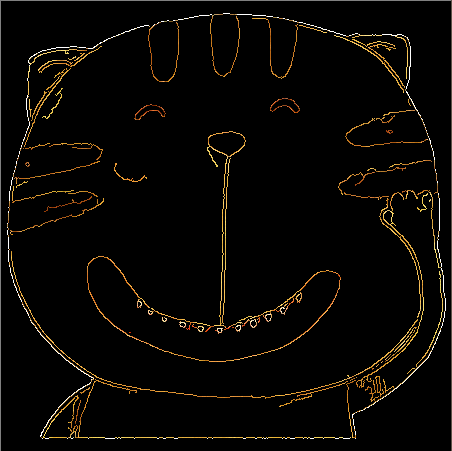
边缘检测效果图:
(从左到右lowThread分别为0、50、100)

参考文献:
[1] Canny. A Computational Approach to Edge Detection, IEEE Trans. on Pattern Analysis and Machine Intelligence, 8(6), pp. 679-698 (1986).
[1] Canny. A Computational Approach to Edge Detection, IEEE Trans. on Pattern Analysis and Machine Intelligence, 8(6), pp. 679-698 (1986).
分享到:


相关推荐
**OpenCV Canny边缘检测详解** Canny边缘检测是一种经典的图像处理算法,广泛应用于计算机视觉、图像分析和机器学习等领域。由John F. Canny在1986年提出,该算法旨在找到图像中的最显著边缘,同时尽可能减少误检和...
OpenCV Canny边缘检测 OpenCV是一个计算机视觉库,提供了许多有用的函数和类来处理图像和视频。其中,Canny边缘检测是一个常用的图像处理技术,用于检测图像中的边缘。下面将详细介绍OpenCV中的Canny边缘检测。 ...
在VC++中使用OpenCV进行Canny边缘检测,你需要包含必要的头文件,如`<opencv2/opencv.hpp>`,然后加载图像,调用`cv::Canny`函数。这个函数的参数通常包括源图像、低阈值、高阈值、边缘连接的最小宽度以及用于检测的...
在实验过程中,通常会在VC++6.0等开发环境中集成OpenCV库,编写相应的C++代码来实现Canny边缘检测。实验结果会展示不同阈值下的边缘检测效果,随着阈值增大,边缘检测更加保守,只保留了图像中亮度变化最明显的部分...
读取图片,对其进行边缘检测操作,并可显示原图像和边缘化后的图片
在本教程中,我们将深入探讨如何在Visual Studio 2015上使用C++和OpenCV库来实现Canny边缘检测。 首先,让我们了解Canny边缘检测的基本原理。Canny算法主要由以下五个步骤组成: 1. **高斯滤波**:消除图像中的...
OpenCV之Canny边缘检测是图像处理中的一个重要概念,它是一种多级边缘检测算法,由John F. Canny在1986年提出。该算法以其高效性和准确性著称,被广泛应用于计算机视觉、图像分析和机器学习等领域。Canny边缘检测...
Canny边缘检测算子是John F. Canny于 1986 年开发出来的一个多级边缘检测算法。Canny 边缘检测的数学原理和算法实现这里就不再了,有兴趣的读者可以查阅专业书籍,本文主要介绍如何在OpenCV中对图像进行Canny 边缘...
可直接使用
Canny边缘检测是OpenCV中常用的一种经典边缘检测方法,由John F. Canny在1986年提出。这个方法通过多级计算和非极大值抑制来有效地找到图像中的边缘,同时减少假阳性边缘的检测。 在【标题】"opencv 实现canny检测...
"OpenCV实现Canny边缘检测" OpenCV是一款功能强大的计算机视觉库,它提供了许多有用的函数和类来处理图像和视频。Canny边缘检测是图像处理中的一种重要技术,它可以检测图像中的边缘信息,从而对图像进行分割和识别...
本篇将详细介绍Canny边缘检测算法在OpenCV中的应用。 Canny算法由John F. Canny在1986年提出,它是一种多级边缘检测方法,通过一系列处理步骤来寻找图像中的边缘。Canny算法主要包含以下四个步骤: 1. **高斯滤波*...
opencv中的canny边缘检测,可实现边缘发现,比prewitt和sobel算子更细
本文将深入探讨如何利用OpenCV实现Canny边缘检测,并介绍如何手动调整阈值以优化结果。 Canny边缘检测算法由John F. Canny于1986年提出,它通过多级处理来找到图像中的边缘。该算法主要包括以下几个步骤: 1. **...
内容概要:本文档是一份关于Canny边缘检测的入门教程,详细介绍了使用Python和OpenCV库实现Canny边缘检测的方法。首先说明了如何安装所需的库(OpenCV和Matplotlib),然后给出了完整的Python代码示例。代码分为几个...
在C++中实现Canny边缘检测,通常会涉及到OpenCV库,这是一个强大的开源计算机视觉库,提供了许多预定义的函数来实现图像处理任务,包括Canny边缘检测。以下是一般步骤: 1. 导入必要的OpenCV库。 2. 读取图像数据。...
在Python中,我们可以使用OpenCV库来实现Canny边缘检测。在提供的`canny.py`文件中,很可能包含了如下代码片段: ```python import cv2 import numpy as np # 读取图像 image = cv2.imread('input_image.jpg', 0) ...
内容概要:本文首先详细介绍了OpenCV,包括其背景、特点、主要功能及安装方法,随后重点讲解了Canny边缘检测算法的原理、步骤及其在OpenCV中的实现方式。最后,讨论了Canny边缘检测的应用场景和调参技巧。 适合人群...
OpenCV-python Canny边缘检测详解 OpenCV-python Canny边缘检测是一种常用的图像处理技术,用于检测图像中的边缘信息。本文将详细介绍OpenCV-python中Canny边缘检测的原理、实现方法和代码实现。 一、Canny边缘...