- 浏览: 16746 次
- 性别:

- 来自: 北京
-

文章分类
最新评论
浅谈A-Frame从零开始做一个 Web 3D 互动游戏
不用学习新的语言,只有前端现有的知识就可以做AR了。而且是在我们熟悉的Web环境中,不用APP就可以做到。
1. 什么是A-Frame
这个框架的命名跟移动4G的“和”有得一拼,结果都是完美错过所有关键词。
A 会被浏览器忽略 - 是连词符,frame又有太多歧义。如果打出来 aframe 还会被浏览器“智能”拆分成 a frame 变成“一个框架”。
这就导致查资料不容易,沙里淘金的感觉,不过也可能是本身资料就少的缘故。2017年05月02日更新,孤陋寡闻了,搜索时用引号包含关键词,代表全匹配搜索,搜“A-Frame”可以得到准确的结果。
A-Frame是一个可以在HTML中创建3d场景的框架,使用Three.js和WebGL来创建VR场景。
不需要了解低层渲染细节,但是A-Frame的说明文档也很长啊。
2. 最简单的demo
在http://codepen.io打开代码,在codepen.io预览
<script src="https://aframe.io/releases/0.4.0/aframe.min.js"></script>

<a-scene>
  <a-sphere position="0 1.25 -5" radius="1.25" color="#EF2D5E"></a-sphere>
  <a-box position="-1 0.5 -3" rotation="0 45 0" width="1" height="1" depth="1" color="#4CC3D9"></a-box>
  <a-cylinder position="1 0.75 -3" radius="0.5" height="1.5" color="#FFC65D"></a-cylinder>
  <a-plane position="0 0 -4" rotation="-90 0 0" width="4" height="4" color="#7BC8A4"></a-plane>

  <a-sky color="#ECECEC"></a-sky>
</a-scene>
代码中的 <a-sky> 就是纯色背景,其他几个看名字就知道是哪个了。
这个demo还可以用鼠标和键盘导航,如果用手机浏览器打开,就是VR效果了。
3. 从头做一个自己的场景
3.1 模板
A-Frame 的所有元素都放在 <a-scene> 中,初始代码如下:
<!DOCTYPE html>
<html>
  <head>
    <meta charset="utf-8"/>
    <title>Our First A-Frame Experience</title>
    <script src="https://aframe.io/releases/0.4.0/aframe.min.js"></script>
  </head>
  <body>
    <a-scene>

    </a-scene>
  </body>
</html>
3.2 天空
天空使用的元素是 <a-sky>,代码如下:
<a-sky color="#C500FF"></a-sky>
此时会产生一个紫红色的天空。天空也可以是一个全景图.
flickr
有很多全景图,我们选一个作为背景,比如这一张:
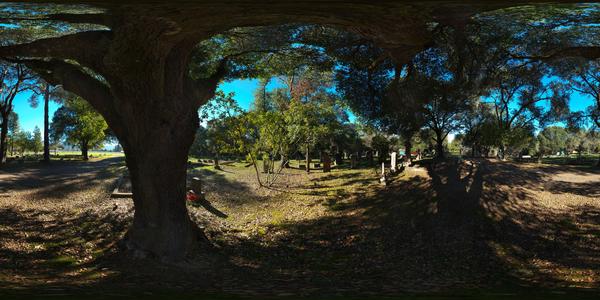
现在把天空换成这张全景图。
<!DOCTYPE html>
<html>
  <head>
    <meta charset="utf-8"/>
    <title>Our First A-Frame Experience</title>
    <script src="https://aframe.io/releases/0.4.0/aframe.min.js"></script>
  </head>
  <body>
    <a-scene>
      <a-sky src="https://c1.staticflickr.com/8/7376/16218590470_468084c950_h.jpg"></a-sky>
    </a-scene>
  </body>
</html>
现在代码(在http://codepen.io打开代码,在codepen.io预览)
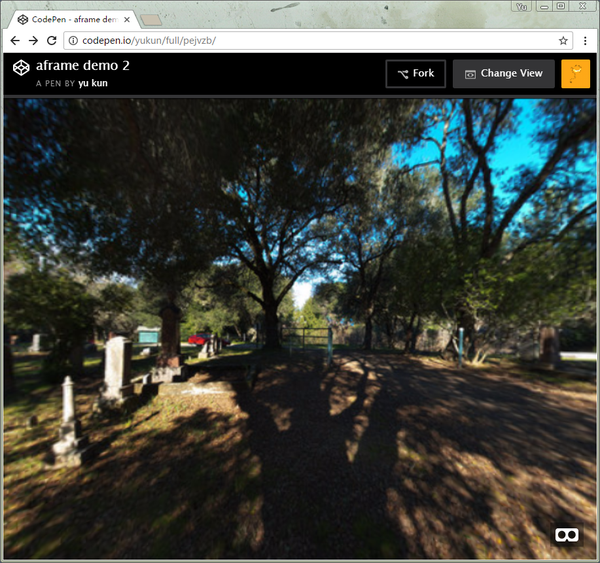
现在用手机看效果是不是有身临其境的感觉了。
3.3 放一个球进去
<a-scene>
<a-sky src="https://c1.staticflickr.com/8/7376/16218590470_468084c950_h.jpg"></a-sky>
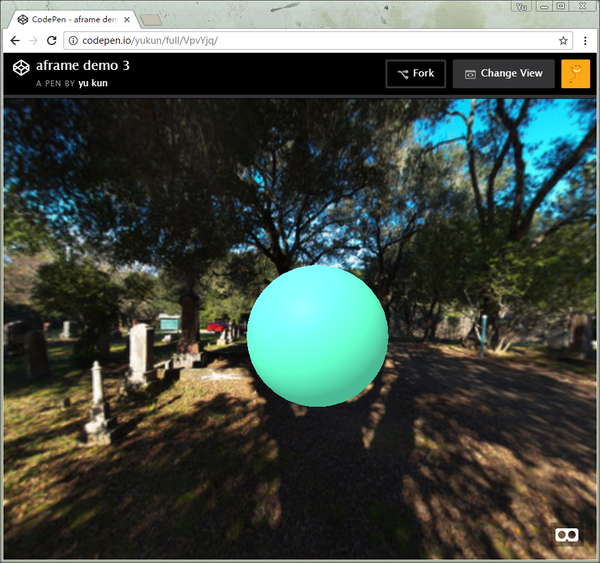
<a-sphere position="0 1.25 -5" radius="1.25" color="#66ffcc"></a-sphere>
</a-scene>
现在场景中多了一个蓝色的球,直接看效果。
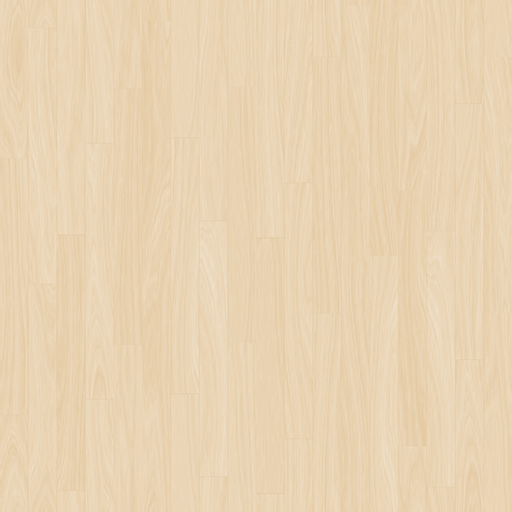
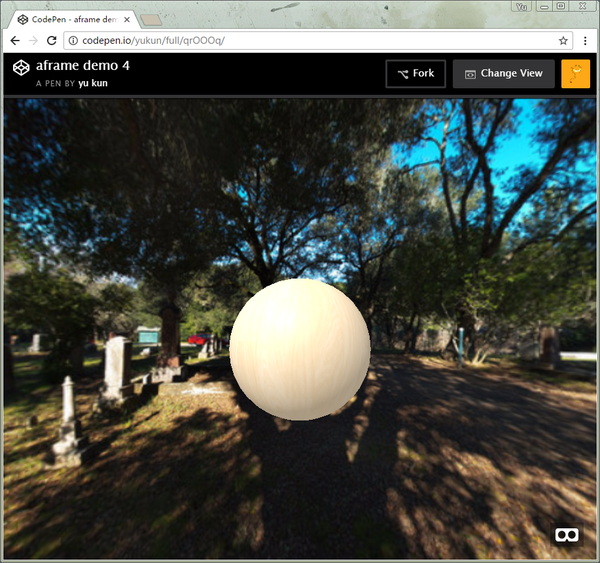
球也可以不是纯色的,这就需要给球表面贴图,我们先从subtlepatterns选一个材质,
就这一张木纹吧:
<a-scene>
  <a-sky src="https://c1.staticflickr.com/8/7376/16218590470_468084c950_h.jpg"></a-sky>
  <a-sphere position="0 1.25 -5" radius="1.25" src="https://www.toptal.com/designers/subtlepatterns/patterns/retina_wood.png"></a-sphere>
</a-scene>
3.4 光标交互
VR里也有对应的交互方案,我们现在增加动画和事件库。场景里增加一个camera和放在其中的curosr。
<script src="https://aframe.io/releases/0.4.0/aframe.min.js"></script>
<script src="https://npmcdn.com/aframe-animation-component@3.0.1"></script>
<script src="https://npmcdn.com/aframe-event-set-component@3.0.1"></script>

<a-scene>
  <a-sky src="https://c1.staticflickr.com/8/7376/16218590470_468084c950_h.jpg"></a-sky>
  <a-sphere position="0 1.25 -5" radius="1.25" src="https://www.toptal.com/designers/subtlepatterns/patterns/retina_wood.png"></a-sphere>

  <!-- Camera + cursor. -->
  <a-entity camera look-controls>
    <a-cursor id="cursor"
        animation__click="property: scale; startEvents: click; from: 0.1 0.1 0.1; to: 1 1 1; dur: 150"
        animation__fusing="property: fusing; startEvents: fusing; from: 1 1 1; to: 0.1 0.1 0.1; dur: 1500"
        event-set__1="_event: mouseenter; color: #0092d8"
        event-set__2="_event: mouseleave; color: black"></a-cursor>
  </a-entity>
</a-scene>
现在代码(在codepen.io查看代码,在codepen.io预览)。
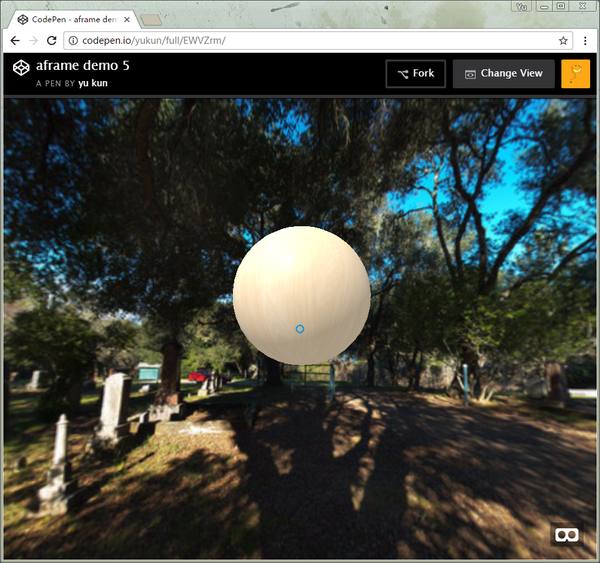
现在随着视口(摄像机)移动,在屏幕中央的光标(定位相对于摄像机固定)会跟着摄像机移动。
光标与鼠标一样遇到圆球,触发 mouseenter 事件,离开圆球触发 mouseleave 事件。现在我们已经增加了这两个事件,进入的时候光标变蓝色,离开变回默认的黑色。点击时伴随有光标缩放效果。
3.5 与场景中的球互动
就像鼠标点击按钮一样,这个光标也可以触发场景中的元素事件,不过这时就没有现成的代码库了,要自己写事件绑定。
<script src="https://aframe.io/releases/0.4.0/aframe.min.js"></script>
<script src="https://npmcdn.com/aframe-animation-component@3.0.1"></script>
<script src="https://npmcdn.com/aframe-event-set-component@3.0.1"></script>
<script>
    AFRAME.registerComponent('hide-on-click', {
        dependencies: ['raycaster'],
        schema: {
            target:{type: 'selector'}
        },
        init: function () {
            var data = this.data;
            var el = this.el;
            el.addEventListener('click', function () {
                el.setAttribute('visible', false);
                data.target.setAttribute('visible', true);
            });
        }
    });
</script>

<a-scene>
  <a-sky src="https://c1.staticflickr.com/8/7376/16218590470_468084c950_h.jpg"></a-sky>
  <a-sphere hide-on-click="target:#another_cube" position="0 1.25 -5" radius="1.25" src="https://www.toptal.com/designers/subtlepatterns/patterns/retina_wood.png"></a-sphere>
  <a-box id="another_cube" visible="false" position="-1 1.5 -4" rotation="0 45 0" width="1" height="1" depth="1" color="#4CC3D9"></a-box>

  <!-- Camera + cursor. -->
  <a-entity camera look-controls>
    <a-cursor id="cursor"
        animation__click="property: scale; startEvents: click; from: 0.1 0.1 0.1; to: 1 1 1; dur: 150"
        animation__fusing="property: fusing; startEvents: fusing; from: 1 1 1; to: 0.1 0.1 0.1; dur: 1500"
        event-set__1="_event: mouseenter; color: #0092d8"
        event-set__2="_event: mouseleave; color: black"></a-cursor>
  </a-entity>
</a-scene>
现在代码(在codepen.io打开代码,在codepen.io预览)。
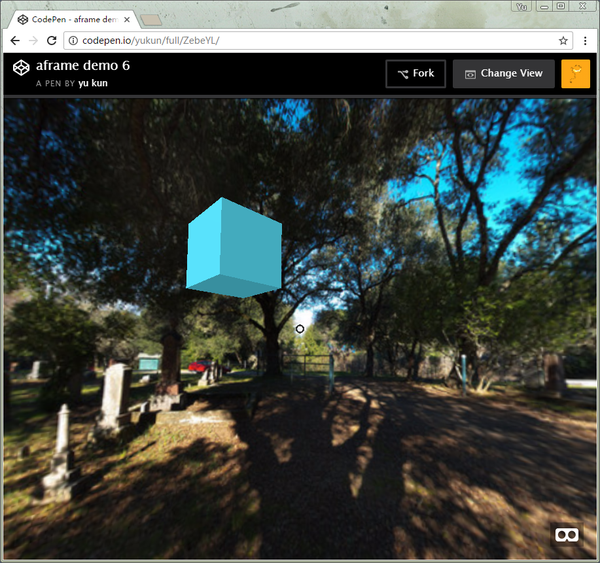
现在如果用PC浏览器看效果,鼠标左右拖动能移动摄像机(同时移动光标),鼠标单击任意位置,光标触发点击事件。点击圆球以后,圆球消失,正方体的盒子出现了。
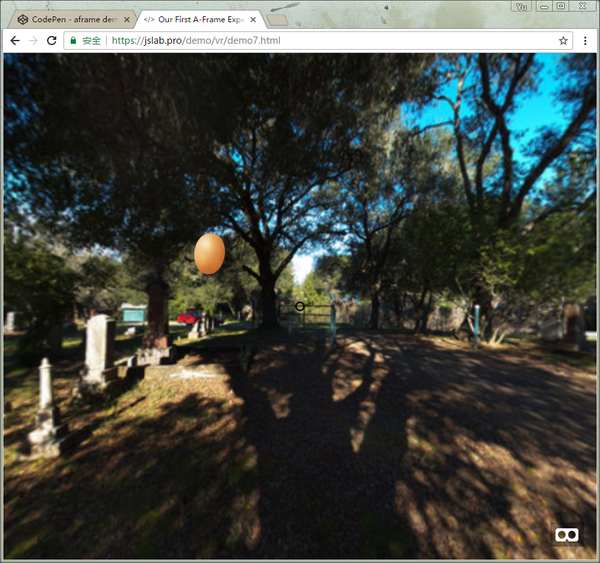
4 做一个互动游戏
我的游戏过程是,进入页面在随机位置生成一个鸡蛋,用户用光标点击鸡蛋,鸡蛋隐藏,然后播放鸡蛋破壳动画,最后触发弹窗,提示用户你获得一只鸡。
4.1 基础代码
跟上面的差不多,只是去掉了绑定事件和圆球。因为球形太圆了,不像鸡蛋。只能用一张静态的鸡蛋图片代替。为什么不用椭圆形的3d元素呢,因为除了方形、圆柱、圆形、平面以外的物体,多边形太多了,占用内存太大。
要展示平面图形就需要另外一个库 aframe-html-shader。
<script src="https://aframe.io/releases/0.4.0/aframe.min.js"></script>
<script src="https://npmcdn.com/aframe-animation-component@3.0.1"></script>
<script src="https://npmcdn.com/aframe-event-set-component@3.0.1"></script>
<script src="https://npmcdn.com/aframe-layout-component@3.0.1"></script>
<script src="https://rawgit.com/mayognaise/aframe-html-shader/master/dist/aframe-html-shader.min.js"></script>

<script>
    AFRAME.registerComponent('hide-on-click', {
        dependencies: ['raycaster'],
        schema: {
            target:{type: 'selector'}
        },
        init: function () {
            var data = this.data;
            var el = this.el;
            el.addEventListener('click', function () {
                el.setAttribute('visible', false);
                data.target.setAttribute('visible', true);

            });
        }
    });
</script>

<div id="textToDisplay"><img src="./frame_1.png" alt=""></div>
<a-scene>
  <a-sky src="https://c1.staticflickr.com/8/7376/16218590470_468084c950_h.jpg"></a-sky>

    <a-entity hide-on-click="target:#chickenAnimate">
        <a-entity id="default_egg"
                  geometry="primitive:plane;width:2;height:2;"
                  position="-3 2 -10"
                  material="shader:html;target:#textToDisplay;transparent:true;fps:0;">
        </a-entity>
    </a-entity>
    <a-box id="chickenAnimate" visible="false" position="-1 1.5 -4" rotation="0 45 0" width="1" height="1" depth="1" color="#4CC3D9"></a-box>


  <!-- Camera + cursor. -->
  <a-entity camera look-controls>
    <a-cursor id="cursor"
        animation__click="property: scale; startEvents: click; from: 0.1 0.1 0.1; to: 1 1 1; dur: 150"
        animation__fusing="property: fusing; startEvents: fusing; from: 1 1 1; to: 0.1 0.1 0.1; dur: 1500"
        event-set__1="_event: mouseenter; color: #0092d8"
        event-set__2="_event: mouseleave; color: black"></a-cursor>
  </a-entity>
</a-scene>
上面的代码改动增加了一个div#textToDisplay 里面只有一张鸡蛋的图片,这张图会用来渲染到 a-entity#default_egg。语法是设置 matrial 的值。具体可参考
github aframe-html-shader
项目主页。
这里有个问题,aframe-html-shader 原理是用canvas渲染DOM中的元素,如果有图片会需要由canvas处理,这就涉及到跨域问题。
跨域问题可以通过html2canvas-php-proxy解决,
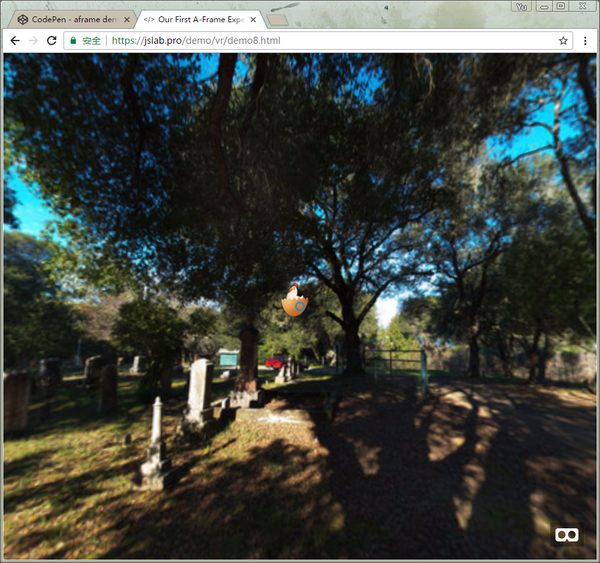
但是在服务器部署这个代理有安全风险,所以我们的demo放到同一个域测试。
演示地址在:demo7
此时用光标点击鸡蛋,鸡蛋会消失,正方体出现。
4.2 播放动画
鸡蛋的动画也需要用canvas渲染出来,这里再引入一个库:
aframe-gif-shadergithub 地址
<script src="https://aframe.io/releases/0.5.0/aframe.min.js"></script>
<script src="https://npmcdn.com/aframe-animation-component@3.0.1"></script>
<script src="https://npmcdn.com/aframe-event-set-component@3.0.1"></script>
<script src="https://npmcdn.com/aframe-layout-component@3.0.1"></script>
<script src="https://rawgit.com/mayognaise/aframe-html-shader/master/dist/aframe-html-shader.min.js"></script>
<script src="./aframe-gif-shader.js"></script>
然后把替代的正方体盒子换成孵蛋动画:
<a-entity id="chickenAnimate" visible="false">
    <a-entity id="animate_egg" geometry="primitive:plane;width:2;height:2;"
              position="-3 2 -10"
              material="shader:gif;src:url(./egg_2017_1.gif);transparent:true;"
              gif=""></a-entity>
</a-entity>
此处的gif渲染原理是用js加载并解析每一帧动画,并用canvas渲染出来。
这里有两个小坑:
-
aframe-gif-shader 组件中渲染每一帧之前,忘记清空画布,导致影响重叠。(难怪demo使用的都是不透明gif图片)我已经修复了这个问题,所以引用的是本地文件。
-
aframe-gif-shader 组件中使用了第三方的优化算法,但是这个优化算法存在bug,连续的两帧图片上部透明部分太多会被认为是多余帧优化掉。此处可以修改gif素材绕过。
脚本也增加一点内容,播放孵蛋的动画后,等3秒弹出alert,提醒用户游戏结果,然后重置游戏。
AFRAME.registerComponent('hide-on-click', {
    dependencies: ['raycaster'],
    schema: {
        target: {type: 'selector'}
    },
    init: function () {
        var data = this.data;
        var el = this.el;
        el.addEventListener('click', function () {
            el.setAttribute('visible', false);
            data.target.setAttribute('visible', true);
            setTimeout(function(){
                alert('恭喜您获得一只鸡!');
                window.location.reload();
            },5000);
        });
    }
});
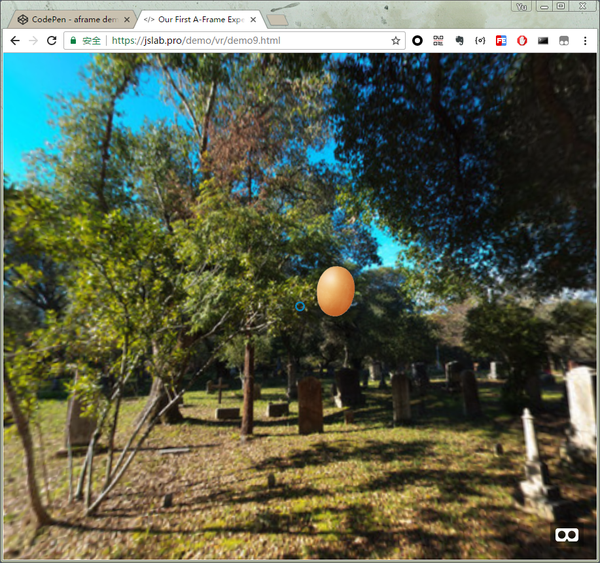
完整的效果和源码请查看:demo8
4.3 增加趣味性,随机位置
现在游戏可以玩了,但是每次鸡蛋都处在统一位置,根本不用找。为了增加趣味性,我们随机改变鸡蛋的位置。
但是根据我的测试,完全随机的游戏一点都不好玩,太远了会变成几个像素大小,根本找不到,太近了有种糊在脸上的感觉。还有上下左右位置都不能太离谱。
多次测试后决定把位置放在用户站的位置周围固定距离的圆圈上,高度比身高多一点点的时候,比较合理。
我翻出来初中数学课本,找到了下面的公式:
var R = Math.random() * 360; // 弧度
var r = 8; // 半径
var X = Math.sin(R) * r; // x 坐标
var Z = Math.cos(R) * r; // 俯视图 z 坐标

$('#default_egg,#animate_egg').attr('position',{ x: X, y: 2, z: Z });
这下位置随机了,可是鸡蛋是平面图形,朝向必须面对摄像头才行,不然会有一种挨着窗户坐在教室第一排看黑板的感觉。
这时就需要另外一个库,从官方插件库中分出来的kframe插件库,其中有个look-at插件,看名字就知道作用就是让元素面对镜头。加上后的js引用有这么多:
<script src="https://aframe.io/releases/0.5.0/aframe.min.js"></script>
<script src="https://npmcdn.com/aframe-animation-component@3.0.1"></script>
<script src="https://npmcdn.com/aframe-event-set-component@3.0.1"></script>
<script src="https://npmcdn.com/aframe-layout-component@3.0.1"></script>
<script src="https://rawgit.com/mayognaise/aframe-html-shader/master/dist/aframe-html-shader.min.js"></script>
<script src="./aframe-gif-shader.js"></script>
<script src="./aframe-look-at-component.min.js"></script>
这里使用本地版本是没找到 cdn 地址的。
元素上也加上属性绑定:
<a-entity hide-on-click="target:#chickenAnimate">
    <a-entity id="default_egg"
              geometry="primitive:plane;width:2;height:2;"
              look-at="[camera]"
              position="-3 2 -10"
              material="shader:html;target:#textToDisplay;transparent:true;fps:0;">
    </a-entity>
</a-entity>
<a-entity id="chickenAnimate" visible="false">
    <a-entity id="animate_egg" geometry="primitive:plane;width:2;height:2;"
              look-at="[camera]"
              position="-3 2 -10"
              material="shader:gif;src:url(./egg_2017_1.gif);transparent:true;"
              gif=""></a-entity>
</a-entity>
此时已经可以完整的游戏了,源代码和演示都在:demo9
4.4 再增加点趣味性,AR?
现在浏览器的运算能力还做不到通过摄像头识别复杂的内容,最多只能识别有限的几个二维码。但是我们也可以退而求其次,先把场景放到用户周围再说。
我们调用摄像头,作为网页的背景就能模拟显示场景了。
iOS 系统没有开放摄像头的权限,只能通过android手机测试了。
我们再引用一个 threex.webar库中的一个threex.webcamgrabbing组件。
etUserMedia() no longer works on insecure origins.
To use this feature, you should consider switching your application to a secure origin,
such as HTTPS. Seehttps://goo.gl/rStTGzfor more details.悲剧啊,过完年 MediaStreamTrack.getSources 接口被Chrome抛弃了,微信X5也停止支持了,但是新的接口navigator.mediaDevices.getUserMedia旧手机不支持。
所以我们使用webrtc adapter兼容新版本的获取资源方法。自己实现获取摄像头内容。
navigator.mediaDevices.getUserMedia 接口只能在 HTTPS 地址中被调用。
就是游戏的最终版本:demo10
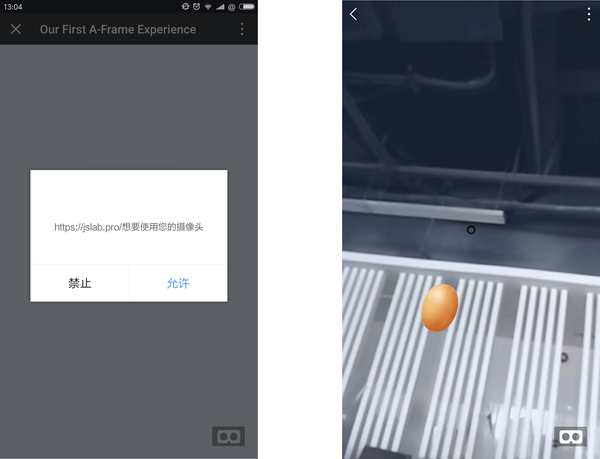
微信里要点最下面的,访问原网页。
最终版做了判断,支持获取摄像头的设备就使用当前环境做背景,不支持的就在小树林里找蛋。
到这里这个游戏就做出来了,如果想要做成产品给用户玩,还需要做很多美化工作。至少要有加载游戏前的Loading页面,游戏界面的装饰效果,提示浮层美化,游戏后台接口记录成绩,给用户发奖品等工作。
参考资料


发表评论

相关推荐
A-Frame框架样板,下载后直接在上面编码即可运行,即普通浏览器即可体验VR世界。
点击劫持:X-Frame-Options头缺失 in a frame because it set 'X-Frame-Options' to 'deny'
X-Frame-Options HTTP响应头是用来确认是否浏览器可以在frame或iframe标签中渲染一个页面,网站可以用这个头来保证他们的内容不会被嵌入到其它网站中,以来避免点击劫持。 恶意攻击者可以利用漏洞攻击做到: 击者...
vue init webpack a-frame-template git clone https://github.com/tf-webvr-dev/a-frame-template.git vr-sample cd vr-sample npm install export HOST=0.0.0.0 npm run dev 部署到火力基地 cd vr-sample npm ...
X-Frame FPS Accelerator reduces lag and contributes to higher FPS (Frames Per Second) providing a smooth gameplay to your users. X-Frame is intended for mobile devices (Android and iOS tested) and ...
SF-G A-B frame outlinepdf,提供“士林SF-G A-B frame outline”免费资料下载,供参考。
X-Frame-Options头缺失漏洞 修复需要ClickjackFilter.jar ,引入esapi.jar(内含ClickjackFilter)即可。
jquery--frame--ziyuan jquery--frame--ziyuan jquery--frame--ziyuan jquery--frame--ziyuan
3DStreet基本演示:http: 3DStreet使用A-Frame和WebXR创建2D 街道的3D可视化。 开发人员可以将3DStreet的相同核心用于自己的项目。快速入门-如何制作自己的3D街道: 首先,使用创建街道设计。 (Streetmix是一个工具...
16-WSGI、mini_frame(web框架)(python和linux高级编程阶段 代码和截图)16-WSGI、mini_frame(web框架)(python和linux高级编程阶段 代码和截图)16-WSGI、mini_frame(web框架)(python和linux高级编程阶段 ...
Google Chrome浏览器跳过X-Frame,很好用!!!!Google Chrome浏览器跳过X-Frame,很好用!!!!
本文从改线的角度出发,改造对象是迎广的H-Frame mini机箱,在它刚刚上市的时候笔者就对这款机箱十分迷恋,当拿到实物的时候更是
前端开源库-code-frame代码帧,最小的代码帧,如Babel代码帧,但更小
一个A-Frame组件,用于在WebVR中渲染体积视频。 A-Frame组件包装了 ,这是一个小型库,为项目提供相同的功能。 用法 首先克隆/派生存储库,并从./dist文件夹中包含aframe.depthkit.min.js (如果您打算运行示例来...
将A-Frame原语(a-box,a-sphere ...)添加到vscode完成列表 添加基本元素及其属性文档描述 用法 变更记录 查看更改日志 问题 如果发现任何错误或有任何建议,请提交。 贡献 分叉并提交拉取请求。
A-Frame是用于构建虚拟现实体验的开源Web框架。... A-Frame是在three.js之上的一个精简而强大的框架。 虽然可以通过HTML完全访问A-Frame,但是开发人员还可以充分利用JavaScript,DOM API,three.js,WebVR和WebGL。
点击图片的右边,则图片向右移动,到屏幕边缘停止 电击图片左边,则图片向左移动,到屏幕左边缘停止
前端开源库-react-frame-componentreact frame组件,react组件将应用程序或组件包装在iframe中以进行封装
webpack-remax-phone-frame-plugin 为 Remax 的 web 端加一个手机壳的样式 如何使用 安装相关依赖 yarn add -D webpack-remax-phone-frame-plugin 修改项目的remax.config.js配置,在configWebpack加入插件 const ...
Android---Frame动画 将图片放到项目中,应用 AnimationDrawable和ImageView 实现动画效果!