
1. Spring Boot是什么?
Spring Boot 是由 Pivotal 团队提供的全新框架,其设计目的是用来简化新 Spring 应用的初始搭建以及开发过程。该框架使用了特定的方式来进行配置,从而使开发人员不再需要定义样板化的配置。
讲的通俗一点就是Spring Boot并不是一个新的框架,它只是整合和默认实现了很多框架的配置方式。
2. 好处是什么?
最大的好处就是简单、快捷、方便,在Spring Boot之前,我们如果要搭建一个框架需要做什么?
- 配置web.xml,加载Spring和Spring MVC,加载各种过滤器、拦截器
- 在配置文件application.xml中配置数据库、配置缓存、配置连接池等等
- 配置日志文件
- 配置各种配置文件的读取
- 配置上下文、配置定时任务
- …
- 各种各样的配置
- …
笔者手边正好有一个很久之前的项目,当时还是使用的Spring3.x,可以给各位看一下当时一个项目的配置文件有多少:

而我如果需要新建一个项目,这里面大量的配置文件都要copy过去,并且重新调试,非常的不方便且浪费时间,当Spring Boot横空出世的时候,这些噩梦都结束了。
Spring Boot的优势:
- 为所有Spring开发者更快的入门
- 开箱即用,提供各种默认配置来简化项目配置
- 内嵌式容器简化Web项目
- 没有冗余代码生成和XML配置的要求
3. 快速入门
目标设定:构建一个简单的RESTful API并实现对应的单元测试
3.1 工程构建方式
Spring Boot提供两种工程构建方式:
关于创建springcloud项目,目前有两种比较方便的方案,核心都是一样的,大家自行选择自己使用方便的。
方式一:
打开spring的官方链接:
在 Group 中填入自己的组织,一般填写公司的域名的到写,例如 com.jd 或者 com
.baidu ,这里我直接写 com.springboot
在 Artifact 中填写工程的名称,这里我直接写 spring-boot-quick-start 。
package 选择 jar ,java 选择11(目前最新的LTS版本),至此,基础选择已经全都选完,接下来要开始选择我们使用的 Spring Boot 的组件了。
在 Dependencies 中找到 Spring Web ,选择 Spring Web ,结果如下图:

最后点击下方的绿色长条按钮 Generate the project 进行下载,等待下载完成后,直接将压缩包解压导入我们的编辑工具idea里即可。
方式二:
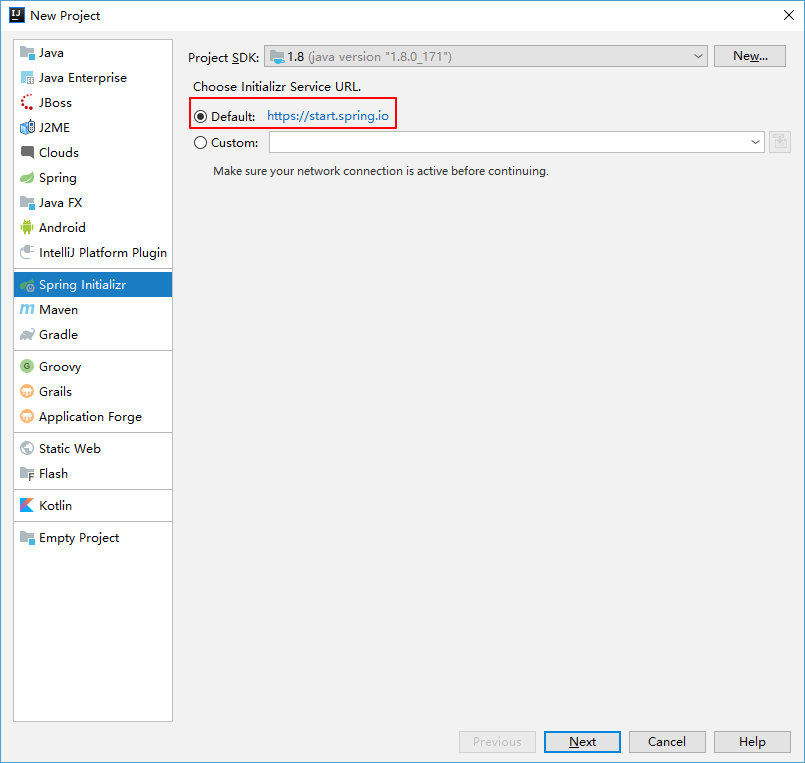
基于 idea 创建,打开 idea ,首先 file->new->project ,选中 Spring Initializr ,这时可以看到右侧让我们选择一个初始化的服务url,默认的就是上面的官方链接,https://start.spring.io/
点击 next 下一步,填写和上面一样的 Group 、 Artifact 、 java 版本、 package 方式等信息,继续 next 下一步,选择依赖,和前面的方法的一样,在 Dependencies 中找到 Spring Web ,选择 Spring Web ,点击 next ,选择项目名称和存储路径,点击 finish ,静静等一会,第一个项目 spring-boot-quick-start 就新鲜出炉了~~~
我一般选择第一种方式创建 Spring Boot 项目,这种方式不依赖IDE工具。
3.2 工程结构解析
首先先看一下我们创建的工程结构,如下图:

- pom.xml:maven工程配置文件,主要配置当前工程的一些基本信息,包含我们当前使用的组件,版本等信息。
- src/main/java下的程序入口:Chapter1Application。
- src/main/resources下的配置文件:application.properties。
- src/test/下的测试入口:Chapter1ApplicationTests。
3.3 pom.xml
这里我们重点关注 <dependencies> 标签,这里写明了我们引入的组
- <dependencies>
- <dependency>
- <groupId>org.springframework.boot</groupId>
- <artifactId>spring-boot-starter-web</artifactId>
- </dependency>
- <dependency>
- <groupId>org.springframework.boot</groupId>
- <artifactId>spring-boot-starter-test</artifactId>
- <scope>test</scope>
- </dependency>
- </dependencies>
-
spring-boot-starter-web:Web模块 -
spring-boot-starter-test:测试模块,包括JUnit、Hamcrest、Mockito
3.4 使用 Spring MVC 实现一组对 User 对象的 RESTful API
RESTful API 设计如下:
请求类型 URL 功能
| GET | / | 查询用户列表 |
| POST | / | 创建User |
| GET | /{id} | 根据 url 中的 id 获取 user 信息 |
| PUT | /{id} | 根据 id 更新用户信息 |
| DELETE | /{id} | 根据 id 删除用户信息 |
注意:RESTful接口在设计的时候应该遵循标准的方法以及语义,这些语义包含了安全性和幂等性等方面的考量,例如GET和HEAD请求都是安全的, 无论请求多少次,都不会改变服务器状态。而GET、HEAD、PUT和DELETE请求都是幂等的,无论对资源操作多少次, 结果总是一样的,后面的请求并不会产生比第一次更多的影响。
下面列出了GET,DELETE,PUT和POST的典型用法:
GET
- 安全且幂等
- 获取表示
- 变更时获取表示(缓存)
POST
- 不安全且不幂等
- 使用服务端管理的(自动产生)的实例号创建资源
- 创建子资源
- 部分更新资源
- 如果没有被修改,则不过更新资源(乐观锁)
PUT
- 不安全但幂等
- 用客户端管理的实例号创建一个资源
- 通过替换的方式更新资源
- 如果未被修改,则更新资源(乐观锁)
DELETE
- 不安全但幂等
- 删除资源
用户Model类如下:
- public class UserModel {
- private Long id;
- private String name;
- private int age;
- // 省略 getter 和 setter
- }
REST API 实现类如下:
- @RestController
- public class UserController {
- // 创建线程安全的Map,用作数据存储
- static Map<Long, UserModel> users = new ConcurrentHashMap<>();
- /**
- * 查询用户列表
- * @return
- */
- @GetMapping("/")
- public List<UserModel> getUserList() {
- List<UserModel> list = new ArrayList<UserModel>(users.values());
- return list;
- }
- /**
- * 创建User
- * @param userModel
- * @return
- */
- @PostMapping("/")
- public UserModel postUser(@ModelAttribute UserModel userModel) {
- users.put(userModel.getId(), userModel);
- return users.get(userModel.getId());
- }
- /**
- * {id} 根据 url 中的 id 获取 user 信息
- * url中的id可通过@PathVariable绑定到函数的参数中
- * @param id
- * @return
- */
- @GetMapping("/{id}")
- public UserModel getUser(@PathVariable Long id) {
- return users.get(id);
- }
- /**
- * 根据 id 更新用户信息
- * @param id
- * @param userModel
- * @return
- */
- @PutMapping("/{id}")
- public UserModel putUser(@PathVariable Long id, @ModelAttribute UserModel userModel) {
- UserModel u = users.get(id);
- u.setName(userModel.getName());
- u.setAge(userModel.getAge());
- users.put(id, u);
- return users.get(userModel.getId());
- }
- /**
- * 根据 id 删除用户信息
- * @param id
- * @return
- */
- @DeleteMapping("/{id}")
- public String deleteUser(@PathVariable Long id) {
- users.remove(id);
- return "success";
- }
- }
- @Controller:修饰class,用来创建处理http请求的对象
- @RestController:Spring4之后加入的注解,原来在@Controller中返回json需要@ResponseBody来配合,如果直接用@RestController替代@Controller就不需要再配置@ResponseBody,默认返回json格式。
可以看一下 @RestController ,可以看到 @RestController 本身就是由 @ResponseBody 和 @Controller 组成的,源码如下:
- @Target(ElementType.TYPE)
- @Retention(RetentionPolicy.RUNTIME)
- @Documented
- @Controller
- @ResponseBody
- public @interface RestController {
- /**
- * The value may indicate a suggestion for a logical component name,
- * to be turned into a Spring bean in case of an autodetected component.
- * @return the suggested component name, if any (or empty String otherwise)
- * @since 4.0.1
- */
- @AliasFor(annotation = Controller.class)
- String value() default "";
- }
单元测试类如下:
- @RunWith(SpringRunner.class)
- @SpringBootTest
- public class SpringBootQuickStartApplicationTests {
- private MockMvc mvc;
- @Before
- public void setUp() throws Exception {
- mvc = MockMvcBuilders.standaloneSetup(new UserController()).build();
- }
- @Test
- public void contextLoads() throws Exception {
- RequestBuilder request = null;
- // 1、get查一下user列表,应该为空
- request = MockMvcRequestBuilders.get("/")
- .contentType(MediaType.APPLICATION_JSON);
- mvc.perform(request)
- .andExpect(MockMvcResultMatchers.status().isOk())
- .andDo(MockMvcResultHandlers.print())
- .andReturn();
- // 2、post提交一个user
- request = MockMvcRequestBuilders.post("/")
- .param("id", "1")
- .param("name", "Spring Boot")
- .param("age", "18")
- .contentType(MediaType.APPLICATION_JSON);
- mvc.perform(request)
- .andExpect(MockMvcResultMatchers.status().isOk())
- .andDo(MockMvcResultHandlers.print())
- .andReturn();
- // 3、get获取user列表,应该有刚才插入的数据
- request = MockMvcRequestBuilders.get("/")
- .contentType(MediaType.APPLICATION_JSON);
- mvc.perform(request)
- .andExpect(MockMvcResultMatchers.status().isOk())
- .andDo(MockMvcResultHandlers.print())
- .andReturn();
- // 4、put修改id为1的user
- request = MockMvcRequestBuilders.put("/1")
- .param("name", "Spring Boot Test")
- .contentType(MediaType.APPLICATION_JSON);
- mvc.perform(request)
- .andExpect(MockMvcResultMatchers.status().isOk())
- .andDo(MockMvcResultHandlers.print())
- .andReturn();
- // 5、get一个id为1的user
- request = MockMvcRequestBuilders.get("/1")
- .contentType(MediaType.APPLICATION_JSON);
- mvc.perform(request)
- .andExpect(MockMvcResultMatchers.status().isOk())
- .andDo(MockMvcResultHandlers.print())
- .andReturn();
- // 6、del删除id为1的user
- request = MockMvcRequestBuilders.delete("/1")
- .contentType(MediaType.APPLICATION_JSON);
- mvc.perform(request)
- .andExpect(MockMvcResultMatchers.status().isOk())
- .andDo(MockMvcResultHandlers.print())
- .andReturn();
- // 7、get查一下user列表,应该为空
- request = MockMvcRequestBuilders.get("/")
- .contentType(MediaType.APPLICATION_JSON);
- mvc.perform(request)
- .andExpect(MockMvcResultMatchers.status().isOk())
- .andDo(MockMvcResultHandlers.print())
- .andReturn();
- }
- }
启动测试类,控制台打印如下,这里仅截取一段内容做展示:
- MockHttpServletRequest:
- HTTP Method = POST
- Request URI = /
- Parameters = {id=[1], name=[Spring Boot], age=[18]}
- Headers = [Content-Type:"application/json"]
- Body = <no character encoding set>
- Session Attrs = {}
- Handler:
- Type = com.springboot.springbootquickstart.controller.UserController
- Method = public com.springboot.springbootquickstart.model.UserModel com.springboot.springbootquickstart.controller.UserController.postUser(com.springboot.springbootquickstart.model.UserModel)
- Async:
- Async started = false
- Async result = null
- Resolved Exception:
- Type = null
- ModelAndView:
- View name = null
- View = null
- Model = null
- FlashMap:
- Attributes = null
- MockHttpServletResponse:
- Status = 200
- Error message = null
- Headers = [Content-Type:"application/json;charset=UTF-8"]
- Content type = application/json;charset=UTF-8
- Body = {"id":1,"name":"Spring Boot","age":18}
- Forwarded URL = null
- Redirected URL = null
- Cookies = []


相关推荐
Spring Boot快速开发利器:Spring Boot CLISpring Boot快速开发利器:Spring Boot CLISpring Boot快速开发利器:Spring Boot CLISpring Boot快速开发利器:Spring Boot CLI
youlai-boot 是【有来开源组织】基于...1. Spring Boot 3.0 + Vue3 前后端分离单体应用,适合快速开发; 2. Spring Security + JWT 认证鉴权方案; 3. 基于 RBAC 模型的权限设计,细粒度接口方法、按钮级别权限控制。
Spring Boot 使用的各种示例,以最简单、最实用为标准,此开源项目中的每个示例都以最小依赖,最简单为标准,帮助初学者快速掌握 Spring Boot 各组件的使用。 本项目中所有示例均已经更新到 Spring Boot 3.0 ...
5 Spring Boot 快速入门24:01 6 Spring Boot 配置分析(一)38:26 7 Spring Boot 配置分析(二)35:47 8 Spring Boot 自动配置32:44 9 Spring Boot @Enable*注解的工作原理47:07 10 Spring Boot @...
描述:Spring Boot中文文档是Spring Boot官方文档的中文翻译版,它包含了Spring Boot的基本介绍、快速入门、核心特性、高级特性等内容,可以帮助用户快速了解和掌握Spring Boot的使用方法和技巧。 Spring Boot是一款...
fleet-spring-boot Spring Boot 教程,Spring Boot 的各种简单示例,快速入门使用 Spring Boot 各种组件 示例项目 基础部分: :Spring Boot 快速入门 Hello world 示例 :Spring Boot 自定义 Banner (启动图案) ...
同时,该系统还具备其他强大的功能,如基于Spring Boot 3.0的快速开发能力、基于Spring Cloud的分布式微服务架构,以及与Alibaba相关的云服务集成能力。总体而言,这个系统是一个高效、安全、可扩展的现代化管理系统...
Spring Boot 2.x基础教程:快速入门 Spring Boot 2.x基础教程:工程结构推荐 配置详解 Spring Boot 2.x基础教程:配置文件详解 Spring Boot 2.x基础教程:2.4版本前后的多环境配置变化 Spring Boot 2.x基础教程:2.4...
Spring Boot 是一个用于快速创建基于 Spring 框架的生产级别应用程序的框架。它通过提供默认配置、自动化配置和各种有用的开发工具,简化了 Spring 应用程序的开发。下面是一个从零开始的 Spring Boot 开发教程。 ...
Spring Boot为Spring平台及第三方库提供开箱即用的设置,这样你就可以有条不紊地开始。多数Spring Boot应用只需要很少的Spring配置。 Spring Boot是由Pivotal团队提供的全新框架,其设计目的是用来简化新Sprin
基于 Spring Cloud Hoxton 、Spring Boot 2.2、 OAuth2 的RBAC权限管理系统 基于数据驱动视图的理念封装 Ant Design Vue,即使没有 vue 的使用经验也能快速上手 提供 lambda 、stream api 、webflux 的生产实践 ...
Spring Boot,作为Spring框架的扩展,以其简化配置、快速开发的特点,成为Java开发者的首选。本报告将分享Spring Boot开发的心得体会,并通过一个具体的案例,展示相关的开发教程、步骤、建议及注意项。
快速上手spring boot项目及配置
Spring boot 是 Spring 的一套快速配置脚手架,可以基于spring boot 快速开发单个微服务,Spring Cloud是一个基于Spring Boot实现的云应用开发工具;Spring boot专注于快速、方便集成的单个个体,Spring Cloud是关注...
Spring Boot实战与原理分析视频课程 课程目录: 1 Spring Boot概述与课程概要...5 Spring Boot 快速入门24:01 6 Spring Boot 配置分析(一)38:26 7 Spring Boot 配置分析(二)35:47 8 Spring Boot 自动配置32:44
Spring Boot 教程、技术栈示例代码,快速简单上手教程。
Spring Boot与Apache Ignite的集成及其持久的内存和基于缓存的sql查询 展示如何将apache ignite与spring boot集成在一起,以及使用持久性内存功能和sql查询来覆盖内存缓存中的ign的案例 将Spring Boot与Apache ...
Spring Boot框架快速入门教程以大量示例讲解了Spring Boot在各类情境中的应用,让大家可以跟着老师的思维和代码快速理解并掌握。适用于Java 开发人员,尤其是初学Spring Boot的人员和需要从传统 Spring 转向 Spring ...
Spring Boot提供了一个名为Starter的概念,每个Starter都包含了一组相关的依赖和配置,可以通过简单地引入Starter来快速添加所需的功能和组件。开发者不需要手动管理依赖项的版本和冲突,Spring Boot会自动解决依赖...