
目录
- Hexo介绍
- Hexo安装
- Hexo使用
- Hexo发布到Github
- Hexo主题
1、Hexo介绍
"A fast, simple & powerful blog framework"这是Hexo官方上面的介绍,Hexo是基于Node.js的一个静态blog框架,通过Hexo可以仅仅使用几条简短的命令就能方便我们快速创建自己的blog。Hexo可以部署在Node服务器上,也可以部署在github上面。当然部署在github上好处多多,不紧可以省去服务器的成本,还可以免去了相关系统运维方便的事情。
2、Hexo安装
#查看Node版本
E:\demo\nodejs>node -v
v0.12.7

#查看Npm版本
E:\demo\nodejs>npm -v
3.5.3

#全局安装hexo-cli
E:\demo\nodejs>npm install hexo-cli -g

#查看hexo版本
E:\demo\nodejs>hexo -v
hexo-cli: 0.2.0
os: Windows_NT 6.1.7601 win32 x64
http_parser: 2.3
node: 0.12.7
v8: 3.28.71.19
uv: 1.6.1
zlib: 1.2.8
modules: 14
openssl: 1.0.1p

#初始化hexo
E:\demo\nodejs>hexo init blog
INFO  Cloning hexo-starter to E:\demo\nodejs\blog
Cloning into 'E:\demo\nodejs\blog'...
remote: Counting objects: 40, done.
remote: Total 40 (delta 0), reused 0 (delta 0), pack-reused 40
Unpacking objects: 100% (40/40), done.

#安装hexo
E:\demo\nodejs>cd blog&npm install

#启动hexo
E:\demo\nodejs\blog>hexo server
INFO  Hexo is running at http://0.0.0.0:4000/. Press Ctrl+C to stop.
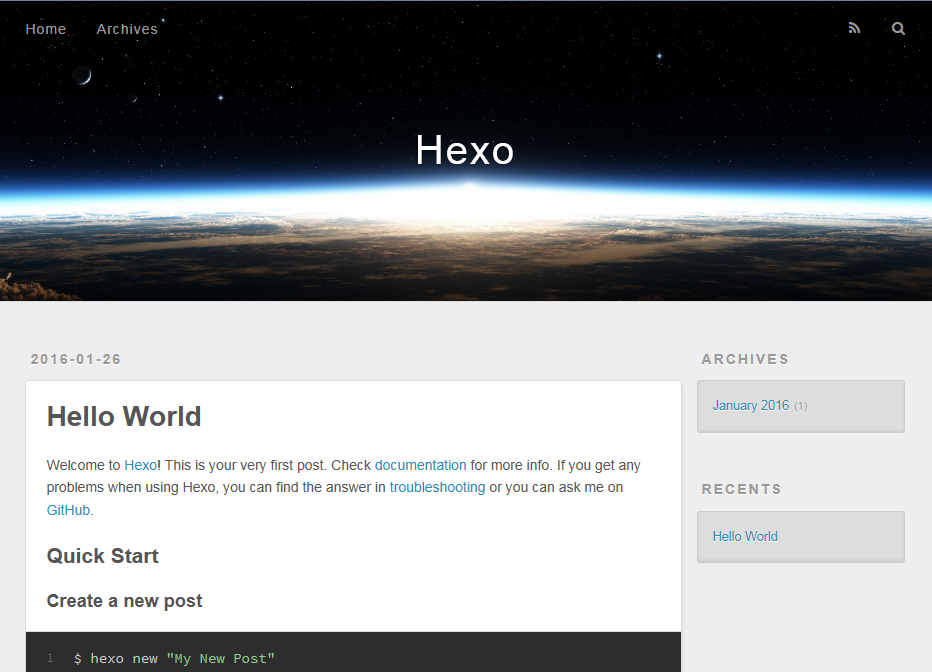
到这里Hexo就搭建好了,怎么样,是不是很Fast、Simple。
我们打开浏览器访问:http://localhost:4000,正常情况会如下显示
3、Hexo使用
>Hexo目录和文件
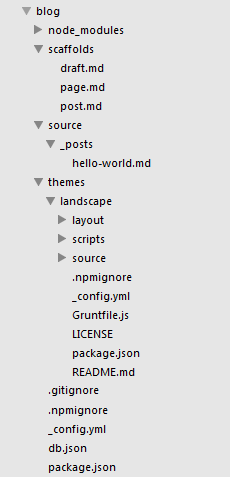
node_modules:依赖的nodejs模块文件
scaffolds:工具模版文件,文件以md扩展名,语法采用markdown
source:存放blog正文内容
source\_posts:正式发布内容
themes:存放blog皮肤样式目录
themes\landscape:blog默认样式目录
_config.yml:全局配置文件
>_config.yml
# Hexo Configuration
## Docs: http://hexo.io/docs/configuration.html
## Source: https://github.com/hexojs/hexo/

# Site
title: Hexo
subtitle:
description:
author: John Doe
language:
timezone:

# URL
## If your site is put in a subdirectory, set url as 'http://yoursite.com/child' and root as '/child/'
url: http://yoursite.com
root: /
permalink: :year/:month/:day/:title/
permalink_defaults:

# Directory
source_dir: source
public_dir: public
tag_dir: tags
archive_dir: archives
category_dir: categories
code_dir: downloads/code
i18n_dir: :lang
skip_render:

# Writing
new_post_name: :title.md # File name of new posts
default_layout: post
titlecase: false # Transform title into titlecase
external_link: true # Open external links in new tab
filename_case: 0
render_drafts: false
post_asset_folder: false
relative_link: false
future: true
highlight:
  enable: true
  line_number: true
  auto_detect: false
  tab_replace:

# Category & Tag
default_category: uncategorized
category_map:
tag_map:

# Date / Time format
## Hexo uses Moment.js to parse and display date
## You can customize the date format as defined in
## http://momentjs.com/docs/#/displaying/format/
date_format: YYYY-MM-DD
time_format: HH:mm:ss

# Pagination
## Set per_page to 0 to disable pagination
per_page: 10
pagination_dir: page

# Extensions
## Plugins: http://hexo.io/plugins/
## Themes: http://hexo.io/themes/
theme: landscape

# Deployment
## Docs: http://hexo.io/docs/deployment.html
deploy:
  type:
全局配置文件,很多网站的相关信息都在这里面进行配置,例如等会要进行配置的root、deploy等属性。
>hexo -h
E:\demo\nodejs\blog>hexo -h
Usage: hexo <command>

Commands:
  clean     Removed generated files and cache.
  config    Get or set configurations.
  deploy    Deploy your website.
  generate  Generate static files.
  help      Get help on a command.
  init      Create a new Hexo folder.
  list      List the information of the site
  migrate   Migrate your site from other system to Hexo.
  new       Create a new post.
  publish   Moves a draft post from _drafts to _posts folder.
  render    Render files with renderer plugins.
  server    Start the server.
  version   Display version information.

Global Options:
  --config  Specify config file instead of using _config.yml
  --cwd     Specify the CWD
  --debug   Display all verbose messages in the terminal
  --draft   Display draft posts
  --safe    Disable all plugins and scripts
  --silent  Hide output on console

For more help, you can use 'hexo help [command]' for the detailed information
or you can check the docs: http://hexo.io/docs/
可以通过help查看hexo可以使用的命令,常用的例如有init、generate、clean、publish、new等。
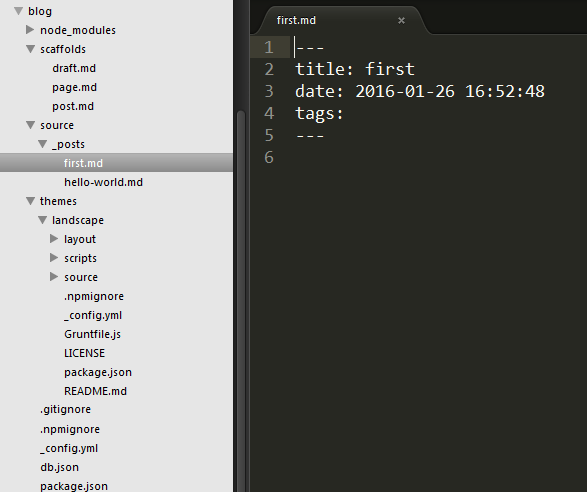
>创建新文章
我们可以通过hexo提供的new创建文章,也可以在_post目录下新建md文件的方式创建文章。
通过hexo命令的方式创建文章:
E:\demo\nodejs\blog>hexo new first
INFO  Created: E:\demo\nodejs\blog\source\_posts\first.md
可以看到在_post目录下新增了first.md文件
再次访问:http://localhost:4000,可以发现我们刚才新加的文章已经发布上去了。是不是很easy。
>语法
关于文章内容采用的语法是有要求的,包括以下三部分:
1、基本信息:标题,发布日期,分类目录,标签,类型,固定发布链接
2、正文:markdown语法和Swig语法(掌握一个就行)
3、特殊标记:引用,链接,图片,代码块,iframe
编辑文章内容:
---
title: 我的第一篇文章
date: 2016-01-26 14:45:07
tags:
- 第一次
- 日记
categories:
- 日志
- 2015
- 01
- 26
---
这是**我的第一篇文章**,是用hexo创建的。
# 引用
** Swing语法 **
{% blockquote Seth Godin http://sethgodin.typepad.com/seths_blog/2009/07/welcome-to-island-marketing.html Welcome to Island Marketing %}
Every interaction is both precious and an opportunity to delight.
{% endblockquote %}
** Markdown语法 **
> Every interaction is both precious and an opportunity to delight.
# 代码块
** Swing语法 **
{% codeblock compact http://www.baidu.com Baidu.js %}
compact([0,1,false,2,'',3]);
=> [1,2,3]
{% endcodeblock %}
** Markdown语法 **
~~~{bash}
compact([0,1,false,2,'',3]);
~~~
# 链接
** Swing语法 **
{% link 我的日志 http://linmuxi.github.io/nodejs-hexo true 我的日志 %}
** Markdown语法 **
[我的日志](http://linmuxi.github.io/nodejs-hexo)
# 图片
* 图片,对于本地图片,需要在source目录下面新建一个images目录存放图片 *
** Swing语法 **
{% img images/1.png 这是第一张图片 %}
** Markdown语法 **


4、Hexo发布到Github
>静态化处理
github只托管静态文件,所以这里我们需要将hexo项目的node剥离出来生成只包括html、js、css文件的静态资源文件。
使用hexo提供的命令可以轻松实现
E:\demo\nodejs\blog>hexo generate
INFO  Files loaded in 314 ms
INFO  Generated: js/script.js
INFO  Generated: fancybox/jquery.fancybox.pack.js
...
INFO  36 files generated in 907 ms
生成的静态文件全部都在更目录下的public文件夹下面。
>发布到Github
1、在github上新建rep、gh-pages分支
这里我的rep命名为:nodejs-hexo
2、修改_config.yml
root: /nodejs-hexo
deploy:
  type: git
  repo: https://github.com/linmuxi/nodejs-hexo.git
  branch: gh-pages
注意:编辑的时候注意空格问题,冒号后面是有空格的。
3、部署
E:\demo\nodejs\blog>hexo deploy
INFO  Deploying: git
INFO  Setting up Git deployment...
Initialized empty Git repository in E:/demo/nodejs/blog/.deploy_git/.git/
[master (root-commit) 4e85e9c] First commit
 1 file changed, 0 insertions(+), 0 deletions(-)
 create mode 100644 placeholder
INFO  Clearing .deploy folder...
INFO  Copying files from public folder...
..
Username for 'https://github.com': git账户名
Password for 'https://linmuxi@github.com':git密码
Branch master set up to track remote branch gh-pages from https://github.com/lin
muxi/nodejs-hexo.git.
To https://github.com/linmuxi/nodejs-hexo.git
 + 4918890...2b8ee29 master -> gh-pages (forced update)
INFO  Deploy done: git
注意:如果上面部署的时候出现:ERROR Deployer not found: git,要先运行:
E:\demo\nodejs\blog>npm install hexo-deployer-git --save
到这里hexo就发布到github上面去了,可以通过:http://linmuxi.github.io/nodejs-hexo/,来进行访问。
5、Hexo主题
Hexo默认主题是landscape,我们可以到Hexo网站去下载其他主题并应用到我们的blog上面去。
首先,找到我们需要的主题git地址,并下载到Hexo根目录下面的thems文件夹下。
E:\demo\nodejs\blog>git clone git://github.com/tommy351/hexo-theme-light.git the
mes/light
Cloning into 'themes/light'...
remote: Counting objects: 892, done.
rRemote: Total 892 (delta 0), reused 0 (delta 0), pack-reused 892eceiving object
Receiving objects:  94% (839/892), 156.01 KiB | 124.00 KiB/s
Receiving objects: 100% (892/892), 346.40 KiB | 124.00 KiB/s, done.
Resolving deltas: 100% (391/391), done.
Checking connectivity... done.
这样主题文件就下载好了,然后修改全局配置文件_config.xml,将theme的值改成对应的them文件夹名称,这里我们下载的是light。
直接就可以打开浏览器输入:http://localhost:4000 查看应用新主题之后的效果了。


相关推荐
前言很多次想把博客从wordpress迁移到github,为此还特意学了一下Ruby和Jekyll。但由于迁移过程过于复杂,我又没有很多时间,这个计划就被搁置了
Hexo + github page 实现搭建博客.pdf
hexo+github搭建个人博客,属于自己的博客,技术文档等等
博主自己使用hexo+github搭建博客的源码
Hexo + github page 实现搭建博客
hexo-Github搭建个人博客.md
博客系列:Hexo+Github博客搭建教程
微信小博客:无博客后端,博客数据来源与 hexo 与github 搭建的博客系统 基于uni-app、colorUi、uView,支持小程序、H5、Android和IOS 软件开发设计:PHP、QT、应用软件开发、系统软件开发、移动应用开发、网站开发...
本博客使用hexo + github构建 下面是建造的过程 准备工作 申请一个github账号 安装了node.js,npm,并了解相关基础知识 Windows的安装了git(或者其他git客户端) 创建Github仓库 新建一个叫做你的用户名.github.io...
- 学会在Linux环境下配置安装hexo及GitHub - 学会使用hexo进行搭建网页 ...## 设计一个在GitHub上可以发布和阅读文章的个人博客网站,使用Hexo进行搭建,使其可以发布文章。并在Linux环境下实现运行
hexo-github-calendar教程:链接: : 一键部署: npm i hexo-githubcalendar --save网站根目录_config配置项(不是主题的):例如butterfly配置为# Ice Kano Plus_in# Hexo Github Canlendar# Author: Ice Kano# ...
没有任何理解成本,一步一步教程,搭建过程中发生的错误很详细的介绍,搭建属于你自己的博客
GitHub+hexo搭建各个博客
如果是手机,先戳右下角的 Desktop Version ...在 Build command 中输入 hexo g 在 Publish directory 中输入 public 0x06 点击 deploy 按钮,等待大约一分钟时间,点击上面那串灰色的网址,根据提示完成后续操作
1.gitHub是一个面向开源及私有软件项目的托管平台,因为只支持git 作为唯一的版本库格式进行托管,故名gitHub 2.一个博客网站建立好之后,想让所有人
dfsf
阅读须知 注意,本篇博客并不是从零...因为本站博客也是最近重新搭建起来的,还有一些优化和功能也在完善。当然,我也会朝着开源方向发展,但具体什么时候公开博客源码,这还不确定,还需要一段时间准备。因为选择
我在GitHub上创建的本地仓库代码
hexo-blog 使用hexo部署到github页面的博客的原始来源
thanatoschen.github.io:hexo + github建造个人博客