
In this tutorial, we will show you how to use Maven to create a Java web application (with Spring MVC) project, and make it support Eclipse IDE.
Tools used :
- Maven 3.0.5
- Eclipse 4.2
- JDK 6
- Spring 3.2.0.RELEASED
- Tomcat 7
1. Web Application Project from Maven Template
In a terminal (*uix or Mac) or command prompt (Windows), navigate to the folder you want to store the project. Issue following command :
mvn archetype:generate -DgroupId={project-packaging} -DartifactId={project-name} -DarchetypeArtifactId=maven-archetype-webapp -DinteractiveMode=false
This tell Maven to create a Java web application project from “maven-archetype-webapp” template.
For example,
$ pwd
/Users/mkyong/Documents/workspace

$ mvn archetype:generate -DgroupId=com.mkyong -DartifactId=CounterWebApp -DarchetypeArtifactId=maven-archetype-webapp -DinteractiveMode=false
[INFO] Scanning for projects...
[INFO]
[INFO] ------------------------------------------------------------------------
[INFO] Building Maven Stub Project (No POM) 1
[INFO] ------------------------------------------------------------------------
[INFO]
[INFO] Generating project in Batch mode
[INFO] ----------------------------------------------------------------------------
[INFO] Using following parameters for creating project from Old (1.x) Archetype: maven-archetype-webapp:1.0
[INFO] ----------------------------------------------------------------------------
[INFO] Parameter: groupId, Value: com.mkyong
[INFO] Parameter: packageName, Value: com.mkyong
[INFO] Parameter: package, Value: com.mkyong
[INFO] Parameter: artifactId, Value: CounterWebApp
[INFO] Parameter: basedir, Value: /Users/mkyong/Documents/workspace
[INFO] Parameter: version, Value: 1.0-SNAPSHOT
[INFO] project created from Old (1.x) Archetype in dir: /Users/mkyong/Documents/workspace/CounterWebApp
[INFO] ------------------------------------------------------------------------
[INFO] BUILD SUCCESS
[INFO] ------------------------------------------------------------------------
[INFO] Total time: 3.147s
[INFO] Finished at: Thu Dec 20 20:35:19 MYT 2012
[INFO] Final Memory: 12M/128M
[INFO] ------------------------------------------------------------------------
In above case, a new web application project named “CounterWebApp“, and the entire project directory structure is created automatically.
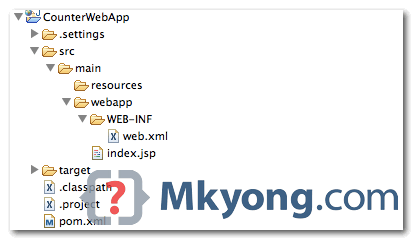
2. Maven Directory Layout
Maven created following web application directory layout. A standard deployment descriptor web.xml and Maven pom.xmlare created.
CounterWebApp
   |-src
   |---main
   |-----resources
   |-----webapp
   |-------index.jsp
   |-------WEB-INF
   |---------web.xml
   |-pom.xml
Please check this official guide to understand more.
<project xmlns="http://maven.apache.org/POM/4.0.0"
	xmlns:xsi="http://www.w3.org/2001/XMLSchema-instance"
  	xsi:schemaLocation="http://maven.apache.org/POM/4.0.0
	http://maven.apache.org/maven-v4_0_0.xsd">
  <modelVersion>4.0.0</modelVersion>
  <groupId>com.mkyong</groupId>
  <artifactId>CounterWebApp</artifactId>
  <packaging>war</packaging>
  <version>1.0-SNAPSHOT</version>
  <name>CounterWebApp Maven Webapp</name>
  <url>http://maven.apache.org</url>
  <dependencies>
    <dependency>
      <groupId>junit</groupId>
      <artifactId>junit</artifactId>
      <version>3.8.1</version>
      <scope>test</scope>
    </dependency>
  </dependencies>
  <build>
    <finalName>CounterWebApp</finalName>
  </build>
</project>
<!DOCTYPE web-app PUBLIC
 "-//Sun Microsystems, Inc.//DTD Web Application 2.3//EN"
 "http://java.sun.com/dtd/web-app_2_3.dtd" >

<web-app>
  <display-name>Archetype Created Web Application</display-name>
</web-app>
<html>
<body>
<h2>Hello World!</h2>
</body>
</html>
3. Eclipse IDE Support
To convert the Maven web project to support Eclipse IDE, in terminal, navigate to “CounterWebAPp” folder, issue this command :
mvn eclipse:eclipse -Dwtpversion=2.0
You must add the -Dwtpversion=2.0 argument to make it as a Eclipse web project. Imports it into Eclipse IDE, a globe icon on top of project, means this is a web project in Eclipse.
Many users are confused, again, if you just issue
mvn eclipse:eclipse, it will only convert the project as Eclipse Java project, add extra -Dwtpversion=2.0 argument to make it as Eclipse web project.Done. This web project is ready to deploy. Attached to Eclipse’s Tomcat server plugin, and start it.

You can access the hello world jsp via – http://localhost:8080/CounterWebApp/
4. Update POM
To make above Maven web project to support Spring MVC framework, we need to touch up on the existing pom.xml :
- Add compiler plugin to specify JDK6 to compile this project (default is using JDK1.4).
- Add Spring frameworks dependencies.
- Update jUnit to latest 4.11.
<project xmlns="http://maven.apache.org/POM/4.0.0"
	xmlns:xsi="http://www.w3.org/2001/XMLSchema-instance"
	xsi:schemaLocation="http://maven.apache.org/POM/4.0.0
	http://maven.apache.org/maven-v4_0_0.xsd">
	<modelVersion>4.0.0</modelVersion>
	<groupId>com.mkyong</groupId>
	<artifactId>CounterWebApp</artifactId>
	<packaging>war</packaging>
	<version>1.0-SNAPSHOT</version>
	<name>CounterWebApp Maven Webapp</name>
	<url>http://maven.apache.org</url>

	<properties>
		<spring.version>3.0.5.RELEASE</spring.version>
		<junit.version>4.11</junit.version>
		<jdk.version>1.6</jdk.version>
	</properties>

	<dependencies>

		<!-- Spring 3 dependencies -->
		<dependency>
			<groupId>org.springframework</groupId>
			<artifactId>spring-core</artifactId>
			<version>${spring.version}</version>
		</dependency>

		<dependency>
			<groupId>org.springframework</groupId>
			<artifactId>spring-web</artifactId>
			<version>${spring.version}</version>
		</dependency>

		<dependency>
			<groupId>org.springframework</groupId>
			<artifactId>spring-webmvc</artifactId>
			<version>${spring.version}</version>
		</dependency>

		<dependency>
			<groupId>junit</groupId>
			<artifactId>junit</artifactId>
			<version>${junit.version}</version>
			<scope>test</scope>
		</dependency>
	</dependencies>
	<build>
		<finalName>CounterWebApp</finalName>
		<plugins>
			<plugin>
				<groupId>org.apache.maven.plugins</groupId>
				<artifactId>maven-compiler-plugin</artifactId>
				<version>3.0</version>
				<configuration>
					<source>${jdk.version}</source>
					<target>${jdk.version}</target>
				</configuration>
			</plugin>
		</plugins>
	</build>
</project>
5. Spring MVC REST
Create a Spring MVC controller class, with two simple methods to print a message.
package com.mkyong.controller;

import org.springframework.stereotype.Controller;
import org.springframework.ui.ModelMap;
import org.springframework.web.bind.annotation.RequestMapping;
import org.springframework.web.bind.annotation.RequestMethod;

@Controller
@RequestMapping("/")
public class BaseController {

	@RequestMapping(value="/welcome", method = RequestMethod.GET)
	public String welcome(ModelMap model) {

		model.addAttribute("message", "Maven Web Project + Spring 3 MVC - welcome()");

		//Spring uses InternalResourceViewResolver and return back index.jsp
		return "index";

	}

	@RequestMapping(value="/welcome/{name}", method = RequestMethod.GET)
	public String welcomeName(@PathVariable String name, ModelMap model) {

		model.addAttribute("message", "Maven Web Project + Spring 3 MVC - " + name);
		return "index";

	}

}
Create a Spring configuration file, defines the Spring view resolver.
<beans xmlns="http://www.springframework.org/schema/beans"
	xmlns:context="http://www.springframework.org/schema/context"
	xmlns:xsi="http://www.w3.org/2001/XMLSchema-instance"
	xsi:schemaLocation="
        http://www.springframework.org/schema/beans
        http://www.springframework.org/schema/beans/spring-beans-3.0.xsd
        http://www.springframework.org/schema/context
        http://www.springframework.org/schema/context/spring-context-3.0.xsd">

	<context:component-scan base-package="com.mkyong.controller" />

	<bean
		class="org.springframework.web.servlet.view.InternalResourceViewResolver">
		<property name="prefix">
			<value>/WEB-INF/pages/</value>
		</property>
		<property name="suffix">
			<value>.jsp</value>
		</property>
	</bean>

</beans>
Update existing web.xml to support Servlet 2.5 (the default Servlet 2.3 is too old), and also integrates Spring framework into this web application project via Spring’s listener ContextLoaderListener.
<web-app xmlns="http://java.sun.com/xml/ns/javaee"
	      xmlns:xsi="http://www.w3.org/2001/XMLSchema-instance"
	      xsi:schemaLocation="http://java.sun.com/xml/ns/javaee
	      http://java.sun.com/xml/ns/javaee/web-app_2_5.xsd"
	      version="2.5">

	<display-name>Counter Web Application</display-name>

	<servlet>
		<servlet-name>mvc-dispatcher</servlet-name>
		<servlet-class>
			org.springframework.web.servlet.DispatcherServlet
		</servlet-class>
		<load-on-startup>1</load-on-startup>
	</servlet>

	<servlet-mapping>
		<servlet-name>mvc-dispatcher</servlet-name>
		<url-pattern>/</url-pattern>
	</servlet-mapping>

	<context-param>
		<param-name>contextConfigLocation</param-name>
		<param-value>/WEB-INF/mvc-dispatcher-servlet.xml</param-value>
	</context-param>

	<listener>
		<listener-class>
			org.springframework.web.context.ContextLoaderListener
		</listener-class>
	</listener>
</web-app>
Move existing index.jsp inside folder WEB-INF, to protect user access it directly. In additional, edit the file to print out the${message} variable that pass by the controller.
<html>
<body>
<h2>Hello World!</h2>

<h4>Message : ${message}</h1>
</body>
</html>
Review the final directory structure

6. Eclipse + Tomcat
In order to start or debug this project via Eclipse server plugin (Tomcat or other container). You need to issue following command again, in order to make all dependencies attached to the project web deployment assembly.
mvn eclipse:eclipse -Dwtpversion=2.0
Before this command, project dependencies are empty.

After this command, now project dependdencies are here!

Many developers are trapped here, and failed to perform the starting or debugging in Eclipse server plugin, all failed by showing dependencies not found error message. Right click on your project properties, make sure all dependencies are inside the web deployment assembly, otherwise issue
mvn eclipse:eclipse -Dwtpversion=2.0again!7. Maven Packaging
Review the pom.xml again, the packaging tag defining what is the packaging format or output.
<project ...>
	<modelVersion>4.0.0</modelVersion>
	<groupId>com.mkyong</groupId>
	<artifactId>CounterWebApp</artifactId>

	<packaging>war</packaging>
	<version>1.0-SNAPSHOT</version>
Package the project to deploy is easy, just issue mvn package, it compiles and package the web project into a “war” file and store in project/target folder.
For example :
$pwd
/Users/mkyong/Documents/workspace/CounterWebApp

Yongs-MacBook-Air:CounterWebApp mkyong$ mvn package
[INFO] Scanning for projects...
[INFO]
[INFO] ------------------------------------------------------------------------
[INFO] Building CounterWebApp Maven Webapp 1.0-SNAPSHOT
[INFO] ------------------------------------------------------------------------
[INFO] -- omitted for readability
[INFO]
[INFO] --- maven-war-plugin:2.1.1:war (default-war) @ CounterWebApp ---
[INFO] Packaging webapp
[INFO] Assembling webapp [CounterWebApp] in [/Users/mkyong/Documents/workspace/CounterWebApp/target/CounterWebApp]
[INFO] Processing war project
[INFO] Copying webapp resources [/Users/mkyong/Documents/workspace/CounterWebApp/src/main/webapp]
[INFO] Webapp assembled in [87 msecs]
[INFO] Building war: /Users/mkyong/Documents/workspace/CounterWebApp/target/CounterWebApp.war
[INFO] WEB-INF/web.xml already added, skipping
[INFO] ------------------------------------------------------------------------
[INFO] BUILD SUCCESS
[INFO] ------------------------------------------------------------------------
[INFO] Total time: 3.936s
[INFO] Finished at: Thu Dec 20 22:28:53 MYT 2012
[INFO] Final Memory: 14M/206M
[INFO] ------------------------------------------------------------------------
Done, just copy the project/target/CounterWebApp.war file and deploy to your container.
8. Demo
Start the web application.
http://localhost:8080/CounterWebApp/welcome

http://localhost:8080/CounterWebApp/welcome/mkyong


相关推荐
基于maven创建web项目 基础环境 Myeclipse2013 Tomcat8.0 Jdk1.8 apache-maven-3.3.9 环境配置
来自 在Eclipse中用Maven创建一个Web项目 的附带项目源码 jdk1.8 博客地址 https://blog.csdn.net/rebornsgundam/article/details/105862362
idea使用maven创建web项目详细教程
使用Idea14.1.4和maven创建java web项目
使用maven创建web项目,独立管理jar包资源,方便简单高效
如何在Eclipse IDE中使用maven创建一个动态Web项目. 使用的工具和技术 - Eclipse Jee Oxygen Maven 3.3.3 JavaSE 1.8 Servlet API 3.1.0 Apache Tomcat 7.0.47 (Embeded)
如何使用 Maven 创建一个 Java Web 项目(Spring MVC)。 用到的技术/工具: Maven 3.3.3 Eclipse 4.3 JDK 8 Spring 4.1.1.RELEASED Tomcat 7 Logback 1.0.13
第一次使用maven在idea上创建的项目,配合着博客一块看。
资源名称:maven创建web项目教程 中文WORD版内容简介: Maven项目对象模型(POM),可以通过一小段描述信息来管理项目的构建,报告和文档的软件项目管理工具。 Maven 除了以程序构建能力为特色之外,还提供高级项目...
一步一步用Maven创建web项目,经过测试,与目前我做的大项目一致
maven创建web工程
使用maven构件web项目,部署tomcat
用idea创建的maven web空白项目,个人用于学习idea所创建。
空白的,经过单元测试的,mavenWeb项目
本文档记录了本人用eclipse搭建maven dynamic web3.0的详细过程,包含了搭建maven项目,把maven项目转换为web项目,Dynamic web Module 2.3转换为3.0等内容
该步骤会依次生成项目的各个模块,但是生成的模块并没有 创建依赖,只是最简单的并且符合maven 要求的项目结构的模块,关于什么是 maven 的标准项目结构,可以参考 maven 官方文档,或者《 maven 权威指南》。
包括: 1 Eclipse创建Maven web项目具体步骤(现在所有公司MAven WEb 项目框架) 2 过程中出现各种问题以及解决办法的汇总,一共7个
用maven创建web项目后所需要修改的设置 否则项目将会报错
手把手教你使用idea建SSM工程(一)——创建maven+web项目 能简单的展示页面。。。。。
(一)创建web项目 File -> New -> Project 出现如下图所示: 出现上图所示,项目就创建完毕了。 (二)项目配置 项目目录结构如下所示: 上图中我们可以看到它没有源码目录,和资源文件目录,我们需要自行创建,...