
安装虚拟机android过程比模拟机快不少。
http://www.cnblogs.com/MaxWoods/archive/2011/09/16/2179310.html
如果想删除这些映射,同样执行以上的命令,而把最后的命令值留空即可,如:
VBoxManage setextradata "android" "CustomVideoMode1"
如果修改启动模式不成功,也可以直接在Debug模式下
启动之后,我们可以将 boot 分区以 read/write(读写)模式重新挂载,以便于修改 Grub 配置。
mount -o remount,rw /mnt然后可以编辑 menu.lst 文件。
vi /mnt/grub/menu.lst在第一个kernel的最后添加 vga=ask
网络采用桥接方式
我们的目标是能够从 Intellij IDEA 中使用 AVD 调用新的 VM 来测试和调试应用。为了做到这一点,网络配置必须允许主机(运行Intellij IDEA的机器)和 VM 之间的连接。为此,在 VirtualBox 的 Network settings(网络设置)中我们有几个选择:
- use Bridge mode(使用桥接模式):模式可行,但是需要宿主机配置 DHCP 服务器;
- host only network(仅与宿主机有网络连接): 在 VM 和宿主机之间使用内部网络;这是最简单的方案。
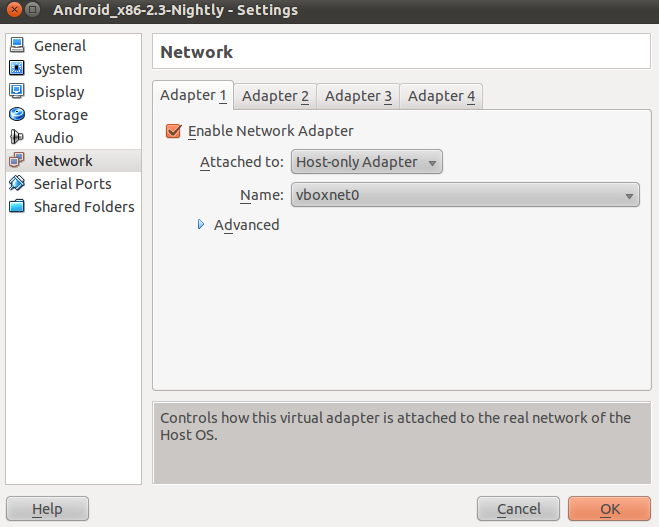
一旦设置好网络,按照如下设置即可。
Debugging an Android x86 application using Intellij
AUGUST 17, 2012 LEAVE A COMMENT
OK, you decided to drop the incredibly slow Android emulator that comes with the official SDK and you are now happily using Android x86… but how do you debug your Android application using Intellij ?
That’s a good question ! (By the way, if you may want to check my last post if you need help running Android x86 in VMWare player).
First, you need to know the IP of your Android x86 VM. To do this, hit ALT-F1 in the VM and use the ‘netcfg’ command to know the IP address given to your eth0 device:

You can then hit ALT-F7 to go back to the Android UI.
Then, in your host PC (the one that is running Intellij), execute the ‘adb connect [ANDROID_X86_IP]” to connect the SDK debugger to your Android x86 VM:

Now go back to Intellij, display your run configuration and make sure that the “show chooser dialog” option is selected:

You are almost done: add a breakpoint in Intellij, launch the application in debug mode and then select your Android x86 device in the “choose device” dialog:


相关推荐
在2020年仍然可以使用的事实表明,尽管Google后来推出了基于IntelliJ IDEA的Android Studio作为官方开发工具,但ADT捆绑包在某些情况下仍能提供服务。然而,随着时间的推移,新的Android版本和开发工具的特性可能会...
对于2014年发布的adt-bundle-windows-x86_64-20140624,需要注意的是,随着技术的发展,Google后来推出了Android Studio,这是现在官方推荐的Android开发环境,它基于IntelliJ IDEA,提供了更强大的功能和更现代的...
4. **开发者工具**:Android Studio是官方的集成开发环境(IDE),它基于IntelliJ IDEA,集成了SDK Manager、AVD Manager等工具,提供了一个全面的开发环境。它支持代码编写、调试、性能分析等功能,并包含Gradle...
它是基于IntelliJ IDEA的,提供了丰富的功能,如智能代码补全、代码分析、性能优化工具等。 3. **Build Tools**: 包含了一组用于构建Android应用的命令行工具,例如aidl、dx、aapt等。这些工具在构建过程中处理资源...
Android Studio 是Google推出的一款基于IntelliJ IDEA的免费集成开发环境(IDE),专门用于开发Android应用程序。它提供了丰富的工具集,包括代码编辑器、调试器、构建工具、模拟器和性能分析器,为开发者提供了一站...
对于现代开发,Google推荐使用Android Studio,它基于IntelliJ IDEA,包含了更强大的功能,如Gradle构建系统和内置模拟器。 3. **API文档**:提供了完整的Java API参考,以及Android框架的详细信息,帮助开发者了解...
Android Studio基于IntelliJ IDEA,提供了更强大的性能优化、更快的构建速度以及更友好的用户界面。尽管如此,理解ADT的历史和工作原理对于深入理解Android开发仍有价值,尤其对于那些从Eclipse时代走过来的老兵们。...
它基于IntelliJ IDEA,提供了许多针对Android开发优化的功能,如代码编辑、调试、构建工具、模拟器等,极大地提升了开发者的工作效率。 "android-studio-ide-192.6308749-windows32.zip" 这个压缩包文件是Android ...
- **Android Studio**: 是Google官方推出的一款专为Android开发设计的集成开发环境(IDE),基于IntelliJ IDEA构建而成。它提供了丰富的功能,旨在简化Android应用的开发流程。 - **官方地位**: 被认为是官方推荐的...
* Android Studio:一个基于 IntelliJ IDEA 的 Android 集成开发环境,提供了项目创建、代码编辑、调试和优化等功能。 * ADT-Bundle-Windows-x86:Android 开发工具包,提供了 Android 操作系统的开发接口和工具。 *...
- **NetBeans、IntelliJ IDEA**: 这些开发平台也提供了Android开发工具,但本书主要讨论基于Eclipse的官方工具。 ### 安装步骤 1. **下载Eclipse**: 从Eclipse官网下载"Eclipse IDE for Java Developers"或...
- 除了Eclipse之外,还有其他的开发平台如NetBeans、IntelliJ IDEA等也提供了Android开发的支持。 #### 四、安装流程 1. **下载Eclipse:** - 访问Eclipse官网,下载适合的操作系统版本。 - 建议选择“Eclipse ...
- **其他开发平台**:虽然本书主要介绍基于Eclipse的开发方式,但也可以选择使用其他集成开发环境,如NetBeans、IntelliJ IDEA等。这些平台也提供了相应的Android开发工具和支持。 通过遵循上述指南,您将能够成功...
ANE 支持 Android-ARM、Android-x86、iPhone-ARM 和 iPhone-x86,包括在 Adobe AIR SDK 16 中引入的 x64 位平台。它使用 16.0.0.259 Adobe AIR SDK 和 iOS 8.1 SDK 构建。 存储库包含 IntelliJ IDEA 的模块...
- 随着时间的推移,Google推出了官方的Android开发工具——Android Studio,它基于IntelliJ IDEA,提供了更强大的性能和更现代的开发体验。尽管如此,Eclipse在某些特定场景下仍然被一些开发者所使用。 10. **持续...
Android Studio基于IntelliJ IDEA,提供了丰富的功能来提升开发效率。 综上所述,`android-sdk_r10-mac_x86.zip`是一个完整的Android开发环境,包含了开发者在Mac上进行Android应用开发所需的所有工具和资源,从...
- 为了便于开发,文档推荐使用IDE工具,如IntelliJ IDEA Community Edition(免费;***)或Eclipse(免费;***)。 Android编程: - 文档中并没有详细描述Android编程的具体内容,但给出了学习Java编程语言的重要...
现在你可以开始创建你的第一个Android项目,利用Android Studio(基于IntelliJ IDEA的现代替代品,虽然这里我们讨论的是Eclipse环境)进行编码、调试和构建应用程序。记得定期更新SDK和ADT,以保持与最新Android版本...
Smalidea 是一个专为 IntelliJ IDEA 开发的插件,用于对 Android 应用程序的字节码分析和调试,尤其适用于逆向工程和性能优化。由于在官方渠道下载速度较慢,这里提供了两个版本的本地下载链接,便于开发者快速获取...