- وµڈ览: 1488350 و¬،
- و€§هˆ«:

- و¥è‡ھ: وه·
-

و–‡ç« هˆ†ç±»
- ه…¨éƒ¨هچڑه®¢ (525)
- SEO (16)
- JAVA-EE-Hibernate (6)
- JAVA-EE-Struts (29)
- JAVA-EE-Spring (15)
- Linux (37)
- JAVA-SE (29)
- NetWork (1)
- CMS (14)
- Semantic Research (3)
- RIA-Flex (0)
- Ajax-Extjs (4)
- Ajax-Jquery (1)
- www.godaddy.com (0)
- SSH (34)
- JavaScript (6)
- SoftwareEngineer (9)
- CMMI (0)
- IDE-Myeclipse (3)
- PHP (1)
- Algorithm (3)
- C/C++ (18)
- Concept&Items (2)
- Useful WebSite (1)
- ApacheServer (2)
- CodeReading (1)
- Socket (2)
- UML (10)
- PowerDesigner (1)
- Repository (19)
- MySQL (3)
- SqlServer (0)
- Society (1)
- Tomcat (7)
- WebService (5)
- JBoss (1)
- FCKeditor (1)
- PS/DW/CD/FW (0)
- DesignPattern (11)
- WebSite_Security (1)
- WordPress (5)
- WebConstruction (3)
- XML|XSD (7)
- Android (0)
- Project-In-Action (9)
- DatabaseDesign (3)
- taglib (7)
- DIV+CSS (10)
- Silverlight (52)
- JSON (7)
- VC++ (8)
- C# (8)
- LINQ (1)
- WCF&SOA (5)
- .NET (20)
- SOA (1)
- Mashup (2)
- RegEx (6)
- Psychology (5)
- Stock (1)
- Google (2)
- Interview (4)
- HTML5 (1)
- Marketing (4)
- Vaadin (2)
- Agile (2)
- Apache-common (6)
- ANTLR (0)
- REST (1)
- HtmlAnalysis (18)
- csv-export (3)
- Nucth (3)
- Xpath (1)
- Velocity (6)
- ASP.NET (9)
- Product (2)
- CSS (1)
社هŒ؛版ه—
- وˆ‘çڑ„资讯 ( 0)
- وˆ‘çڑ„è®؛ه› ( 83)
- وˆ‘çڑ„é—®ç” ( 3)
هکو،£هˆ†ç±»
- 2012-06 ( 4)
- 2011-01 ( 1)
- 2010-10 ( 2)
- و›´ه¤ڑهکو،£...
وœ€و–°è¯„è®؛
-
lt26wï¼ڑ
çگ†è§£وˆگé—¨é¢و¨،ه¼ڈه؛”该و¯”较ه®¹وک“وکژ白هگ§
FacadePattern-Javaن»£ç په®ن¾‹è®²è§£ -
lt26wï¼ڑ
看ن¸‹é¢çڑ„ن¾‹هگو¯”较وکژ白.
FacadePattern-Javaن»£ç په®ن¾‹è®²è§£ -
javaloverkehuiï¼ڑ
è؟™ن¹ںهڈ«و–‡و،£ï¼Œهˆ«é€—وˆ‘è،Œهگ—,ن¹ںه°±è‡ھه·±çœ‹çœ‹م€‚
HtmlCleaner API -
SE_XiaoFengï¼ڑ
至ه°‘ن¹ںه؛”该ه†™ن¸ھو³¨é‡ٹهگ§م€‚
HtmlCleaner API -
jfzshandongï¼ڑ
...
org.springframework.web.filter.CharacterEncodingFilter é…چç½®
CoverFlow – built using Silverlight 3's 'Projection' feature
- هچڑه®¢هˆ†ç±»ï¼ڑ
- Silverlight
CoverFlow – built using Silverlight 3's 'Projection' feature
آ
So I decided to have a go at building the coverflow experience using the new Silverlight 3 “Projection†feature.
If you want any of your SL3 content to look like it’s in 3D then the “Projection †feature is your friend. It’s not true 3D, like what we’d expect from WPF camera/viewport, BUT it is sufficient to give the appearance of 3D.
What I also want to do in this sample is utilize designer created storyboards for ALL animations. It’s easy with something like coverflow to create your animations using code generated storyboards and/or dispatcher timers. These code generated storyboards or dispatcher timers are very DESIGNER UN-FRIENDLY, and this is something I try to steer clear of. I want to show you that you can create these complex types of experiences using “designer†friendly techniques.
What we’re going to build
We are going to build a very very simplified version of the infamous coverflow. The below picture is taken from the iTunes store, we are going to build something similar but without the scrollbar (that will be added in a future blog post). Also my version will have the covers tilted on a more exaggerated angle to highlight the ease at which you can do it using the blend tools.
آ ![http://farm4.static.flickr.com/3659/3524282252_22fe9bf3c6_o.jpg]](http://farm4.static.flickr.com/3659/3524282252_22fe9bf3c6_o.jpg "http://farm4.static.flickr.com/3659/3524282252_22fe9bf3c6_o.jpg]")
Future blog post’s will work off this sample BUT for now it will be lean and clean, showing only the perspective transform and use of designer friendly storyboards.
So here is the final looking coverflow that we are going to build as mentioned it is a very vanilla version without the bells and whistles found in the iTunes version (like reflection or fading gradients etc). It’s only a youTube clip in case you haven’t installed SL3 and thus can’t play with it. (If you do want to play with the Silverlight 3 version then go to the bottom of this post.)
آ
<object width="500" height="400"> <param name="movie" value="http://www.youtube.com/v/-Vgb7HhCWqQ&hl=en&fs=1"> <param name="allowFullScreen" value="true"> <param name="allowscriptaccess" value="always"> <embed type="application/x-shockwave-flash" width="500" height="400" src="http://www.youtube.com/v/-Vgb7HhCWqQ&hl=en&fs=1" allowscriptaccess="always" allowfullscreen="true"></embed></object>
آ
My interpretation of a CoverFlow solution
This is my own interpretation of how a coverflow system can work. The beauty of programming is that there are many ways to solve the same problem, each developer/designer has there own techniques and seeing all the different approaches to problems makes programming interesting.
Don’t get too bogged down in the pictures, hopefully the code will make more sense.
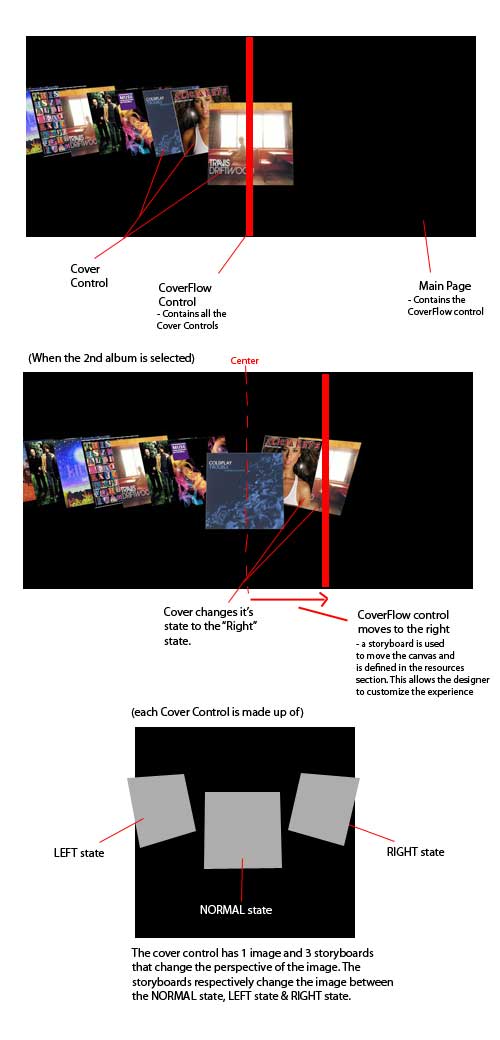
The visual tree hierarchy of the coverflow application is as follows
- Main Page (MainPage.xaml & cs)
آ آ آ آ آ آ آ آ آ آ آ آ آ آ آ --> CoverFlow (CoverFlow.xaml & cs)
آ آ آ آ آ آ آ آ آ آ آ آ آ آ آ آ آ آ آ آ آ آ آ آ آ آ آ آ آ آ آ آ --> Cover (Cover.xaml & cs)
آ آ آ آ آ آ آ آ آ آ آ آ آ آ آ آ آ آ آ آ آ آ آ آ آ آ آ آ آ آ آ آ --> Cover (Cover.xaml & cs)
آ آ آ آ آ آ آ آ آ آ آ آ آ آ آ آ آ آ آ آ آ آ آ آ آ آ آ آ آ آ آ آ --> Cover (Cover.xaml & cs)
آ آ آ آ آ آ آ آ آ آ آ آ آ آ آ آ آ آ آ آ آ آ آ آ آ آ آ آ آ آ آ آ --> Cover (Cover.xaml & cs)
آ آ آ آ آ آ آ آ آ آ آ آ آ آ آ آ آ آ آ آ آ آ آ آ آ آ آ آ آ آ آ آ --> …… etc.
The “Main Page †is nothing more than a simple user-control that hosts the coverflow control. In the main page we also create the dummy data and pass that into the coverflow control.
The “CoverFlow †control is a canvas container that hosts all the covers. Note that the canvas is horizontally and vertically aligned to the centre, and it has no set width (i.e. it is zero in width). This ensures that the canvas is aligned to the centre of the screen and all the covers that will be added to it will position from the centre outwards (this is an important point to remember).

آ
The “Cover †control is very simple in design. It has 3 storyboards that animate an image between the three different views mentioned above (Left, Normal, Right). They’re just storyboards for this sample however in a future blog post they will be turned into visual states as i wanted to keep this demo as simple as possible.
آ 
آ
Silverlight 3 Demo
[demo uses Silverlight 3 beta]
آ
آ
Conclusion
I’ve tried to keep the overall design of the solution as simple as possible, the reflections, iTunes like effects etc were intentionally not added as I wanted to just concentrate on “Projection†and “Using designer friendly storyboardsâ€.
I’ve seen a lot of implementations of coverflow both within Silverlight and from the Flash side and all of them have been built mainly using code generated animations. I have no problems with that approach as long as you somehow expose those animations to a designer for them to tweak and customize.
Blend 3 “behaviours†is one such technology that will allow you to keep your code generated animations (storyboards) but bubble up the important bits for a designer to be able to configure. Bare this in mind when you create your future coverflow like experiences.
There will be a couple of follow up posts on this coverflow application, I plan on showing you how to create this same coverflow experience using the Scroll Viewer, and/or via using the other layout controls. I choose to do using a canvas for this first version to keep it simple.
Silverlight 3 projection makes building 3D like experiences dead simple. And the animation engine within Silverlight is so simple to implement that it lets you concentrate on the important things like getting the experience right!
Enjoy and if you’ve got any questions feel free to look me up on Twitter @ JoseFajardo .


- 2010-01-12 18:11
- وµڈ览 1841
- 评è®؛(0)
- هˆ†ç±»:编程è¯è¨€
- وں¥çœ‹و›´ه¤ڑ
هڈ‘è،¨è¯„è®؛

-
SilverLightه¼‚و¥è°ƒç”¨WebServiceه‡؛é”™ï¼پ
2010-01-19 12:58 5362SilverLightه¼‚و¥è°ƒç”¨WebServiceه‡؛é”™ï¼پ ... -
Silverlightو’و”¾ه™¨ C#è¯è¨€
2010-01-13 13:30 3258è؟™و®µو—¶é—´ç ”究Silverlightن¸çڑ„MediaElement ... -
ن½؟用Silverlight,هˆ¶ن½œç®€هچ•و’و”¾ه™¨çڑ„ن¸€ç‚¹ç‚¹ه؟ƒه¾—م€‚
2010-01-13 13:28 3610首ه…ˆن»‹ç»چن»€ن¹ˆوک¯Silverligh ... -
هˆوژ¢silverlight--简وک“و’و”¾ه™¨
2010-01-13 13:28 1471<UserControl xmlns=" ... -
و–°ه¼€هڈ‘çڑ„silverlight视频و’و”¾ه™¨,
2010-01-13 13:21 4434http://www.chenjiliang.com/Arti ... -
Silverlightو•™ç¨‹ç¬¬ه››éƒ¨هˆ†ï¼ڑن½؟用 Style ه…ƒç´ و›´ه¥½هœ°ه°پ装观و„ں
2010-01-12 22:11 1222Silverlightو•™ç¨‹ç¬¬ه››éƒ¨هˆ†ï¼ ... -
Silverlight Carousel: Creating a Silverlight Control Displays Picture in an Inte
2010-01-12 18:18 1817http://www.codeproject.com/KB/s ... -
Using projection to build a 3D carousel in Silverlight 3
2010-01-12 18:14 2281http://ww ... -
silverlightهٹ¨ç”»و’و”¾هپœو¢é‡چو’ç‰وژ§هˆ¶
2010-01-06 12:38 1346ani.begin() ani.stop(); ani. ... -
silverlighté€ںه¦èŒƒن¾‹100
2010-01-06 12:37 1235silverlighté€ںه¦èŒƒن¾‹100 ... -
Silverlight ن¸çڑ„ HTTP é€ڑن؟،ه’Œه®‰ه…¨
2010-01-04 23:43 1972Silverlight ن¸çڑ„ HTTP é€ڑن؟،ه’Œه®‰ه…¨ < ... -
Visual Studioçڑ„ è¯،ه¼‚bug(mscorlibو— و³•ه¼•ç”¨)ه¼•هڈ‘çڑ„ه¯¹è¯ and Silverlight XAML و„é€ ه‡؛é”™
2010-01-04 09:25 4073آ آ آ آ آ آ ... -
Silverlightه¸¸è§پé—®é¢کهڈٹ解ه†³و–¹و³•
2009-12-22 14:06 1224Silverlightه¸¸è§پé—®é¢کهڈٹ解ه†³و–¹و³• ... -
网ن¸ٹه¸¸ç”¨ه…چè´¹webservice وں¥è¯¢
2009-12-22 12:47 4552网ن¸ٹه¸¸ç”¨ه…چè´¹webservice وں¥è¯¢ آ 2008-11 ... -
ه؟…ه؛” Bing و–°ç‰¹و€§ن¹‹وœ€و–°و–‡ç« , Wolfram|Alpha و•´هگˆ, ه¤©و°”وگœç´¢ç‰ه·²وژ¨ه‡؛
2009-12-21 23:33 1460ه؟…ه؛” Bing ه¢هٹ ن؛†ن¸€é،¹â€œوœ€و–°و–‡ç« â€çڑ„وگœç´¢ç»“وœç‰¹و€§ï¼Œن¾‹ه¦‚ن¸‹ه›¾ ... -
ن¸‹è½½silverlightه®ک网çڑ„ه…¨éƒ¨è§†é¢‘و•™ç¨‹
2009-12-21 23:30 14810Silverlightه®ک网وڈگن¾›ن؛†è®¸ه¤ ... -
Silverlightه®¢وˆ·ç«¯ه’ŒWCFوœچهٹ،ه™¨ç«¯ه…±ن؛«ç±»ه؛“
2009-12-21 23:21 1789هœ¨Silverlightن¼پن¸ڑç؛§é،¹ç›®ه¼€هڈ‘ن¸ï¼Œè®؟é—®و•°وچ®ه؛“وک¯ه¾ˆه¸¸è§پçڑ„ ... -
Create a Silverlight Europe weather map
2009-12-21 22:55 1538آ I don’t generally fi ... -
ه؟…ه؛”هœ°ه›¾ه›¾ç‰‡ç³»ç»ں(Tile System)ن¹‹ن؛Œ
2009-12-21 22:53 2242م€گهگو ‡ç³»ه’Œهœ°ه›¾ه›¾ç‰‡ç¼–ç ... -
ه؟…ه؛”هœ°ه›¾SilverLightوژ§ن»¶ه…¥é—¨è®²ه؛§ن¹‹ه…ï¼ڑوک¾ç¤؛è،—و™¯ï¼ˆStreetside)
2009-12-21 22:51 4815ه؟…ه؛”هœ°ه›¾SilverLightوژ§ن»¶ه…¥é—¨è®²ه؛§ن¹‹ه…ï¼ڑوک¾ç¤؛è،—و™¯ï¼ˆSt ...
相ه…³وژ¨èچگ
è؟™ç¯‡è®؛و–‡وک¯ه…³ن؛ژن¸‰ç»´هœ؛و™¯çڑ„Flow Estimaitonçڑ„م€‚ن¸»è¦په‡؛هڈ‘点وک¯ه¹³è،Œوٹ•ه½±ه’Œé€ڈ视م€‚该è®؛و–‡ه¯¹ن؛ژن¸‰ç»´هœ؛و™¯ن¸ه…‰çڑ„采用ه’Œو„é€ ç‰è®²è§£çڑ„و¯”较çھپه‡؛م€‚وœ‰éœ€è¦پçڑ„هڈ¯ن»¥ن¸‹و¥çœ‹çœ‹م€‚
Feature extraction using maximum nonparametric margin projection
High-Speed 3D Imaging with Digital Fringe Projection Techniques
هˆ©ç”¨matlabè؟›è،ŒFDKç®—و³•é‡چه»؛,وœ€هگژه¾—ه‡؛结وœï¼Œهگ„ن¸ھو–¹هگ‘ن¸ٹçڑ„و•°وچ®ï¼ŒFDKç®—و³•ن¸»è¦پهˆ†ن¸؛ن¸‰و¥ï¼ڑ第ن¸€و¥وک¯ه¯¹وٹ•ه½±و•°وچ®è؟›è،Œهٹ وƒï¼Œç¬¬ن؛Œو¥وک¯ه¯¹هٹ وƒهگژçڑ„و•°وچ®è؟›è،Œو»¤و³¢ï¼Œç¬¬ن¸‰و¥وک¯ه¯¹و»¤و³¢هگژçڑ„و•°وچ®è؟›è،Œهڈچوٹ•ه½±ï¼Œوœ€هگژه¾—هˆ°é‡چه»؛و•°وچ®م€‚
This is a classical paper named"Eigenfaces vs Fishfaces: Recognition Using Class Specific Linear Projection".
ه‰چ端é،¹ç›®-d3-geo-projection,d3.jsçڑ„و‰©ه±•هœ°çگ†é¢„وµ‹م€‚
3DMAXه‡ ن½•وٹ•ه½±وڈ’ن»¶Geometry Projection,ه°†ن¸€ن¸ھوˆ–ه¤ڑن¸ھه¯¹è±،وˆ–ه®ƒçڑ„é،¶ç‚¹é€‰و‹©و²؟ه…¨ه±€وˆ–ه±€éƒ¨ xم€پy وˆ– z è½´وٹ•ه½±هˆ°هڈ¦ن¸€ن¸ھه¯¹è±،ن¸ٹم€‚
هˆ©ç”¨MATLAB编程ه®çژ°و»¤و³¢هڈچوٹ•ه½±ç®—و³•ï¼Œه¹¶é‡چه»؛ه›¾هƒڈ,و•ˆوœوک¾è‘—ï¼پ
Time for action – filtering the projection list 83 Summary 85 Chapter 4: Accessing Layers 87 Layer types 88 OpenLayers 88 Time for action – exploring OpenLayers options 89 Working with tiles 90 ...
PanoramicMosaics by Manifold Projection.pdf
Android MediaProjectionوˆھه±ڈ&ه½•ه±ڈ 1م€پ解ه†³Android Qن¸java.lang.SecurityException: Media projections require a foreground service of type ServiceInfo.FOREGROUND_SERVICE_TYPE_MEDIA_PROJECTION ه¼‚ه¸¸ 2م€پ...
ه¦‚وœن½؟用NPM,هˆ™npm install d3-geo-projection م€‚ هگ¦هˆ™ï¼Œè¯·ن¸‹è½½م€‚ و‚¨ن¹ںهڈ¯ن»¥ç›´وژ¥ن»ژن½œن¸؛هٹ è½½م€‚ و”¯وŒپAMD,CommonJSه’Œé¦™èچ‰çژ¯ه¢ƒم€‚ هœ¨é¦™èچ‰ن¸ï¼Œه°†ه¯¼ه‡؛d3ه…¨ه±€هڈکé‡ڈï¼ڑ < script src =" ...
Projection For VR
function of the projection algorithm
è؟™ن¸ھن¸œن¸œوˆ‘ن¹ںç»™ه؟کن؛†م€‚
Adaptive fringe-pattern__ projection for image saturation avoidance in 3D surface-shape__ measurement.pdf
Introduction_Vertica_Projection_Design
Android5.0ن¹‹هگژ,用MediaProjectionه®çژ°وˆھه±ڈهٹں能م€‚
è؟™وک¯ن¸€ن¸ھهژ‹ç¼©ن¼ و„ںو–¹é¢çڑ„Gradient Projection for Sparse Reconstruction ه·¥ه…·هŒ…م€‚
C#ç»کهˆ¶ï¼“Dو›²ç؛؟çڑ„ن¾‹هگ,هڈ¯ن»¥ن¸‹è½½çœ‹çœ‹ï¼Œه¾ˆه¥½çڑ„ن¾‹هگ,能è؟گè،Œم€‚