
文章原文:
《Spring Boot: API First Approach》:https://dzone.com/articles/spring-boot-api-first-approach?edition=664392
提到的工具:
2、https://openapi-generator.tech/
I describe how I created the API definition, then how I created the server and client code from the API definition. Then I will talk about some of the problems I faced.
Join the DZone community and get the full member experience.
JOIN FOR FREEIn this blog, I take a practical approach to API first design with Open API 3 specification.
Firstly, I describe how I created the API definition, then how I created the server and the client code from the API definition. Then I will talk about some of the problems I faced.
Advantages of API First Approach
As we are adopting microservice-based architectures, API first approach has been gaining some traction. There are quite many advantages to using API first approach and I will discuss a few of them.
Clear Contract Definition
With API first approach, you can create a concrete contract with which you can set clear goals on what will be provided by your application. It also helps to decouple your implementation from the Interface you provide via the API.
Well Documented API
You follow well-structured documentation of the API you are providing and it helps stakeholders to have a clear understanding of the interface you are providing via your APIs in a human-readable format.
Promotes Development in Parallel
This is one of the advantages that I really love is that the producer and consumer of the API can work in parallel once you have the API definition in place. The Consumer can easily create mocks with the already agreed API contract and start their end of the development.
Let’s Get Started!
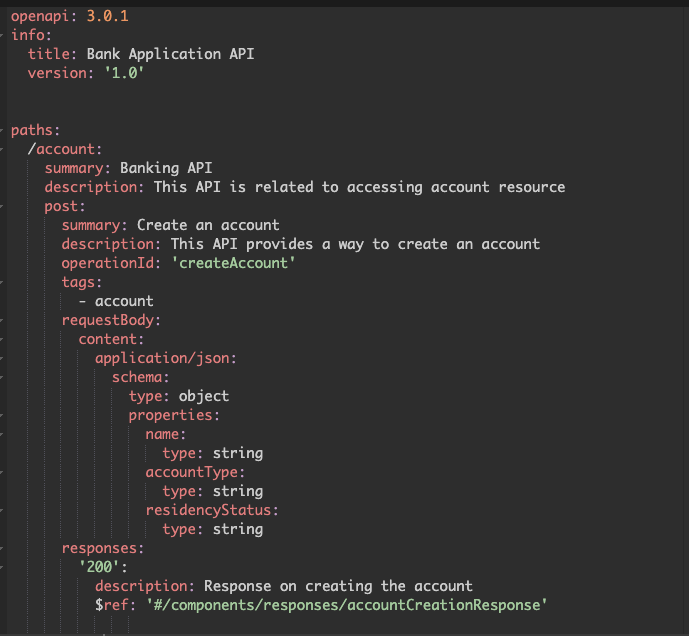
To start off, I went to https://editor.swagger.io/ and created my API definition. I used the Open API 3 specification to create the API definition. There are many other tools to create your API definition, but I choose this as I was familiar with creating Swagger API documentation in Java. I used this online editor as it provides an auto-complete feature (with ctrl + space) depending on the context you are in. This helped me a lot to create the API definition.
However, I am not a fluent API definition creator, So I learned the way to define the API using the petstore API definition example.
To get started, I created a very minimal API definition in which I can create an account using a post request.
Generating Code
With the API definition all set, let’s start with creating the server and client of the API. For this, I created a spring boot application which I created normally via https://start.spring.io. The only dependency I added here was spring-web .
Next, I used the Open API Generator Maven plugin to create the server and the client for me. Let’s see how to do that.
Server-side Code Generation
To create the server-side code from the API definition, I added the Open API generator plugin and provided it with the API definition file. Since I am creating a server based on spring, I provided a generation type spring, So that it knows it can use spring classes to create my server code. There are quite a few server code generators that you can find here. Now, let's look at what the plugin config looks like:
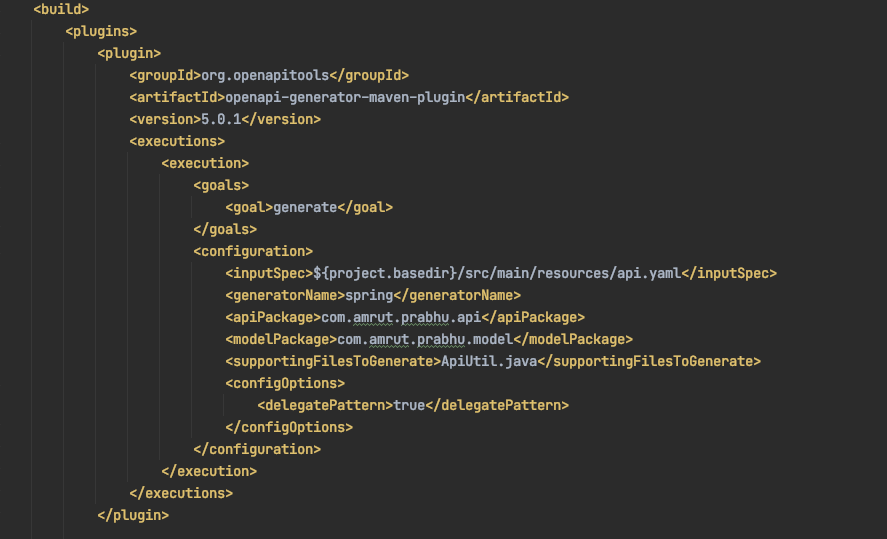
Some of the customization options I used here were, which package name to use to create my API and model classes. There are quite a few other options you can specify. E.g., you can define what your model class names can be pre-appended with and you can find the various other options on their GitHub link.
Now, the code that gets generated from the plugin requires a few more dependencies for it to compile successfully. I exactly found the minimal set I needed and added the following dependencies.
<dependency>
    <groupId>javax.validation</groupId>
    <artifactId>validation-api</artifactId>
</dependency>
<dependency>
    <groupId>io.springfox</groupId>
    <artifactId>springfox-swagger2</artifactId>
    <version>${springfox-version}</version>
</dependency>
<dependency>
    <groupId>org.openapitools</groupId>
    <artifactId>jackson-databind-nullable</artifactId>
    <version>${jackson-databind-nullable}</version>
</dependency>
<dependency>
    <groupId>io.swagger.core.v3</groupId>
    <artifactId>swagger-annotations</artifactId>
    <version>${swagger-annotations-version}</version>
</dependency>
Now comes the main part, i.e., generating the code. After building the code using mvn clean verify, there were a few classes that got generated.
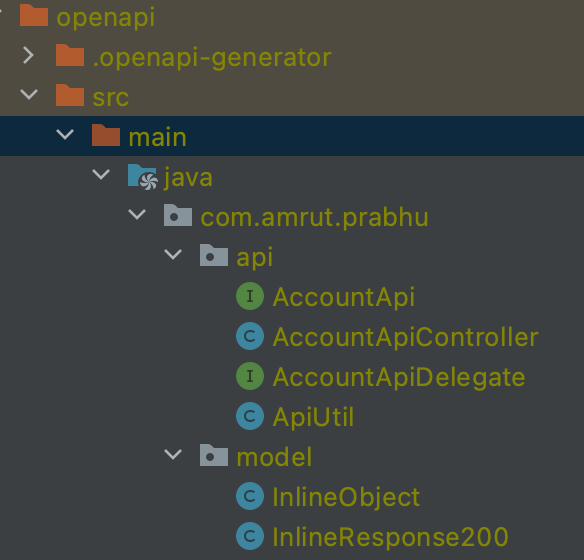
In the API package, there were two main interfaces, AccountApi and AccountApiDeligate . The AccountApi interface contains the actual definition of the API using @postmapping annotation and it also contains the required API documentation using spring swagger annotations. Its implementation class is AccountApiController which calls the delegated service.
The important interface for you is the AccountApiDelegate interface. This provides a delegate service pattern, which allows you to provide the implementation of what needs to be handled or done when the API is called. Here you put in your business logic that handles the request. Once you implement the service delegate, you are actually ready to serve requests.
That’s it, you are done with the server-side. Next, the Client.
Client Code Generation
For the client-side code generation, I use the same plugin, but this time with the generator name as java .
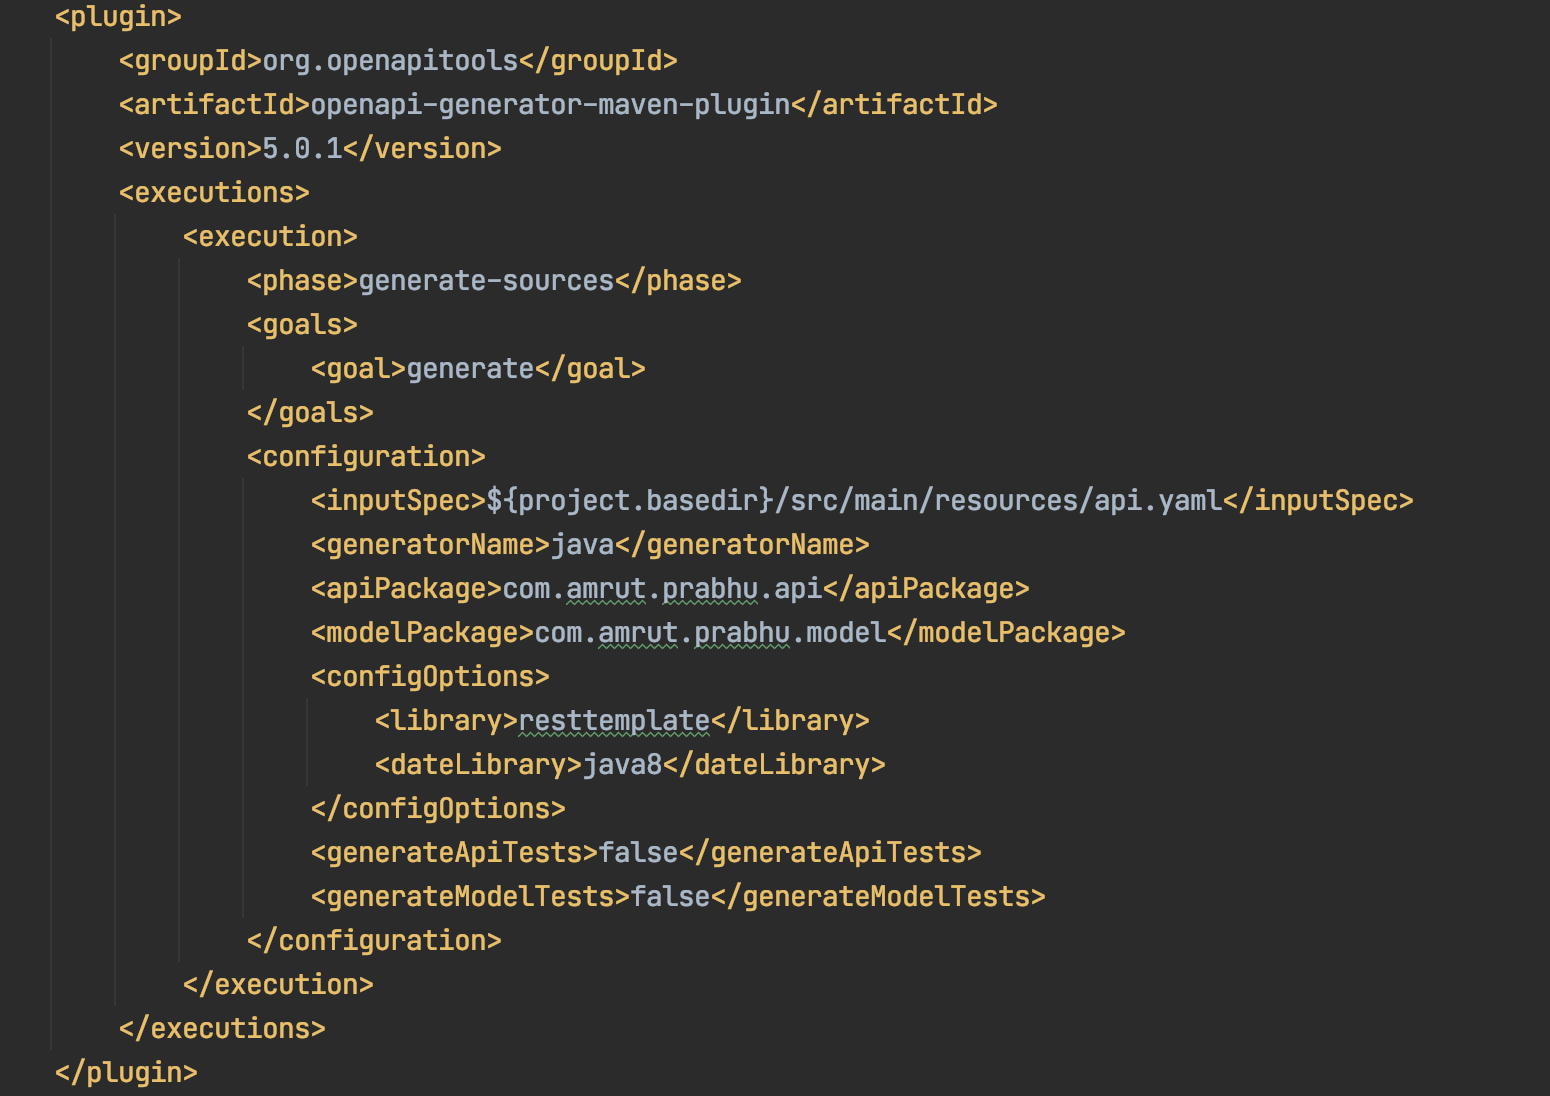
I also provide some config properties, Like the library to use for making the rest client. Here I wanted it to use restemplate for making the calls to the server. There are quite a few options you can configure that you can find from their documentation here.
You would also require some more dependencies to help you compile the generated code.
<dependency>
   <groupId>com.google.code.gson</groupId>
   <artifactId>gson</artifactId>
   <version>${gson.version}</version>
</dependency>
<dependency>
   <groupId>io.swagger.core.v3</groupId>
   <artifactId>swagger-annotations</artifactId>
   <version>${swagger-annotations-version}</version>
</dependency>
<dependency>
   <groupId>io.springfox</groupId>
   <artifactId>springfox-swagger2</artifactId>
   <version>${springfox-version}</version>
</dependency>
<dependency>
   <groupId>com.squareup.okhttp3</groupId>
   <artifactId>okhttp</artifactId>
   <version>${okhttp.version}</version>
</dependency>
<dependency>
   <groupId>com.google.code.findbugs</groupId>
   <artifactId>jsr305</artifactId>
   <version>${jsr305.version}</version>
</dependency>

After the code generation, You can find classes that provide you how to configure the client to talk to the server. It also provides some basic authentication, using bearer token or basic auth.
Now you need to create an instance/bean of the ApiClient . This contains the host config of the server you want to communicate. This is then used in the AccountApi class to help you make requests to the server. To make a request, you would only have to call the API function from the AccountApi class.
There we have it now. You have successfully generated the client code and you can now check the interaction between the client and the server.
Problems I Encountered
There are quite a few bugs in the latest version of the plugin that I was using (5.0.1).
- For
springgenerator, there are some unused imports from spring data that get added by the generator while creating the controller. Hence you would have to add spring data dependency, Even if you not using a database with the service. This may not be a big problem, because mostly you would have a database that you connect to with your service. You can check the current open bug here. - Usually, you would define the schema for request and response in the
componentssection of the API definition file and then use the reference to these schemas in the API using the$ref:property. This is currently not working as excepted. The way to get around it was to define the inline schema for each request and response. Hence the model names get generated with a prefixInline*. You can track this bug here.
If you use the older version, i.e, 4.3.1 ; it's free from these bugs and the plugin works well as expected.
As usual, I have uploaded the code to GitHub. Enjoy!!


相关推荐
demo代码演示了如何使用swagger-codegen 的 maven 插件生成可以继承到 spring boot项目中的api client
一份关于使用Swagger自动生成API说明文档的开发文档。
基于Swagger,Swagger open api 3.0 规范,通过配置Swagger JSON 生成API 文档
SpringBoot结合Swagger自动生成api文档.docx
1、本地执行代码生成工具,可生成controller、service、repository、entity、mapper、mapper.xml的增删改查代码。生成的文件复制到项目路径中,修修改改即可实现大部分CRUD功能。 2、工具不需要导入到项目中,本地...
基于Swagger端点为Retrofit 2生成kotlin代码的库。 包含一个注释处理器,用于在构建时配置和生成代码。
为Java MVC框架集成Swagger生成Api文档的工具
ASP.NET Core WebApi使用Swagger生成API说明文档 演示了如何在一个ASP.NET Core WebApi中使用SwaggerUI生成api说明文档。
主要给大家介绍了关于Asp.Net Core使用swagger生成api文档的完整步骤,文中通过示例代码介绍的非常详细,对大家学习或者使用Asp.Net Core具有一定的参考学习价值,需要的朋友们下面来一起学习学习吧
swagger生成api相关依赖
根据 swagger 生成 js api调用
使用swagger自动生成Api文档 demo java spring boot
前言:我注意到,只要提供了合适的 swagger.json,swagger ui 就会帮我们完成其他的:动态生成 web 客户端,让我们可以在线浏览 API,构建/发送请求并获得响应。所以,在发现现有框架都不能支持在 request/...
asp.net webapi集成swagger自动生成接口文档(亲测可用)swagger生成html离线接口文档swagger生成html离线接口文档
使用maven+springboot+swagger3+idea生成swagger API文档的演示示例。
工具是一个maven工程,可通过maven命令导出静态接口文档,具体操作步骤见附件中的ReadMe.txt
swagger提供的接口文档相比传统的文档方式更加直观也更加高效,但是在网上找了很多关于Swagger与SpringMvc整合的资料,发现都比较繁琐,不是很满意,于是有了这篇博客,希望对大家有所帮助。教程:...
一个用于解析swagger.json生成符合WebApiClient接口代码的代码生成工具
通过摇摇欲坠的方案生成API。 支持OA 3.0、2.0,JSON,yaml 生成的api模块使用发出请求。 任何问题可以问或在(#招摇,打字稿-API频道) :eyes: 例子 您可以在找到所有示例 :stop_sign: 它是带有模板的新版本 ...