- µĄÅĶ¦ł: 18104 µ¼Ī
- µĆ¦Õł½:

- µØźĶć¬: µĘ▒Õ£│
-

µ¢ćń½ĀÕłåń▒╗
ńżŠÕī║ńēłÕØŚ
- µłæńÜäĶĄäĶ«» ( 0)
- µłæńÜäĶ«║ÕØø ( 0)
- µłæńÜäķŚ«ńŁö ( 0)
ÕŁśµĪŻÕłåń▒╗
- 2012-08 ( 2)
- 2012-07 ( 16)
- µø┤ÕżÜÕŁśµĪŻ...
µ£Ćµ¢░Ķ»äĶ«║
ŃĆÉOSCµēŗµ£║AppµŖƵ£»Ķ¦Żµ×ÉŃĆæ- ń╝¢ĶŠæµĪåµÅÆÕģźĶĪ©µāģÕøŠńēć
- ÕŹÜÕ«óÕłåń▒╗’╝Ü
- ń¦╗ÕŖ©Õ╝ĆÕÅæ
┬Ā┬Ā┬Ā õ╝ŚµēĆÕæ©ń¤ź’╝īAPPÕ║öńö©õĖŁÕĖ”µ£ēĶĪ©µāģÕŖ¤ĶāĮ’╝īÕÅ»õ╗źµø┤ÕźĮńÜäµÅÉķ½śńö©µłĘõĮōķ¬īŃĆé OSChina.NET AndroidńēłÕ«óµłĘń½»v1.6 õ╣¤ÕŖĀÕģźĶĪ©µāģÕŖ¤ĶāĮ’╝īÕƤµŁżµ£║õ╝Üõ╣¤ń╗ÖÕż¦Õ«ČÕłåõ║½õĖĆõĖŗAndroidńÜäń╝¢ĶŠæµĪåµś»Õ”éõĮĢµÅÆÕģźĶĪ©µāģÕøŠńēćńÜä’╝īµ¼óĶ┐ÄÕż¦Õ«ČõĖĆĶĄĘõ║żµĄüÕŁ”õ╣ĀŃĆé

ķ”¢Õģł’╝īµŖŖµĢ┤ńÉåÕźĮńÜäĶĪ©µāģÕøŠńēćõ╗źÕÅŖÕĖāÕ▒Ćńö©Õł░ńÜäõĖĆõ║øÕøŠńēćÕ»╝ÕģźÕł░ķĪ╣ńø«ńÜäres/drawableńø«ÕĮĢõĖŁŃĆé
ńäČÕÉÄ’╝īń╝¢ĶŠæres/layoutńø«ÕĮĢõĖŗÕĖāÕ▒Ć.xmlµ¢ćõ╗Č’╝īĶ┐ÖķćīµłæµŖŖoschinaÕ«óµłĘń½»ńÜäÕĖāÕ▒Ćõ╗ŻńĀüĶ┤┤õĖŖµØź’╝īõŠøÕż¦Õ«ČÕÅéĶĆā’╝Ü
tweet_pub.xml
<?xml version="1.0" encoding="utf-8"?> <LinearLayout xmlns:android="http://schemas.android.com/apk/res/android" android:layout_width="fill_parent" android:layout_height="fill_parent" android:orientation="vertical" android:background="@color/white"> <FrameLayout android:id="@+id/tweet_pub_form" android:layout_width="fill_parent" android:layout_height="fill_parent" android:layout_weight="1"> <EditText android:id="@+id/tweet_pub_content" android:layout_width="fill_parent" android:layout_height="fill_parent" android:autoLink="web" android:gravity="top" android:hint="Ķ»ĘĶŠōÕģźÕŖ©Õ╝╣ÕåģÕ«╣" android:background="@null"/> <ImageView android:id="@+id/tweet_pub_image" android:layout_width="60.0dip" android:layout_height="45.0dip" android:layout_marginLeft="5.0dip" android:layout_marginBottom="5.0dip" android:layout_gravity="left|bottom" android:clickable="true" android:visibility="gone"/> <LinearLayout android:id="@+id/tweet_pub_clearwords" android:layout_width="wrap_content" android:layout_height="wrap_content" android:layout_marginRight="5.0dip" android:layout_marginBottom="5.0dip" android:layout_gravity="right|bottom" android:gravity="center" android:background="@drawable/clearwords_bg" android:clickable="true"> <TextView android:id="@+id/tweet_pub_numberwords" android:layout_width="wrap_content" android:layout_height="wrap_content" android:textColor="@color/black" android:text="160"/> <ImageView android:layout_width="wrap_content" android:layout_height="wrap_content" android:layout_marginLeft="3dip" android:src="@drawable/clearwords_icon"/> </LinearLayout> </FrameLayout> <include layout="@layout/tweet_pub_footer"/> </LinearLayout>
┬Ā
tweet_pub_footer.xml
<?xml version="1.0" encoding="utf-8"?>
<LinearLayout xmlns:android="http://schemas.android.com/apk/res/android"
	android:orientation="vertical"
	android:layout_width="fill_parent"
	android:layout_height="wrap_content">

    <LinearLayout
		android:orientation="horizontal"
		android:layout_width="fill_parent"
		android:layout_height="wrap_content"
		android:gravity="center_horizontal"
		android:background="@drawable/widget_bar_bg">
		<ImageView
			android:id="@+id/tweet_pub_footbar_face"
			style="@style/main_footbar_image"
			android:src="@drawable/widget_bar_face"/>
		<ImageView
			style="@style/main_footbar_cutline"
			android:src="@drawable/widget_bar_cut_off"/>
		<ImageView
			android:id="@+id/tweet_pub_footbar_photo"
			style="@style/main_footbar_image"
			android:src="@drawable/widget_bar_photo"/>
		<ImageView
			style="@style/main_footbar_cutline"
			android:src="@drawable/widget_bar_cut_off"/>
		<ImageView
			android:id="@+id/tweet_pub_footbar_atme"
			style="@style/main_footbar_image"
			android:src="@drawable/widget_bar_atme"/>
		<ImageView
			style="@style/main_footbar_cutline"
			android:src="@drawable/widget_bar_cut_off"/>
		<ImageView
			android:id="@+id/tweet_pub_footbar_software"
			style="@style/main_footbar_image"
			android:src="@drawable/widget_bar_soft"/>
	</LinearLayout>

    <GridView
        android:id="@+id/tweet_pub_faces"
        android:layout_width="fill_parent"
		android:layout_height="220dip"
		android:numColumns="auto_fit"
		android:columnWidth="50dip"
		android:stretchMode="columnWidth"
		android:gravity="center"
		android:fadingEdge="none"
		android:scrollingCache="false"
		android:background="@color/face_bg"
		android:visibility="gone"/>

</LinearLayout>
┬Ā
ķĆÜĶ┐ćõĖŖķØóÕĖāÕ▒Ćõ╗ŻńĀüÕÅ»õ╗źń£ŗÕć║’╝īµłæµŖŖµĢ┤õĖ¬ń╝¢ĶŠæńĢīķØóÕłåµłÉõ║å2õĖ¬.xmlµ¢ćõ╗ČŃĆéõĖ╗ÕĖāÕ▒Ƶ¢ćõ╗Čtweet_pub.xmlķĆÜĶ┐ć<include>µĀćńŁŠµŖŖÕ║Ģ ķā©ÕĘźÕģʵĀÅtweet_pub_footer.xmlÕŖĀĶĮĮĶ┐øĶ¦åÕøŠŃĆéĶ┐ÖµĀĘÕüÜńÜäÕźĮÕżäµś»µŖŖõĖĆõĖ¬ĶŠāÕżŹµØéńÜäÕĖāÕ▒Ćń╗åÕłåµłÉÕćĀõĖ¬Õ░ÅÕĖāÕ▒Ć’╝īĶ«®ÕĖāÕ▒Ƶø┤µĖģµÖ░’╝īń╗┤µŖżĶĄĘµØźµø┤ÕŖĀµ¢╣õŠ┐ŃĆé
µÄźõĖŗµØź’╝īÕłøÕ╗║õĖĆõĖ¬Activityń▒╗’╝īÕ╣ČÕ£©AndroidManifest.xmlõĖŁµ│©Õåī’╝īÕ»╣Ķ»źActivityµĘ╗ÕŖĀõĖĆõĖ¬Õ▒׵Ʀ’╝Ü
android:windowSoftInputMode="stateVisible|adjustResize"
┬Ā
Ķ»źÕ▒×µĆ¦Õ£©ActivityÕÉ»ÕŖ©µśŠńż║ńÜ䵌ČÕĆÖ’╝īĶĮ»ķö«ńøśõ╣¤Ķć¬ÕŖ©Õ╝╣Õć║µśŠńż║’╝īĶ┐ÖµĀʵ¢╣õŠ┐ńö©µłĘÕÅ»ńø┤µÄźÕ»╣EditTextń╝¢ĶŠæµĪåĶ┐øĶĪīĶŠōÕģźµ¢ćÕŁŚµōŹõĮ£ŃĆé
õĖŗķØóĶ┤┤Õć║ActivityńÜäÕ«īµĢ┤õ╗ŻńĀü’╝Ü
public class MainActivity extends Activity {
private EditText mContent;
private ImageView mFace;
private LinearLayout mClearwords;
private TextView mNumberwords;
private GridView mGridView;
private GridViewFaceAdapter mGVFaceAdapter;
private InputMethodManager imm;
private static final int MAX_TEXT_LENGTH = 160;//µ£ĆÕż¦ĶŠōÕģźÕŁŚµĢ░
@Override
public void onCreate(Bundle savedInstanceState) {
super.onCreate(savedInstanceState);
setContentView(R.layout.tweet_pub);
//ĶĮ»ķö«ńøśń«ĪńÉåń▒╗
imm = (InputMethodManager)getSystemService(INPUT_METHOD_SERVICE);
//ÕłØÕ¦ŗÕī¢Õ¤║µ£¼Ķ¦åÕøŠ
this.initView();
//ÕłØÕ¦ŗÕī¢ĶĪ©µāģĶ¦åÕøŠ
this.initGridView();
}
//ÕłØÕ¦ŗÕī¢Ķ¦åÕøŠµÄ¦õ╗Č
private void initView()
{
mContent = (EditText)findViewById(R.id.tweet_pub_content);
mFace = (ImageView)findViewById(R.id.tweet_pub_footbar_face);
mClearwords = (LinearLayout)findViewById(R.id.tweet_pub_clearwords);
mNumberwords = (TextView)findViewById(R.id.tweet_pub_numberwords);
//Ķ«ŠńĮ«µÄ¦õ╗Čńé╣Õć╗õ║ŗõ╗Č
mFace.setOnClickListener(faceClickListener);
mClearwords.setOnClickListener(clearwordsClickListener);
//ń╝¢ĶŠæÕÖ©µĘ╗ÕŖĀµ¢ćµ£¼ńøæÕɼ
mContent.addTextChangedListener(new TextWatcher() {
public void onTextChanged(CharSequence s, int start, int before, int count) {
//µśŠńż║Õē®õĮÖÕÅ»ĶŠōÕģźńÜäÕŁŚµĢ░
mNumberwords.setText((MAX_TEXT_LENGTH - s.length()) + "");
}
public void beforeTextChanged(CharSequence s, int start, int count, int after) {}
public void afterTextChanged(Editable s) {}
});
//ń╝¢ĶŠæÕÖ©ńé╣Õć╗õ║ŗõ╗Č
mContent.setOnClickListener(new View.OnClickListener() {
public void onClick(View v) {
//µśŠńż║ĶĮ»ķö«ńøś
showIMM();
}
});
//Ķ«ŠńĮ«µ£ĆÕż¦ĶŠōÕģźÕŁŚµĢ░
InputFilter[] filters = new InputFilter[1];
filters[0] = new InputFilter.LengthFilter(MAX_TEXT_LENGTH);
mContent.setFilters(filters);
}
//ÕłØÕ¦ŗÕī¢ĶĪ©µāģµÄ¦õ╗Č
private void initGridView() {
mGVFaceAdapter = new GridViewFaceAdapter(this);
mGridView = (GridView)findViewById(R.id.tweet_pub_faces);
mGridView.setAdapter(mGVFaceAdapter);
mGridView.setOnItemClickListener(new AdapterView.OnItemClickListener(){
public void onItemClick(AdapterView<?> parent, View view, int position, long id) {
//µÅÆÕģźńÜäĶĪ©µāģ
SpannableString ss = new SpannableString(view.getTag().toString());
Drawable d = getResources().getDrawable((int)mGVFaceAdapter.getItemId(position));
d.setBounds(0, 0, 35, 35);//Ķ«ŠńĮ«ĶĪ©µāģÕøŠńēćńÜ䵜Šńż║Õż¦Õ░Å
ImageSpan span = new ImageSpan(d, ImageSpan.ALIGN_BOTTOM);
ss.setSpan(span, 0, view.getTag().toString().length(), Spannable.SPAN_EXCLUSIVE_EXCLUSIVE);
//Õ£©ÕģēµĀćµēĆÕ£©ÕżäµÅÆÕģźĶĪ©µāģ
mContent.getText().insert(mContent.getSelectionStart(), ss);
}
});
}
private void showIMM() {
mFace.setTag(1);
showOrHideIMM();
}
private void showFace() {
mFace.setImageResource(R.drawable.widget_bar_keyboard);
mFace.setTag(1);
mGridView.setVisibility(View.VISIBLE);
}
private void hideFace() {
mFace.setImageResource(R.drawable.widget_bar_face);
mFace.setTag(null);
mGridView.setVisibility(View.GONE);
}
private void showOrHideIMM() {
if(mFace.getTag() == null){
//ķÜÉĶŚÅĶĮ»ķö«ńøś
imm.hideSoftInputFromWindow(mFace.getWindowToken(), 0);
//µśŠńż║ĶĪ©µāģ
showFace();
}else{
//µśŠńż║ĶĮ»ķö«ńøś
imm.showSoftInput(mContent, 0);
//ķÜÉĶŚÅĶĪ©µāģ
hideFace();
}
}
//ĶĪ©µāģµÄ¦õ╗Čńé╣Õć╗õ║ŗõ╗Č
private View.OnClickListener faceClickListener = new View.OnClickListener() {
public void onClick(View v) {
showOrHideIMM();
}
};
//µĖģķÖżµÄ¦õ╗Čńé╣Õć╗õ║ŗõ╗Č
private View.OnClickListener clearwordsClickListener = new View.OnClickListener() {
public void onClick(View v) {
String content = mContent.getText().toString();
if(content != ""){
AlertDialog.Builder builder = new AlertDialog.Builder(v.getContext());
builder.setTitle("µĖģķÖżµ¢ćÕŁŚÕÉŚ’╝¤");
builder.setPositiveButton("ńĪ«Õ«Ü", new DialogInterface.OnClickListener() {
public void onClick(DialogInterface dialog, int which) {
dialog.dismiss();
//µĖģķÖżµ¢ćÕŁŚ
mContent.setText("");
mNumberwords.setText(String.valueOf(MAX_TEXT_LENGTH));
}
});
builder.setNegativeButton("ÕÅ¢µČł", new DialogInterface.OnClickListener() {
public void onClick(DialogInterface dialog, int which) {
dialog.dismiss();
}
});
builder.show();
}
}
};
}
Ķ┐ÖķćīĶ»┤µśÄõĖŗ’╝īGridViewFaceAdapterń▒╗µś»µłæĶć¬Õ«Üõ╣ēńÜäķĆéķģŹÕÖ©ń▒╗’╝īń╗¦µē┐õ║åBaseAdapterŃĆéõĖŗķØóµłæõ╣¤Õ░åĶ»źń▒╗ńÜäÕ«īµĢ┤õ╗ŻńĀüĶ┤┤Õć║µØź’╝īń╗ÖÕż¦Õ«ČÕÅéĶĆā’╝Ü
public class GridViewFaceAdapter extends BaseAdapter
{
// Õ«Üõ╣ēContext
private Context mContext;
// Õ«Üõ╣ēµĢ┤Õ×ŗµĢ░ń╗ä ÕŹ│ÕøŠńēćµ║É
private int[] mImageIds;
public GridViewFaceAdapter(Context c)
{
mContext = c;
mImageIds = new int[]{
R.drawable.f001,R.drawable.f002,R.drawable.f003,R.drawable.f004,R.drawable.f005,R.drawable.f006,
R.drawable.f007,R.drawable.f008,R.drawable.f009,R.drawable.f010,R.drawable.f011,R.drawable.f012,
R.drawable.f013,R.drawable.f014,R.drawable.f015,R.drawable.f016,R.drawable.f017,R.drawable.f018,
R.drawable.f019,R.drawable.f020,R.drawable.f021,R.drawable.f022,R.drawable.f023,R.drawable.f024,
R.drawable.f025,R.drawable.f026,R.drawable.f027,R.drawable.f028,R.drawable.f029,R.drawable.f030,
R.drawable.f031,R.drawable.f032,R.drawable.f033,R.drawable.f034,R.drawable.f035,R.drawable.f036,
R.drawable.f037,R.drawable.f038,R.drawable.f039,R.drawable.f040,R.drawable.f041,R.drawable.f042,
R.drawable.f043,R.drawable.f044,R.drawable.f045,R.drawable.f046,R.drawable.f047,R.drawable.f048,
R.drawable.f049,R.drawable.f050,R.drawable.f051,R.drawable.f052,R.drawable.f053,R.drawable.f054,
R.drawable.f055,R.drawable.f056,R.drawable.f057,R.drawable.f058,R.drawable.f059,R.drawable.f060,
R.drawable.f061,R.drawable.f062,R.drawable.f063,R.drawable.f064,R.drawable.f065,R.drawable.f067,
R.drawable.f068,R.drawable.f069,R.drawable.f070,R.drawable.f071,R.drawable.f072,R.drawable.f073,
R.drawable.f074,R.drawable.f075,R.drawable.f076,R.drawable.f077,R.drawable.f078,R.drawable.f079,
R.drawable.f080,R.drawable.f081,R.drawable.f082,R.drawable.f083,R.drawable.f084,R.drawable.f085,
R.drawable.f086,R.drawable.f087,R.drawable.f088,R.drawable.f089,R.drawable.f090,R.drawable.f091,
R.drawable.f092,R.drawable.f093,R.drawable.f094,R.drawable.f095,R.drawable.f096,R.drawable.f097,
R.drawable.f098,R.drawable.f099,R.drawable.f100,R.drawable.f101,R.drawable.f103,R.drawable.f104,
R.drawable.f105
};
}
// ĶÄĘÕÅ¢ÕøŠńēćńÜäõĖ¬µĢ░
public int getCount()
{
return mImageIds.length;
}
// ĶÄĘÕÅ¢ÕøŠńēćÕ£©Õ║ōõĖŁńÜäõĮŹńĮ«
public Object getItem(int position)
{
return position;
}
// ĶÄĘÕÅ¢ÕøŠńēćID
public long getItemId(int position)
{
return mImageIds[position];
}
public View getView(int position, View convertView, ViewGroup parent)
{
ImageView imageView;
if (convertView == null)
{
imageView = new ImageView(mContext);
// Ķ«ŠńĮ«ÕøŠńēćn├ŚnµśŠńż║
imageView.setLayoutParams(new GridView.LayoutParams(85, 85));
// Ķ«ŠńĮ«µśŠńż║µ»öõŠŗń▒╗Õ×ŗ
imageView.setScaleType(ImageView.ScaleType.CENTER);
}
else
{
imageView = (ImageView) convertView;
}
imageView.setImageResource(mImageIds[position]);
if(position < 65)
    imageView.setTag("["+position+"]");
else if(position < 100)
    imageView.setTag("["+(position+1)+"]");
else
    imageView.setTag("["+(position+2)+"]");
return imageView;
}
}
Õ»╣õĖŖķØóGridViewFaceAdapterń▒╗ńÜäõ╗ŻńĀüÕüÜõĖŗĶ»┤µśÄ’╝Ü
1.µłæÕ░åµēƵ£ēńÜäĶĪ©µāģÕøŠńēćÕ»╣Õ║öńÜäĶĄäµ║ÉID’╝īńö©õĖĆõĖ¬µĢ┤µĢ░µĢ░ń╗äÕ░üĶŻģõ║åŃĆé
2.getViewµ¢╣µ│ĢķćīńÜäõĖŗķØóĶ┐Öµ«Ąõ╗ŻńĀü’╝Ü
imageView.setImageResource(mImageIds[position]);
if(position < 65)
┬Ā┬Ā┬Ā imageView.setTag("["+position+"]");
else if(position < 100)
┬Ā┬Ā┬Ā imageView.setTag("["+(position+1)+"]");
else
┬Ā┬Ā┬Ā imageView.setTag("["+(position+2)+"]");
┬Ā
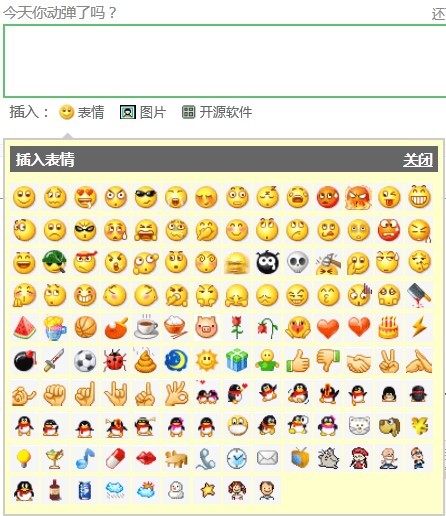
ńö▒õ║ÄÕ«óµłĘń½»ńö©Õł░ĶĪ©µāģÕøŠńēć’╝īÕ»╣Õ║öOSCńĮæń½ÖķćīńÜäĶĪ©µāģÕøŠńēćõĖŹµś»Õ«īµĢ┤ńÜä’╝īµēŹÕüÜõ║åõĖŖķØóõ╗ŻńĀüńÜäÕłżµ¢ŁÕżäńÉåŃĆé
OK’╝īÕ░▒Ķ┐Öõ╣łń«ĆÕŹĢŃĆé┬Ā
õĖŗķØóķÖäõĖŖOSC AndroidķĪ╣ńø«µÅÉÕÅ¢ńÜäµ║ÉńĀüÕīģ’╝Ü
 ńé╣Õć╗µŁżÕżä
Õ”éµ×£Õż¦Õ«Čµ£ēõ╗Ćõ╣łń¢æķŚ«ńÜäĶ»Ø’╝īµ¼óĶ┐ÄÕ£©õĖŗķØóÕø×ÕĖ¢õĖĆĶĄĘµÄóĶ«©ŃĆé
PS:
OSC AndroidÕ«óµłĘń½»õĖŗĶĮĮÕ£░ÕØĆ:
http://www.oschina.net/uploads/osc.apk
OSC iPhoneÕ«óµłĘń½»õĖŗĶĮĮÕ£░ÕØĆ:
http://www.oschina.net/uploads/osc.ipa
OSC Windows PhoneÕ«óµłĘń½»õĖŗĶĮĮÕ£░ÕØĆ:
http://www.oschina.net/uploads/osc.xap
┬Ā
ĶĮ¼ĶĮĮ’╝Ühttp://www.oschina.net/question/157182_65855
┬Ā
┬Ā


- 2012-08-21 18:36
- µĄÅĶ¦ł 1228
- Ķ»äĶ«║(0)
- Õłåń▒╗:ń¦╗ÕŖ©Õ╝ĆÕÅæ
- µ¤źń£ŗµø┤ÕżÜ
ÕÅæĶĪ©Ķ»äĶ«║

-
Õ╝Ƶ║ÉõĖŁÕøĮ 4 Õæ©Õ╣┤’╝ī AndroidŃĆüiPhoneŃĆüWP7õĖēõĖ¬Õ╣│ÕÅ░Õ«óµłĘń½»Õģ©ķØóÕ╝Ƶ║É
2012-08-31 10:26 9592008Õ╣┤8µ£ł31µŚź’╝īOSChina┬ĀńĮæń½ÖµŁŻÕ╝ÅõĖŖń║┐’╝īÕł░õ╗ŖÕż®ÕłÜÕźĮ ... -
ŃĆÉOSCµēŗµ£║AppµŖƵ£»Ķ¦Żµ×ÉŃĆæ- AndroidÕ«īÕģ©ķĆĆÕć║ń©ŗÕ║Å
2012-07-23 15:25 689ÕüÜĶ┐ćAndroidÕ╝ĆÕÅæńÜäõ║║ķāĮń¤źķüō’╝īÕ║öńö©ń©ŗÕ║Åńé╣Õć╗Ķ┐öÕø×ķö« µł¢ĶĆģ õ╗Ż ... -
ŃĆÉOSCµēŗµ£║AppµŖƵ£»Ķ¦Żµ×ÉŃĆæ- ÕłŚĶĪ©Õ╝鵣źń║┐ń©ŗÕŖĀĶĮĮÕøŠńēć
2012-07-23 15:16 1129µēŗµ£║Õ«óµłĘń½»õ╗źÕłŚĶĪ©ÕĮóÕ╝ÅÕ▒Ģńż║µĢ░µŹ«µś»ķØ×ÕĖĖÕĖĖĶ¦üńÜäõĖĆń¦Źµ¢╣Õ╝ÅŃĆéńäČĶĆīÕłŚĶĪ©õĖŁĶ”ü ... -
ŃĆÉOSCµēŗµ£║AppµŖƵ£»Ķ¦Żµ×ÉŃĆæ- µ░öµ│ĪÕ»╣Ķ»ØÕłŚĶĪ©
2012-07-18 11:47 881Õ£©OSC ńÜäWindows Phoneõ╗źÕÅŖAndro ... -
ŃĆÉOSCµēŗµ£║AppµŖƵ£»Ķ¦Żµ×ÉŃĆæ- Õ»īµ¢ćµ£¼ÕłŚĶĪ©ńÜäÕ▒Ģńż║
2012-07-18 11:38 920Õż¦Õ«ČķāĮń¤źķüōOSC ńÜäńĮæķĪĄÕŖ©µĆüµśŠńż║µś»ķ£ĆĶ”üÕżÜń¦Źķó£Ķē▓ńÜäµēŹĶāĮĶŠŠÕł░ķ£ĆĶ”ü ... -
ŃĆÉOSCµēŗµ£║AppµŖƵ£»Ķ¦Żµ×ÉŃĆæ- ńö©µłĘķĆÜń¤ź
2012-07-11 16:31 663Õż¦Õ«ČÕ£©õĮ┐ńö©OSCńÜäµēŗµ£║Õ«óµłĘń½»ńÜäĶ┐ćń©ŗõĖŁ’╝īÕŠłÕÅ»ĶāĮõ╣¤õ╝ܵöČÕł░µØźĶ欵£Ź ... -
ŃĆÉOSCµēŗµ£║AppµŖƵ£»Ķ¦Żµ×ÉŃĆæ- ķøåµłÉµ¢░µĄ¬ÕŠ«ÕŹÜAndroid SDK
2012-07-10 15:02 1147õĮ┐ńö© OSChina.NET Androidń ... -
ŃĆÉOSCµēŗµ£║AppµŖƵ£»Ķ¦Żµ×ÉŃĆæ- Õ£©WebViewõĖŁń╗äĶŻģHTML
2012-07-10 13:30 912õĖŖõĖĆń»ćµłæõ╗¼õ╗ŗń╗Źõ║å OSChin ... -
ŃĆÉOSCµēŗµ£║AppµŖƵ£»Ķ¦Żµ×ÉŃĆæ- Õ║öńö©ÕåģWebķōŠµÄźńÜäÕżäńÉå
2012-07-08 16:29 674Õ£©OSChina.NETµēŗµ£║Õ«óµłĘń½»õĖŖµśŠńż║ĶĄäĶ«»’╝īµ£ĆÕźĮńÜäµ¢╣µĪłÕ░▒µś»ńö© ...
ńøĖÕģ│µÄ©ĶŹÉ
Gnome-OSC-HS--2-themes’╝īÕīģÕɽGnome-OSC-HS-(transparent)ÕÆīGnome-OSC-HS-(transparent)’╝īńö©õ║ÄUbuntu 18.04’╝īõ╗┐macķŻÄµĀ╝’╝īńø┤µÄźµöŠÕģź/usr/share/themesõĖŗÕ░▒ÕÅ»õ╗źõ║åõĮ┐ńö©
Õ«śµ¢╣ń”╗ń║┐Õ«ēĶŻģÕīģ’╝īõ║▓µĄŗÕÅ»ńö©
OSCµī»ĶŹĪÕÖ©µ£ēµ║ɵŚĀµ║ɵÖČõĮōµÖȵī»ADÕ░üĶŻģÕ║ōAltiumÕ░üĶŻģÕ║ōõĖēń╗┤Ķ¦åÕøŠPCBÕ░üĶŻģÕ║ō(3DÕ░üĶŻģÕ║ō),52õĖ¬Õ░üĶŻģ’╝īPcbLibbÕÉÄń╝Ƶ¢ćõ╗Č’╝īÕ░üĶŻģÕłŚĶĪ©Õ”éõĖŗ’╝Ü Component Count : 52 Component Name ----------------------------------------------- ...
Õ«śµ¢╣ń”╗ń║┐Õ«ēĶŻģÕīģ’╝īµĄŗĶ»ĢÕÅ»ńö©ŃĆéõĮ┐ńö©rpm -ivh [rpmÕ«īµĢ┤ÕīģÕÉŹ] Ķ┐øĶĪīÕ«ēĶŻģ
Gnome-OSC-HS--2-themes.tar.xz ubuntu18.04 õ╗┐ mac õĖ╗ķóś
pythonÕ║ōŃĆé ĶĄäµ║ÉÕģ©ÕÉŹ’╝Üosc-docker-builder-1.7.tar.gz
Õ«śµ¢╣ń”╗ń║┐Õ«ēĶŻģÕīģ’╝īµĄŗĶ»ĢÕÅ»ńö©ŃĆéõĮ┐ńö©rpm -ivh [rpmÕ«īµĢ┤ÕīģÕÉŹ] Ķ┐øĶĪīÕ«ēĶŻģ
pythonÕ║ōŃĆé ĶĄäµ║ÉÕģ©ÕÉŹ’╝Üosc-placement-1.5.0.tar.gz
OSC 455E-LI OSC 455E-WI OSC 1612-4P OSC 2025-4P OSC 3215-2P OSC 3225-4P OSC 4025-4P OSC 5032-2P OSC 5032-4P OSC 6035-2P OSC 6035-4P OSC 7050-2P OSC 7050-4P OSC 8045-2P OSC 8045-4P OSC 8045-4P-C OSC HC...
OSC 455E-LI OSC 455E-WI OSC 1612-4P OSC 2025-4P OSC 3215-2P OSC 3225-4P OSC 4025-4P OSC 5032-2P OSC 5032-4P OSC 6035-2P OSC 6035-4P OSC 7050-2P OSC 7050-4P OSC 8045-2P OSC 8045-4P OSC 8045-4P-C OSC HC...
OSC 455E-LI OSC 455E-WI OSC 1612-4P OSC 2025-4P OSC 3215-2P OSC 3225-4P OSC 4025-4P OSC 5032-2P OSC 5032-4P OSC 6035-2P OSC 6035-4P OSC 7050-2P OSC 7050-4P OSC 8045-2P OSC 8045-4P OSC 8045-4P-C OSC HC...
Õ«śµ¢╣ń”╗ń║┐Õ«ēĶŻģÕīģ’╝īµĄŗĶ»ĢÕÅ»ńö©ŃĆéõĮ┐ńö©rpm -ivh [rpmÕ«īµĢ┤ÕīģÕÉŹ] Ķ┐øĶĪīÕ«ēĶŻģ
ń”╗ń║┐Õ«ēĶŻģÕīģ’╝īõ║▓µĄŗÕÅ»ńö©
Õ«śµ¢╣ń”╗ń║┐Õ«ēĶŻģÕīģ’╝īµĄŗĶ»ĢÕÅ»ńö©ŃĆéõĮ┐ńö©rpm -ivh [rpmÕ«īµĢ┤ÕīģÕÉŹ] Ķ┐øĶĪīÕ«ēĶŻģ
Õ«śµ¢╣ń”╗ń║┐Õ«ēĶŻģÕīģ’╝īµĄŗĶ»ĢÕÅ»ńö©ŃĆéõĮ┐ńö©rpm -ivh [rpmÕ«īµĢ┤ÕīģÕÉŹ] Ķ┐øĶĪīÕ«ēĶŻģ
Õ«śµ¢╣ń”╗ń║┐Õ«ēĶŻģÕīģ’╝īµĄŗĶ»ĢÕÅ»ńö©ŃĆéõĮ┐ńö©rpm -ivh [rpmÕ«īµĢ┤ÕīģÕÉŹ] Ķ┐øĶĪīÕ«ēĶŻģ
Used to demonstrate best practices for managing back-office systems
Õ«śµ¢╣ń”╗ń║┐Õ«ēĶŻģÕīģ’╝īµĄŗĶ»ĢÕÅ»ńö©ŃĆéõĮ┐ńö©rpm -ivh [rpmÕ«īµĢ┤ÕīģÕÉŹ] Ķ┐øĶĪīÕ«ēĶŻģ
Õ«śµ¢╣ń”╗ń║┐Õ«ēĶŻģÕīģ’╝īµĄŗĶ»ĢÕÅ»ńö©ŃĆéõĮ┐ńö©rpm -ivh [rpmÕ«īµĢ┤ÕīģÕÉŹ] Ķ┐øĶĪīÕ«ēĶŻģ
Õ«śµ¢╣ń”╗ń║┐Õ«ēĶŻģÕīģ’╝īµĄŗĶ»ĢÕÅ»ńö©ŃĆéõĮ┐ńö©rpm -ivh [rpmÕ«īµĢ┤ÕīģÕÉŹ] Ķ┐øĶĪīÕ«ēĶŻģ