本文为原创,如需转载,请注明作者和出处,谢谢!
HTML标签库中的标签基本上都是和HTML Tag一一对应的。但我们经常使用的主要是<html:form>标签及其子标签。因此,在本文将介绍一下<html:form>及其常用子标签的用法。
一、HTML标签库中的常用标签
1. <html:form>标签
<html:form>标签对应于HTML<form>标签。用于向服务端提交用户输入信
息。<html:form>标签和HTML<form>标签在使用方法上基本相同,但它们的一个重要的区别
是<html:form>标签的action属性值所指的Struts动作在struts-config.xml中必须正确配置,否
则<html:form>标签会因为未找到Struts动作而抛出异常,从页使JSP页面无法正常运行,而HTML<form>
无论action属性的值所指的URL是否正确(或Struts动作是否在struts-config.xml中正确配置),都会正常显
示。<html:form>标签的基本用法如下:
<!--<br />
<br />
Code highlighting produced by Actipro CodeHighlighter (freeware)<br />
http://www.CodeHighlighter.com/<br />
<br />
--><html:formaction="Struts动作"method="get/post">
2. <html:text>标签
<html:text>标签是最常用的HTML标签,它对应于type属性值为“text”的HTML<input>标签。每一
个和HTML
Tags对应的HTML标签都有一个property属性,<html:text>标签也不例外。这个属性用于和ActionForm的子类
对象实例绑定,也就是说,property属性的值必须和ActionForm子类中相应的属性拥有同样的名子。如果property属性的值在
ActionForm子类中未找到相应的属性名,该HTML标签就会由于抛出异常而使JSP页面无法正常显示。<html:text>标签的
基本用法如下:
<!--<br />
<br />
Code highlighting produced by Actipro CodeHighlighter (freeware)<br />
http://www.CodeHighlighter.com/<br />
<br />
--><html:textproperty="name"/>
<html:text>标签的其他属性(如size属性)和<input type=”text” ... />标签的相应属性使用方法完全一致。
3.<html:radio>标签
<html:radio>标签对应于type属性值为“radio”的HTML<input>标签。如果ActionForm子类的某个属性有多个可枚举的选择值(如性别为“男”、“女”),就可以使用<html:radio>来采集用户的输入信息。每一个可能的值对应一个<html:radio>标签,如性别选项对应两个<html:radio>标签,代码如下:
<!--<br />
<br />
Code highlighting produced by Actipro CodeHighlighter (freeware)<br />
http://www.CodeHighlighter.com/<br />
<br />
-->男<html:radioproperty="sex"value="1"/>
女<html:radioproperty="sex"value="2"/>
其中两个<html:radio>标签中的property属性值必须都为“sex”,每个value表示选中当前选项后,提交给服务端的值,也就是通过ActionForm的子类实例对象的相应属性可以获得的值。
4.<html:checkbox>标签
<html:checkbox>标签对应于type属性值为“checkbox”的HTML<input>标签。<html:checkbox>标签的基本用法如下:
<!--<br />
<br />
Code highlighting produced by Actipro CodeHighlighter (freeware)<br />
http://www.CodeHighlighter.com/<br />
<br />
--><html:checkboxproperty="student"value="true"/>
其中value属性表示当勾选这个复选框时提交给服务端的值。
5. <html:multibox>标签
<html:multibox>标签实际上也对应于type属性值为“checkbox”的HTML<input>标签。
但<html:multibox>和<html:checkbox>在映射到ActionForm子类实例对象的相应属性的映射
方式不同。所有property属性值相同的<html:multibox>标签被映射到同一个property所指的属性中,并且这个属性
是一个数组类型。而<html:checkbox>标签只对应了一个值。<html:multibox>标签的基本用法如下:
<!--<br />
<br />
Code highlighting produced by Actipro CodeHighlighter (freeware)<br />
http://www.CodeHighlighter.com/<br />
<br />
-->上网<html:multiboxproperty="hobbies"value="上网"/>
旅游<html:multiboxproperty="hobbies"value="旅游"/>
足球<html:multiboxproperty="hobbies"value="足球"/>
围棋<html:multiboxproperty="hobbies"value="围棋"/>
其中value属性表示选中当前复选框的返回值。
6.<html:select>和<html:option>标签
<html:select>和<html:option>组合对应了HTML中的<select>和<option>组合。这两个标签的基本用法如下:
<!--<br />
<br />
Code highlighting produced by Actipro CodeHighlighter (freeware)<br />
http://www.CodeHighlighter.com/<br />
<br />
--><html:selectproperty="work">
<html:optionvalue="软件工程师"/>
<html:optionvalue="软件测试工程师"/>
<html:optionvalue="项目经理"/>
<html:optionvalue="高级顾问"/>
<html:optionvalue="其他"/>
</html:select>
其中value属性表示在下拉列表框中选择某一项时向服务端提交的值。
7. <html:submit>和<html:reset>标签
这两个HTML标签分别对应了type为“submit”和“reset”的HTML<input>标签。它们的基本用法如下:
<!--<br />
<br />
Code highlighting produced by Actipro CodeHighlighter (freeware)<br />
http://www.CodeHighlighter.com/<br />
<br />
--><html:submitvalue="提交"/>
<html:resetvalue="重置"/>
其中value属性表示在按钮上显示的信息。
8..其他的HTML标签
在HTML标签库中还有很多其他的标签。关于这些标签的详细信息读者可以参阅Struts的官方网站,URL如下:
http://struts.apache.org/1.2.9/userGuide/struts-html.html
二、HTML标签库演示实例
在本文给出了一个完整的例子来演示如何通过HTML标签来展现用户界面,以及如何从由HTML标签生成的界面中获取用户提交的信息。实现这个例子需要如下四步:
【第1步】建立使用HTML标签的JSP页面
在<samples工程目录>中建立一个htmlTags.jsp文件,并输入如下的内容:
<!--<br />
<br />
Code highlighting produced by Actipro CodeHighlighter (freeware)<br />
http://www.CodeHighlighter.com/<br />
<br />
--><%@pagepageEncoding="GBK"%>
<%@tagliburi="http://struts.apache.org/tags-html"prefix="html"%>
<html>
<head>
<title>HTML标签库演示</title>
</head>
<body>
<html:formaction="htmlTags"method="post">
姓名:<html:textproperty="name"/><p/>
性别:男<html:radioproperty="sex"value="1"/>
女<html:radioproperty="sex"value="2"/><p/>
学生:<html:checkboxproperty="student"value="true"/><p/>
爱好:上网<html:multiboxproperty="hobbies"value="上网"/>
旅游<html:multiboxproperty="hobbies"value="旅游"/>
足球<html:multiboxproperty="hobbies"value="足球"/>
围棋<html:multiboxproperty="hobbies"value="围棋"/><p/>
职业:
<html:selectproperty="work">
<html:optionvalue=""/>
<html:optionvalue="软件工程师"/>
<html:optionvalue="软件测试工程师"/>
<html:optionvalue="项目经理"/>
<html:optionvalue="高级顾问"/>
<html:optionvalue="其他"/>
</html:select>
<p/>
<html:submitvalue="提交"/> <html:resetvalue="重置"/>
</html:form>
</body>
</html>
现在htmlTags.jsp还运行不了,因为htmlTags动作并没有在struts-config.xml中配置。下面我们先在struts-config.xml中配置一下这个htmlTags动作和相应的ActionForm的子类。
【第2步】配置ActionForm子类和htmlTags动作
打开struts-config.xml,在<form-beans>中加入如下的<form-bean>标签:
<!--<br />
<br />
Code highlighting produced by Actipro CodeHighlighter (freeware)<br />
http://www.CodeHighlighter.com/<br />
<br />
--><form-beanname="htmlTagsForm"type="actionform.HtmlTagsForm"/>
然后在<action-mappings>中加入如下的<action>标签:
<!--<br />
<br />
Code highlighting produced by Actipro CodeHighlighter (freeware)<br />
http://www.CodeHighlighter.com/<br />
<br />
--><actionname="htmlTagsForm"path="/htmlTags"scope="request" type="action.HtmlTagsAction"/>
我们从上面两段配置代码可以看出,ActionForm的子类为HtmlTagsForm,动作类为HtmlTagsAction,下面我们就来建立这两个类。
【第3步】实现HtmlTagsForm类
在本例中,HtmlTagsForm类只含有用于接收用户提交的信息的属性,除此之外,并未在这个类中做其他的事(如验证数据)。在<samples工程目录>"src" actionform目录中建立一个HtmlTagsForm.java文件,并输入如下的代码:
<!--<br />
<br />
Code highlighting produced by Actipro CodeHighlighter (freeware)<br />
http://www.CodeHighlighter.com/<br />
<br />
-->packageactionform;
importorg.apache.struts.action.*;
publicclassHtmlTagsFormextendsActionForm
{
privateStringname;
privateStringsex;
privateBooleanstudent;
privateString[]hobbies;
privateStringwork;
publicStringgetWork()
{
returnwork;
}
publicvoidsetWork(Stringwork)
{
this.work=work;
}
publicString[]getHobbies()
{
returnhobbies;
}
publicvoidsetHobbies(String[]hobbies)
{
this.hobbies=hobbies;
}
publicStringgetName()
{
returnname;
}
publicStringgetSex()
{
returnsex;
}
publicvoidsetSex(Stringsex)
{
this.sex=sex;
}
publicvoidsetName(Stringname)
{
this.name=name;
}
publicBooleangetStudent()
{
returnstudent;
}
publicvoidsetStudent(Booleanstudent)
{
this.student=student;
}
}
【第4步】建立HtmlTagsAction类
HtmlTagsAction类的主要功能是通过HtmlTagsForm类的实例对象读取用户提交的信息,并将它们输出的客户端浏览器。在<samples工程目录>"src"action目录中建立一个HtmlTagsAction.java文件,并输入如下的代码。
<!--<br />
<br />
Code highlighting produced by Actipro CodeHighlighter (freeware)<br />
http://www.CodeHighlighter.com/<br />
<br />
-->packageaction;
importjavax.servlet.http.*;
importorg.apache.struts.action.*;
importjava.io.*;
importactionform.HtmlTagsForm;
publicclassHtmlTagsActionextendsAction
{
publicActionForwardexecute(ActionMappingmapping,ActionFormform,
HttpServletRequestrequest,HttpServletResponseresponse)
{
HtmlTagsFormhtForm=(HtmlTagsForm)form;
try
{
response.setCharacterEncoding("GB2312");
PrintWriterout=response.getWriter();
out.println("姓名:"+htForm.getName()+"<p/>");
if(htForm.getSex()!=null)
out.println("性别:"+(htForm.getSex().equals("1")?"男":"女")+"<p/>");
out.println("学生:"+(htForm.getStudent()==null?"否":"是")+"<p/>");
if(htForm.getHobbies()!=null)
{
out.println("爱好:");
for(Stringhobby:htForm.getHobbies())
out.println(hobby+"");
out.println("<p/>");
}
if(htForm.getWork()!=null)
out.println("职业:"+htForm.getWork());
}
catch(Exceptione)
{
}
returnnull;
}
}
启动Tomcat,并在IE中输入如下的URL:
http://localhost:8080/samples/htmlTags.jsp
在出现用户界面后,输入如图1所示的信息。
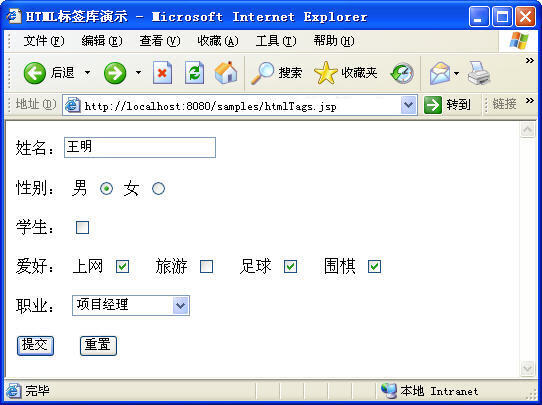
图1
在点击“提交”按钮后,将显示如图2所示的页面。

图2
分享到:


相关推荐
struts1.x入门教程
适用于Struts1.x初学者(网摘共25节)
Struts1.x HTML标签库,好多标签用法介绍
Struts1.x常用的开发包,需要学习struts1.x朋友可以下载
struts1.x和struts2.x区别
无C:\Users\toshiba\Desktop\Struts标签库.doc
freemarker与struts 1.x 结合,生成html 在http://blog.csdn.net/chen1255 的web中有详细描述关于freemarker与struts1.x的结合
Struts1.x的标签库使用示例,详细教程参考我的Blog:http://blog.csdn.net/boyazuo
Struts1.x的登录示例,Struts1.x相关详细教程参考我的Blog:http://blog.csdn.net/boyazuo
这是struts1.x标签! struts1.x是历经考验的成熟的框架! 此标签可以帮助你更好的学习struts1.x的标签!
在这里,通过一个小例子稍微总结了下struts1和struts2的区别,希望这个能帮助到初学struts的朋友
文章来自:http://www.blogjava.net/nokiaguy/
java Struts 1.x 框架 Web 开发 java Struts 1.x 框架 Web 开发
Struts 2.x权威指南(第3版)
struts标签库struts标签库struts标签库struts标签库struts标签库struts标签库struts标签库struts标签库
Struts1.x入门与提高系列教程.pdf 很好用的,拿来与大家分享
struts1.x多文件上传, 感觉不错.
struts1.x apps 所有最新的Struts1.x项目应用 struts1.x apps 所有最新的Struts1.x项目应用 欢迎大家下载。。。
IBMStruts2培训PPT (大全集) ...第五章:struts2标签库.ppt 第六章:struts2国际化.ppt 第七章:Struts2验证机制.ppt 第八章:struts2文件上传下载.ppt 第九章:struts2拦截器.ppt + Struts2开发详解.ppt
Struts1.x系列教程(1)文件乱码问题的解决.doc )