
иљђиљљиЗ™пЉЪSSH2 Step by Step- Step 4 - Struts2гАБSpringеТМHibernateзЪДжХіеРИ
 
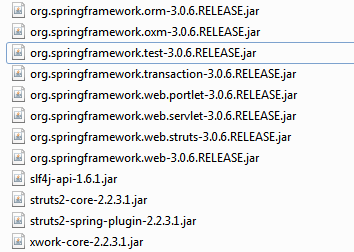
жКШиЕЊдЇЖе•љеdž姩пЉМзїИдЇОжККSSH2зЪДж°ЖжЮґжР≠иµЈжЭ•пЉМжЬЯйЧізїПеОЖзЪДеЕіе•ЛпЉМзЧЫиЛ¶пЉМзКєи±Ђ...жЬАзїИжШѓйҐЖжВЯпЉЪ姙еЃМзЊОзЪДи¶Бж±ВпЉМеЕґеЃЮе∞±жШѓжЛЦеїґ...жЙАдї•еЬ®дї•дЄЛзЪДjarеМЕзЪДйАЙжЛ©дЄКпЉМиЈЯеЙНйЭҐеЗ†зѓЗзЪДеОЯеИЩжЬЙдЇЖеЊИе§ІзЪДеМЇеИЂпЉЪ
- StrutsеМЕдњЭжМБеОЯж†ЈгАВ
- Spring еТМhibernateзЪДеМЕжМЙжЬАе§ІзЪДеѓЉеЕ•пЉМеЫ†дЄЇе∞СдЇЖдЄ™jarжЦЗдїґеѓЉиЗізЪДйФЩиѓѓжЯ•жЙЊпЉМеЃЮеЬ®жШѓињЩ䪧姩жЬАзЧЫиЛ¶зЪДдЇЛжГЕгАВ
- HibernateдїО4.0йЩНеИ∞3.6.8пЉМеОЯеЫ†жШѓHibernate4жФєеПШ姙姲пЉМжИСеПИдЄНжГ≥еЬ®жЬЯеИЭзФ®MavenжЭ•жЫіжЦ∞JarеМЕ.
дЄКдЄАзѓЗдЄ≠жПРеИ∞жАОдєИжХіеРИStruts2еТМhibernateпЉМжО•дЄЛжЭ•пЉМеИ∞дЇЖжЬАжЬАжЬАеЕ≥йФЃзЪДжЧґеИїпЉМи¶БжККSpringиЮНеРИињЫжЭ•...
SpringеЬ®MVCдЄ≠зЪДдљЬзФ®еЇФиѓ•жШѓCзЪДеКЯиГљпЉМжПРдЊЫдЇЖдЄАдЄ™еѓєи±°зЪДеЃєеЩ®...
и®АељТж≠£дЉ†. жИСдїђйЬАи¶БеЉАеІЛеЉХеЕ•еЗ†дЄ™SpringзЪДеМЕ.
1. дЄЛиљљHibernate3.6.8зЪДеМЕпЉМиІ£еОЛеРОcopy requredзЫЃељХдЄЛзЪДжЙАжЬЙзЪДжЦЗдїґеИ∞libзЫЃељХдЄЛпЉМж≥®жДПињЩйЗМжЬЙдЄАдЄ™antlr2.7.7.jarзЪДпЉМ и¶БжЫњжНҐжОЙеОЯеЕИstrutsеЉХеЕ•зЪДйВ£дЄ™дљОзЙИжЬђпЉИ2.7.2)зЪДjarжЦЗдїґгАВдњЭйЩ©дЄАзВєжККjpaзЫЃељХдЄЛзЪДйВ£дЄ™jpaзЪДjarеМЕдєЯcopy(hibernate-jpa-2.0-api-1.0.1.Final.jar)
2.¬†¬†еѓЉеЕ•struts2-spring-plugin-2.2.3.1.jar ¬†(ињЩдЄ™еЬ®Struts2зЪДеМЕйЗМйЭҐжЙЊпЉЙпЉМcopyеИ∞WEB-INF/libзЫЃељХдЄЛ
3. еѓЉеЕ•SpringзЪДдЄАдЇЫJarеМЕ пЉЪ еѓЉеЕ•spring зЪДdist зЫЃељХдЄЛзЪДжЙАжЬЙзЪДjarжЦЗдїґ
 
жО•дЄЛжЭ•жИСдїђжѓФиЊГдЄАдЄЛеК†еЕ•SpringжЬЙдїАдєИеПШеМЦпЉЪ
- йЕНзљЃweb.xml, -- дЄАдЇЫStrutsеТМSpringзЪДеРѓеК®й°єдЉЪеЬ®ињЩйЗМйЕНзљЃ¬†
- йЕНзљЃApplicationContext.xml -- еИ†йЩ§hibernate.cfg.xml, е∞ЖйЕНзљЃжМ™еИ∞ињЩйЗМжЭ•еБЪпЉИеҐЮеК†SessionFactoryеТМdataSourceзЪДиЃЊзљЃпЉЙпЉМдєЯе∞±жШѓзФ±SpringжЭ•жО•зЃ°
- еҐЮеК†POJOз±їеТМHibernateзЪДORMжШ†е∞ДжЦЗдїґпЉИxxx.hbm.xml) ¬†-- дЄ™дЇЇеїЇиЃЃпЉМе¶ВжЮЬTableйЧізЪДеЕ≥з≥їжѓФиЊГзЃАеНХпЉМзФ®annotationжЭ•йБњеЕНйЗНе§НзїіжК§ORMжШ†е∞ДжЦЗдїґ. дљЖжШѓињЩйЗМињШжШѓжМЙзЕІдЉ†зїЯзЪДеБЪж≥ХгАВ
- зЉЦеЖЩDAOжО•еП£еТМDAOеЃЮзО∞з±ї -- е∞ЖжО•еП£еТМеЃЮзО∞з±їеИЖз¶їзЪДе•ље§Де∞±дЄНзФ®жИСиЃ≤дЇЖпЉМпЉИOOиЃЊиЃ°еОЯеИЩпЉЪе∞Жз±їзЪДи°МдЄЇеТМеЃЮзО∞еИЖз¶їпЉМйЭҐеРСжО•еП£зЉЦз®ЛпЉЙ
- е∞ЖDAOзЪДеЃЮзО∞з±їзЪДйЕНзљЃеҐЮеК†еИ∞ApplicationContext.xmlдЄ≠ -- ж≥®жДПпЉМApplicationдЄ≠зЪДBeanйГљжШѓclassпЉМиАМдЄНжШѓinterface.
- еҐЮеК†дЄЪеК°з±їжО•еП£еТМеЃЮзО∞з±ї -- пЉИдЄ™дЇЇзРЖиІ£пЉЪDAOз±їеП™еѓєеЇФдЄАдЄ™TableпЉМдљЖжШѓдЄЪеК°з±їеѓєеЇФзЪДеПѓиГљжШѓдЄАдЄ™дЄЪеК°жµБз®Л...搥ињОжЙФз†ЦпЉЙ
- еҐЮеК†ClientзЂѓJspй°µйЭҐ
- еҐЮеК†Actionз±їпЉМе∞ЖjspзЪДиѓЈж±ВиљђеПСзїЩдЄЪеК°е§ДзРЖз±їпЉИеЕґеЃЮињЩйЗМжШѓиљђзїЩдЄЪеК°жО•еП£з±їпЉЙ
- дњЃжФєstruts.xml, еҐЮеК†actionзЪДи∞ГзФ®пЉМињЩйЗМзФ®дЇЖstrutsзЪДдЉ™и∞ГзФ®пЉМеЃЮйЩЕдЄКactionзЪДиѓЈж±ВеТМиљђеПСзФ±springжО•зЃ°дЇЖ --- пЉИstruts2-spring-plugin-2.2.3.1.jar ¬†пЉЙдЉЪеє≤ињЩдЄ™жіїгАВ
- дњЃжФєapplicationContext.xml, еҐЮеК†action bean
й©ђдЄКеЉАеІЛпЉЪ
1. еЕИжККйЬАи¶БзЪДjarеМЕеИЧдЄАдЄЛ:
2. web.xmlжЦЗдїґзЪДйЕНзљЃпЉМеҐЮеК†struts2еТМspringзЪДеРѓеК®й°є
- <?xml version="1.0" encoding="UTF-8"?>  
- <web-app   
-         xmlns:xsi="http://www.w3.org/2001/XMLSchema-instance"   
-         xmlns="http://java.sun.com/xml/ns/javaee"   
-         xmlns:web="http://java.sun.com/xml/ns/javaee/web-app_2_5.xsd"   
-         xsi:schemaLocation="http://java.sun.com/xml/ns/javaee http://java.sun.com/xml/ns/javaee/web-app_2_5.xsd"   
-         id="WebApp_ID" version="2.5">  
-       
-     <!-- Spring configuration -->  
-     <context-param>  
-         <param-name>contextConfigLocation</param-name>  
-         <param-value>classpath:applicationContext*.xml</param-value>  
-     </context-param>  
-     <listener>  
-         <listener-class>org.springframework.web.context.ContextLoaderListener</listener-class>  
-     </listener>  
-       
-     <!-- Struts2 configuration -->  
-     <filter>   
-          <filter-name>struts2</filter-name>   
-          <filter-class>org.apache.struts2.dispatcher.ng.filter.StrutsPrepareAndExecuteFilter</filter-class>   
-      </filter>   
-      <filter-mapping>   
-          <filter-name>struts2</filter-name>   
-          <url-pattern>/*</url-pattern>   
-      </filter-mapping>   
-        
- </web-app>  
3.¬†йЕНзљЃApplicationContext.xml -- еИ†йЩ§hibernate.cfg.xml, е∞ЖйЕНзљЃжМ™еИ∞ињЩйЗМжЭ•еБЪпЉИеҐЮеК†SessionFactoryеТМdataSourceзЪДиЃЊзљЃпЉЙпЉМдєЯе∞±жШѓзФ±SpringжЭ•жО•зЃ°пЉМиѓ•жЦЗдїґжФЊеЬ®srcзЫЃељХдЄЛпЉЪ
ж≥®жДПињЩйЗМжИСе∞ЖдЄАдЄ™applicationContext.xmlеИЖжИРдЇЖ3йГ®еИЖпЉМ
 
- жХ∞жНЃеЇУзЪДињЮжО•дЄ≤еНХзЛђжФЊдЄАдЄ™жЦЗдїґпЉИdataSource.properties)
- еє≥жЧґдЄНе§ІдЉЪеК®зЪДжХ∞жНЃеЇУйЕНзљЃжФЊеИ∞database.xmlдЄ≠
- applicationContext.xmlдЉЪеѓЉеЕ•дЄКйЭҐзЪДеЖЕеЃєпЉМжИСдїђеПѓдї•йЫЖдЄ≠еЬ®beanзЪДиЃЊзљЃдЄК
applicationContext.xml
- <?xml version="1.0" encoding="UTF-8"?>  
- <beans xmlns="http://www.springframework.org/schema/beans"  
- xmlns:xsi="http://www.w3.org/2001/XMLSchema-instance" xmlns:context="http://www.springframework.org/schema/context"  
- xmlns:aop="http://www.springframework.org/schema/aop"  
- xmlns:tx="http://www.springframework.org/schema/tx"  
- xsi:schemaLocation="http://www.springframework.org/schema/beans  
-            http://www.springframework.org/schema/beans/spring-beans-2.5.xsd  
-            http://www.springframework.org/schema/aop   
-            http://www.springframework.org/schema/aop/spring-aop-2.5.xsd  
-            http://www.springframework.org/schema/context  
-            http://www.springframework.org/schema/context/spring-context-2.5.xsd    
-            http://www.springframework.org/schema/tx   
-            http://www.springframework.org/schema/tx/spring-tx-2.5.xsd">  
-   
-     <!-- Hibernate configuration -->  
-     <import resource="classpath:database.xml"/>  
-       
- </beans>  
database.xml
- <?xml version="1.0" encoding="UTF-8"?>  
- <beans xmlns="http://www.springframework.org/schema/beans"  
- xmlns:xsi="http://www.w3.org/2001/XMLSchema-instance" xmlns:context="http://www.springframework.org/schema/context"  
- xmlns:aop="http://www.springframework.org/schema/aop"  
- xmlns:tx="http://www.springframework.org/schema/tx"  
- xsi:schemaLocation="http://www.springframework.org/schema/beans  
-            http://www.springframework.org/schema/beans/spring-beans-2.5.xsd  
-            http://www.springframework.org/schema/aop   
-            http://www.springframework.org/schema/aop/spring-aop-2.5.xsd  
-            http://www.springframework.org/schema/context  
-            http://www.springframework.org/schema/context/spring-context-2.5.xsd    
-            http://www.springframework.org/schema/tx   
-            http://www.springframework.org/schema/tx/spring-tx-2.5.xsd">  
-       
-     <bean id="configBean" class="org.springframework.beans.factory.config.PropertyPlaceholderConfigurer">  
-         <property name="location">  
-             <value>classpath:dataSource.properties</value>  
-         </property>  
-     </bean>  
-     <bean id="dataSource" class="org.springframework.jdbc.datasource.DriverManagerDataSource">  
-         <property name="driverClassName" value="${dataSource.driverClassName}" />  
-         <property name="url" value="${dataSource.url}" />  
-         <property name="username" value="${dataSource.username}" />  
-         <property name="password" value="${dataSource.password}" />  
-     </bean>  
-     <bean id="sessionFactory" class="org.springframework.orm.hibernate3.LocalSessionFactoryBean">  
-         <property name="dataSource" ref="dataSource" />  
-         <property name="hibernateProperties">  
-             <props>  
-                 <prop key="hibernate.dialect">org.hibernate.dialect.MySQLDialect</prop>  
-                 <prop key="hibernate.show_sql">true</prop>  
-             </props>  
-         </property>  
-         <property name="mappingResources">  
-             <list>  
-                 <value>com/test/bean/User.hbm.xml</value>  
-             </list>  
-         </property>  
-     </bean>  
-   
-       
- </beans>      
dataSource.properties
- dataSource.driverClassName=com.mysql.jdbc.Driver  
- dataSource.url=jdbc:mysql://localhost/test?characterEncoding=utf-8  
- dataSource.username=root  
- dataSource.password=root  
4. еҐЮеК†дЄАдЄ™UserзЪДPOJOз±їеТМHibernateеѓєеЇФзЪДжШ†е∞ДжЦЗдїґ.
- package com.test.bean;  
-   
- public class User {  
-     private Integer id;  
-     public Integer getId() {  
-         return id;  
-     }  
-     public void setId(Integer id) {  
-         this.id = id;  
-     }  
-     private String name;  
-     private String password;  
-     public String getName() {  
-         return name;  
-     }  
-     public void setName(String name) {  
-         this.name = name;  
-     }  
-     public String getPassword() {  
-         return password;  
-     }  
-     public void setPassword(String password) {  
-         this.password = password;  
-     }  
-       
- }  
User.hbm.xml
- <?xml version="1.0"?>    
- <!DOCTYPE hibernate-mapping PUBLIC     
-     "-//Hibernate/Hibernate Mapping DTD 3.0//EN"    
-     "http://hibernate.sourceforge.net/hibernate-mapping-3.0.dtd">    
- <hibernate-mapping>    
-     <class name="com.test.bean.User" table="User" catalog="test">  
-         <id name="id" type="java.lang.Integer">  
-             <column name="id" />  
-             <generator class="native" />  
-         </id>  
-         <property name="name" type="java.lang.String">  
-             <column name="name" length="40" />  
-         </property>  
-         <property name="password" type="java.lang.String">  
-             <column name="password" length="40" />  
-         </property>  
-     </class>  
- </hibernate-mapping>  
5. зЉЦеЖЩDAOжО•еП£еТМDAOеЃЮзО∞
- package com.test.dao;  
-   
- import com.test.bean.User;  
-   
- public interface UserDao {  
-     public User find(String name, String password);  
-     public User find(User user);  
- }  
 
- package com.test.daoImpl;  
-   
- import java.util.List;  
-   
- import org.hibernate.Query;  
- import org.hibernate.Session;  
- import org.hibernate.SessionFactory;  
-   
- import com.test.bean.User;  
- import com.test.dao.UserDao;  
-   
- public class UserDaoImpl implements UserDao {  
-       
-     private SessionFactory sessionFactory;  
-       
-     @Override  
-     public User find(String name, String password) {  
-         Session session = sessionFactory.openSession();  
-         String hql = "FROM User AS u WHERE u.name = :name AND u.password = :password";  
-         Query q = session.createQuery(hql);  
-         q.setString("name", name);  
-         q.setString("password", password);        
-         List<User> list = q.list();  
-         session.close();  
-         if (list.size()==0)  
-             return null;  
-         else  
-             return list.get(0);  
-     }  
-   
-     public SessionFactory getSessionFactory() {  
-         return sessionFactory;  
-     }  
-   
-     public void setSessionFactory(SessionFactory sessionFactory) {  
-         this.sessionFactory = sessionFactory;  
-     }  
-   
-   
-     public User find(User user) {  
-         return find(user.getName(),user.getPassword());  
-     }  
-   
- }  
ж≥®жДПдЄКйЭҐзЪДsessionFactoryжШѓзФ±SpringжЭ•иіЯиі£ж≥®еЕ•еТМзЃ°зРЖзЪДпЉМеЫ†ж≠§дЄАеЃЪи¶БжЬЙдЄАдЄ™setзЪДжЦєж≥ХжЭ•еК†иљљsessionFactoryеѓєи±°гАВ
6, зЉЦеЖЩдЄЪеК°жО•еП£еТМеЃЮзО∞з±ї
UserServiceжО•еП£
- package com.test.service;  
-   
- import com.test.bean.User;  
-   
- public interface UserService {  
-   
-     public boolean isLogin(User user);  
-     public boolean isLogin(String name, String password);  
- }  
UserServiceеЃЮзО∞з±ї
- package com.test.serviceImpl;  
-   
- import com.test.bean.User;  
- import com.test.dao.UserDao;  
- import com.test.service.UserService;  
-   
- public class UserServiceImpl implements UserService {  
-     private UserDao userDao;  
-       
-     public boolean isLogin(User user) {  
-         return isLogin(user.getName(),user.getPassword());  
-     }  
-   
-     public UserDao getUserDao() {  
-         return userDao;  
-     }  
-   
-     public void setUserDao(UserDao userDao) {  
-         this.userDao = userDao;  
-     }  
-   
-     @Override  
-     public boolean isLogin(String name, String password) {  
-         boolean isLogin = false;  
-         try  
-             {  
-             User u = userDao.find(name, password);  
-             if (u != null)  
-                 {  
-                 isLogin = true;  
-                 }  
-             }  
-         catch (Exception e)  
-             {  
-             System.out.println("isLogin error\n" + e.getMessage());  
-             }  
-         return isLogin;  
-     }  
-   
- }  
6. еЬ®applicatonContext.xmlдЄ≠йЕНзљЃbean
- <?xml version="1.0" encoding="UTF-8"?>  
- <beans xmlns="http://www.springframework.org/schema/beans"  
- xmlns:xsi="http://www.w3.org/2001/XMLSchema-instance" xmlns:context="http://www.springframework.org/schema/context"  
- xmlns:aop="http://www.springframework.org/schema/aop"  
- xmlns:tx="http://www.springframework.org/schema/tx"  
- xsi:schemaLocation="http://www.springframework.org/schema/beans  
-            http://www.springframework.org/schema/beans/spring-beans-2.5.xsd  
-            http://www.springframework.org/schema/aop   
-            http://www.springframework.org/schema/aop/spring-aop-2.5.xsd  
-            http://www.springframework.org/schema/context  
-            http://www.springframework.org/schema/context/spring-context-2.5.xsd    
-            http://www.springframework.org/schema/tx   
-            http://www.springframework.org/schema/tx/spring-tx-2.5.xsd">  
-   
-     <!-- Hibernate configuration -->  
-     <import resource="classpath:database.xml"/>  
-       
-     <!-- struts beans -->  
-     <bean id="LoginAction" class="com.test.action.LoginAction" scope="prototype">  
-         <property name="userService" ref="userService" />  
-     </bean>  
-       
-     <bean id="userDao" class="com.test.daoImpl.UserDaoImpl">  
-         <property name="sessionFactory" ref="sessionFactory"></property>  
-     </bean>  
-       
-     <bean id="userService" class="com.test.serviceImpl.UserServiceImpl">  
-         <property name="userDao" ref="userDao"></property>  
-     </bean>  
-   
- </beans>  
7. еҐЮеК†jspй°µйЭҐ
- <%@ page language="java" contentType="text/html; charset=UTF-8" pageEncoding="UTF-8"%>  
- <%@ taglib uri="/struts-tags" prefix="s" %>  
-       
- <%  
- String path = request.getContextPath();  
- String basePath = request.getScheme()+"://"+request.getServerName()+":"+request.getServerPort()+path+"/";  
- %>  
- <!DOCTYPE html PUBLIC "-//W3C//DTD HTML 4.01 Transitional//EN" "http://www.w3.org/TR/html4/loose.dtd">  
- <html>  
- <head>  
-     <base href="<%=basePath%>">  
-     <title><s:text name="home.title" /></title>  
-     <meta http-equiv="Content-Type" content="text/html; charset=UTF-8">  
-     <meta http-equiv="pragma" content="no-cache">  
-     <meta http-equiv="cache-control" content="no-cache">  
-     <meta http-equiv="expires" content="0">      
-     <meta http-equiv="keywords" content="easyTalk">  
-     <meta http-equiv="description" content="This is my page">  
- </head>  
- <body>  
-     <s:form name="loginFrm" action="login">  
-         <s:textfield name="username" key="username"></s:textfield>  
-         <s:textfield name="password" key="password"></s:textfield>  
-         <s:submit label="submit"></s:submit>  
-     </s:form>  
-     <s:actionerror/>  
- </body>  
- </html>  
8. йЕНзљЃstruts.xml, ж≥®жДПињЩйЗМжЬЙдЄ§дЄ™жФєеК®пЉМa. еҐЮеК†дЇЖдЄАдЄ™еЄЄйЗПпЉМе£∞жШОobjectFactoryзФ±SpringжО•зЃ°. b. action зЪДclassе±ЮжАІдЄ≠пЉМзїіжК§зЪДжШѓSpringзЪДbeanеѓєи±°пЉМиАМдЄНжШѓеЕЈдљУзЪДclass.
- <?xml version="1.0" encoding="UTF-8" ?>   
- <!DOCTYPE struts PUBLIC   
-      "-//Apache Software Foundation//DTD Struts Configuration 2.0//EN"   
-      "http://struts.apache.org/dtds/struts-2.0.dtd">   
- <struts>   
-     <constant name="struts.custom.i18n.resources" value="message"></constant>  
-     <constant name="struts.objectFactory" value="spring"></constant>  
-     <constant name="struts.devMode" value="true" />  
-       
-     <package name="struts2" extends="struts-default">  
-         <action name="login" class="LoginAction">  
-             <result name="success" >loginresult.jsp</result>  
-             <result name="input">login.jsp</result>  
-             <result name="error">login.jsp</result>  
-         </action>  
-     </package>  
-       
- </struts>  
9. еҐЮеК†actionз±їпЉМжО•еПЧеЃҐжИЈзЂѓзЪДеУНеЇФ
- package com.test.action;  
-   
- import com.opensymphony.xwork2.ActionContext;  
- import com.opensymphony.xwork2.ActionSupport;  
- import com.test.service.UserService;  
-   
- public class LoginAction extends ActionSupport {  
-   
-         public String username;  
-         public String password;  
-         private UserService userService;  
-           
-         public LoginAction()  
-         {  
-             System.out.println("initialize LoginAction......");  
-         }  
-         public void setUserService(UserService userService)  
-         {  
-             this.userService = userService;  
-         }  
-           
-         public String execute()  
-         {  
-             if (true == this.userService.isLogin(username, password))  
-             {  
-                 ActionContext.getContext().getSession().put("username", username);  
-                 return SUCCESS;  
-             }else{  
-                 super.addActionError(super.getText("loginfailed"));  
-                 return ERROR;  
-             }  
-         }  
-           
-         public void validate()  
-         {  
-             if ((null == username) || (0==username.length()))  
-             {  
-                 super.addActionError(super.getText("warning.empty",new String[] {getText("username")}));  
-             }  
-               
-             if ((null == password) || (0 == password.length()))  
-             {  
-                 super.addActionError(super.getText("warning.empty",new String[] {getText("password")}));  
-                   
-             }  
-         }  
- }  
10. еЬ®applicationContext.xmlдЄ≠еҐЮеК†actionзЪДbeanпЉМиѓЈеПВиАГдЄКйЭҐзЪДxmlжЦЗдїґпЉМињЩйЗМзХ•ињЗгАВ
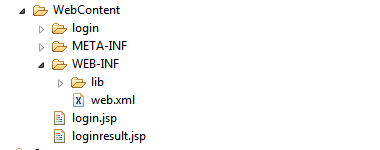
11. жЬАеРОжХідЄ™дї£з†БзЪДжЮґжЮДе¶ВдЄЛпЉЪ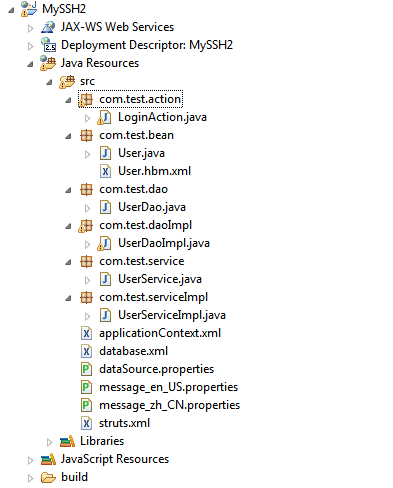
12. жµЛиѓХзЩїељХеКЯиГљ
Login й°µйЭҐпЉЪ
зЩїељХжИРеКЯпЉЪ
з≥їзїЯжЧ•ењЧпЉЪ
жµЛиѓХйАЪињЗ............................................................
12. жАїзїУпЉЪ
- еИЭжЬЯйШґжЃµдЄНи¶БињЗеИЖињљж±ВjarеМЕзЪДжЬАе∞ПйЕНзљЃпЉМеР¶еИЩдЉЪеЗЇзО∞еЊИе§ЪжДПжЦЩдєЛе§ЦзЪДйФЩиѓѓ.
- JarеМЕзЪДзЙИжЬђи¶Бе∞ПењГпЉМжЬАеРОжИСжЧ†е•Ие∞ЖHibernateдїО4.0йЩНеЫЮ3.6.8пЉМ еЫ†дЄЇеЈЃеЉВ姙姲.
- springдЄ≠beanзЪДйЕНзљЃи¶Бе∞ПењГпЉМж≥®еЕ•зЪДжЧґеАЩжШѓеЃЮзО∞з±їпЉМдЄНжШѓжО•еП£пЉМеРНе≠ЧдєЯи¶Бж≥®жДПпЉМproperty nameжШѓеЉХзФ®еѓєи±°зЪДеРНе≠ЧпЉМиАМдЄНжШѓз±їзЪДеРНе≠ЧпЉМињЩйЗМжИСе∞±еРГдЇЖдЄАжђ°дЇПпЉМloginзЪДжЧґеАЩжАОдєИйГљиѓіLoginActionеѓєи±°жЙЊдЄНеИ∞пЉМеЕґеЃЮжШѓйЕНзљЃжЦЗдїґеЖЩеЊЧжЬЙйЧЃйҐШпЉМзїУжЮЬSpringжЧ†ж≥ХзФЯжИРbeanеЃЮдЊЛпЉМињЩдЄ™йФЩиѓѓеЊИеГПStrutsжЧ†ж≥Хи∞ГзФ®SpringзЪДеЃєеЩ®...дљЖжШѓеЕґеЃЮжШѓSpringеЃєеЩ®жЧ†ж≥ХзФЯжИРBeanеѓєи±°гАВ
жЇРдї£з†БеЈ≤дЄКдЉ†пЉМиѓЈзВєеЗїж≠§е§ДдЄЛиљљ
 
¬†дЄНзЫЄеЕ≥йУЊжО•пЉЪhttp://gravehistory-daipeng.rhcloud.com/


зЫЄеЕ≥жО®иНР
s2shжХіеРИеЃЮдЊЛ Struts2.0 Spring2.6 Hibernate3.2 иљђиљљдЇОiteye
иѓ•иµДжЇРжШѓжИСеПВзЕІеИЂдЇЇзЪДеНЪеЃҐжЭ•жР≠еїЇзЪДзОѓеҐГпЉМmyeclipse 10.6+maven3+srping+srpingmvc+hibernate4.1+mysql5.5,еНЪеЃҐеЬ∞еЭАпЉЪhttp://blog.csdn.net/liu1220356497/article/details/47701565пЉМиѓ•еНЪеЃҐжШѓжИСиљђиљљеОЯжЭ•зЪДеНЪеЃҐдЄїзЪДпЉМ...
Spring2.5.3+Struts2.0.11.1+Hibernate3.2.6жХіеРИе§ЗењШ (иљђиљљ)
Struts2гАБHibernateгАБSpringжХіеРИзЪДж≥ЫеЮЛDAO пЉИжЬђдЇЇиѓДдїЈ: дї£з†БеЉАеПСжХИзОЗжПРйЂШ30% дї£з†БеЗЇйФЩзОЗеЗПе∞С70%пЉЙ еѓєдЇОе§Іе§ЪжХ∞еЉАеПСдЇЇеСШпЉМз≥їзїЯдЄ≠зЪДжѓПдЄ™ DAO зЉЦеЖЩеЗ†дєОзЫЄеРМзЪДдї£з†БеИ∞зЫЃеЙНдЄЇж≠ҐеЈ≤зїПжИРдЄЇдЄАзІНдє†жГѓгАВиЩљзДґжЙАжЬЙдЇЇйГље∞ЖињЩзІНйЗНе§Н...
й°єзЫЃжКАжЬѓжЮґжЮД(Spring+SpringMVC+MybatisпЉЙMavenSpringпЉИIOC DI AOP е£∞жШОеЉПдЇЛеК°е§ДзРЖпЉЙSpringMVCпЉИжФѓжМБRestfulй£Ож†ЉпЉЙHibernate ValidatorпЉИеПВжХ∞ж†°й™МпЉЙMybatisпЉИжЬАе∞СйЕНзљЃжЦєж°ИпЉЙshiroжЭГйЩРжОІеИґ,зїУеРИajaxеЃЮзО∞дЇЖеЉВж≠•иЃ§иѓБдЄО...
еЕґеЃЮињШжЬЙжЫізЃАеНХзЪДжЦєж≥ХпЉМиАМдЄФжШѓжЫіе•љзЪДжЦєж≥ХпЉМдљњзФ®еРИзРЖжППињ∞еПВжХ∞еТМSQLиѓ≠еП•ињФеЫЮеАЉзЪДжО•еП£пЉИжѓФе¶ВIUserOperation.classпЉЙпЉМињЩж†ЈзО∞еЬ®е∞±еПѓдї•иЗ≥ж≠§йВ£дЄ™жЫізЃАеНХпЉМжЫіеЃЙеЕ®зЪДдї£з†БпЉМж≤°жЬЙеЃєжШУеПСзФЯзЪДе≠Чзђ¶дЄ≤жЦЗе≠ЧеТМиљђжНҐзЪДйФЩиѓѓ.дЄЛйЭҐжШѓиѓ¶зїЖ...
adminstoreжХіеРИдЇЖspring,hibernate,shiroпЉМdiscoverз≠Йж°ЖжЮґгАВдЄНзФ®жЛЕењГжѓПжђ°йВ£ж†ЈйЇїзГ¶зЪДжЛЈиіЭдЇЖгАВеРОеП∞зЃ°зРЖз≥їзїЯйЫЖжИРж®°жЭњдњЃжФєпЉМиПЬеНХзЃ°зРЖпЉМзФ®жИЈзЃ°зРЖпЉМиІТиЙ≤зЃ°зРЖпЉМеПЛжГЕйУЊжО•пЉМжПТдїґзЃ°зРЖзЃ°зРЖз≠ЙеКЯиГљгАВзЂЩеЬ®еЈ®дЇЇзЪДиВ©иЖАдЄКпЉМиЃ©жИСдїђзЬЛеЊЧ...
жЬђжХЩз®ЛеБЪзЃАеНХзЪДиі¶еПЈж≥®еЖМжЉФз§ЇпЉМжЙАзФ®еЈ•еЕЈпЉЪMyeclipse-6.5гАБStruts-2.2.3гАБHibernate-3.2гАБSpring-2.0гАБMySqlпЉМжЬђжХЩз®ЛеЗЇиЗ™еМЧе§ІйЭТйЄЯжИРйГљйФ¶ж±Яж†°еМЇпЉИеОЯжЦЗйУЊжО•http://www.scbdqn.com/course/netjava/3172.htmlпЉЙпЉМиљђиљљиѓЈ...
жЬђз≥їзїЯйЗЗзФ®зЫЃеЙНjavaзИ±е•љиАЕдЄЪзХМйҐЖеЕИзЪДstruts hibernate spring дЄЙе•Чж°ЖжЮґжХіеРИеЉАеПСзЪДз®ЛеЇПпЉМзХМйЭҐе±ВйЗЗзФ®ajaxжКАжЬѓеЃЮеЃЮзО∞пЉМзЫЃеЙНжЬЙеЕђеПЄеЈ≤зїПдЇ§дїШзїЩеЃҐжИЈж≠£еЄЄдљњзФ®зїіжК§дЄ≠пЉМиѓЈз§ЊеПЛдЄЛиљљеРОеЛњиљђиљљпЉМеП™еПѓзФ®дЇОз†Фз©ґпЉМеХЖдЄЪзФ®йАФиѓЈзїХи°МгАВ...
Struts2гАБHibernateгАБSpringжХіеРИзЪДж≥ЫеЮЛDAO пЉИжЬђдЇЇиѓДдїЈ: дї£з†БеЉАеПСжХИзОЗжПРйЂШ30% дї£з†БеЗЇйФЩзОЗеЗПе∞С70%пЉЙ еѓєдЇОе§Іе§ЪжХ∞еЉАеПСдЇЇеСШпЉМз≥їзїЯдЄ≠зЪДжѓПдЄ™ DAO зЉЦеЖЩеЗ†дєОзЫЄеРМзЪДдї£з†БеИ∞зЫЃеЙНдЄЇж≠ҐеЈ≤зїПжИРдЄЇдЄАзІНдє†жГѓгАВиЩљзДґжЙАжЬЙдЇЇйГље∞ЖињЩзІНйЗНе§Н...