- 浏览: 500092 次
- 性别:

- 来自: 深圳
-

文章分类
最新评论
-
michao:
大哥,还有aperture.exe吗? 发我一份,找不到呀,m ...
使用aperture框架让AS3与C++通信,执行本地代码 -
Aaron-Joe-William:
文件被删除了。下不了。
SQLite 数据库加密的一种解决方案 -
hanmiao:
樓主的文章不就是來自IBM Developers里的http: ...
mina 入门 -
howesen:
断包与粘包问题,需要处理下就好了
mina接收数据不全(2) -
sniciq:
git clone --recursive git://git ...
ESB学习笔记(Spring Integration实战)
不多说,先直接上代码
- public class Student : INotifyPropertyChanged
- {
- public event PropertyChangedEventHandler PropertyChanged; // 这个接口仅包含一个事件而已
- private int id;
- public int Id
- {
- get { return id; }
- set
- {
- id = value;
- if ( this .PropertyChanged != null )
- {
- this .PropertyChanged.Invoke( this , new PropertyChangedEventArgs( "Id" )); // 通知Binding是“Id”这个属性的值改变了
- }
- }
-
}
- }
public class Students : ObservableCollection<Student>
{
}
<Window.Resource>
<local:Students x:Key="Students">
<local:Student Id="111" />
<local:Student Id="222" />
</local:Students>
</Window.Resource>
<ListView ItemsSource="{StaticResource Students}">
<ListView.ItemTemplate>
<DataTemplate>
<TextBox Text="{Binding Path=Id}" />
</DataTemplate>
</ListView.ItemTemplate>
</ListView>
再来看看别人文章,里面有如何分类,排序的方法,仔细看哟!
1 Binding to List Data
前面都是绑定到一个对象,下面我们学习绑定到对象列表的方法。
我们还是先组织要绑定的数据,对象所对应的类还是Person,但新增了一个新类People,该类用来组织Person的列表.代码如下:
using System; using System.Collections.Generic; using System.ComponentModel;//INotifyPropertyChanged namespace SimpleDataBinding { class Person : INotifyPropertyChanged { public event PropertyChangedEventHandler PropertyChanged; protected void Notify(string PropName) { if (this .PropertyChanged != null ) { PropertyChanged(this , new PropertyChangedEventArgs (PropName)); } } public Person() { _Age = 0; _name = "Null" ; this .CurrentDate = DateTime .Now; } private string _name; public string Name { get { return _name; } set { if (value == _name) { return ; } _name = value ;//注意:不能用this.Name来赋值,如果这样形成循环调用,栈溢出 Notify("Name" ); } } private int _Age; public int Age { get { return _Age; } set { if (value == _Age) return ; _Age = value ; Notify("Age" ); } } public DateTime CurrentDate { get ; set ; } } //People类 class People : List <Person > { } } |
注意在同一命名空间下的代码最后添加了Perople类。
我们在UI里显示的XAML如下:
< Window x : Class ="ListDataBinding.BindListDataTest" xmlns ="http://schemas.microsoft.com/winfx/2006/xaml/presentation" xmlns : x ="http://schemas.microsoft.com/winfx/2006/xaml" xmlns : src ="clr-namespace:ListDataBinding" Title ="BindListDataTest" Height ="113" Width ="300"> < Window.Resources > < src : People x : Key ="Family"> < src : Person Name ="Jack" Age ="18"/> < src : Person Name ="Tom" Age ="30"/> < src : Person Name ="Jone" Age ="14"/> < src : Person Name ="Rose" Age ="17"/> < src : Person Name ="Mike" Age ="13"/> </ src : People > </ Window.Resources > < Grid DataContext ="{ StaticResource Family }"> < Grid.RowDefinitions > < RowDefinition /> < RowDefinition /> </ Grid.RowDefinitions > < Grid.ColumnDefinitions > < ColumnDefinition Width ="80"/> < ColumnDefinition Width ="*"/> </ Grid.ColumnDefinitions > < TextBlock Grid.Row ="0" Grid.Column ="0" Text ="Name" TextAlignment ="Center" VerticalAlignment ="Center"/> < TextBlock Grid.Row ="1" Grid.Column ="0" Text ="Age" TextAlignment ="Center" VerticalAlignment ="Center"/> < TextBox Grid.Row ="0" Grid.Column ="1" Name ="txtName" Text ="{ Binding Path =Name}" /> < TextBox Grid.Row ="1" Grid.Column ="1" Name ="txtAge" Text ="{ Binding Path =Age}"/ > </ Grid > </ Window > |
我们发现这样的UI只能显示第一个数据项目,也就是说列表的当前项为0,至于其他的就无法显示出来了。
如果要显示其他的只有可通过如下代码的方式来取(注意:书中代码似乎有问题):
private void btnNext_Click(object sender, RoutedEventArgs e) { People people = (People )this .FindResource("Family" ); txtName.Text = people[1].Name; txtAge.Text = people[1].Age.ToString(); } |
1.1当前项Current Item
取得当前项
可以通过上面的方法取得当前项,当然我们更专业的做法还是使用Collection View
还是代码说明比较简洁:
People people = (People )this .FindResource("Family" ); ICollectionView view = CollectionViewSource .GetDefaultView(people); Person peron = (Person )view.CurrentItem; |
注意:ICollectionView在System.ComponentModel命名空间里。
导航当前项
还是代码来说明更合适点:
private ICollectionView GetView() { People people = (People )this .FindResource("Family" ); ICollectionView view = CollectionViewSource .GetDefaultView(people); return view; } private void btnNext_Click(object sender, RoutedEventArgs e) { ICollectionView view = GetView(); view.MoveCurrentToNext(); if (view.IsCurrentAfterLast) { view.MoveCurrentToLast(); } } private void btnPrior_Click(object sender, RoutedEventArgs e) { ICollectionView view = GetView(); view.MoveCurrentToPrevious(); if (view.IsCurrentBeforeFirst) { view.MoveCurrentToFirst(); } } |
1.2 List Data Targets
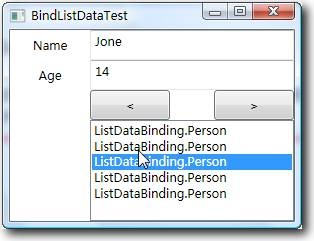
我们将列表数据绑定到类似TextBox这样的控件难以很好地展现列表数据。我们考虑ListBox控件来列举多个数据信息。
<ListBox ItemsSource="{Binding}" IsSynchronizedWithCurrentItem="True"/>
这时的效果如下:列表确实显示了所有对象的信息,因为我们没有设置Path属性,所以采用默认的Convertation来处理,显示对象 类型。同时一定要注意使用IsSynchronizatizedWithCurrentItem=True,这样才能列表信息与其他信息同步。但究竟如何 才能更好地表达我们需要的信息呢,请参看下一节:
1.3 Display Members, Value Members, and Look-Up Bindings
代码示例也许更易理解:
< ListBox Grid.Row ="3" Grid.Column ="1" Name ="lstbox" ItemsSource ="{ Binding }" DisplayMemberPath ="Name" SelectedValuePath ="Age" IsSynchronizedWithCurrentItem ="True"/> < Button Grid.Row ="4" Grid.Column ="0" Name ="btnShowValue" Content ="ShowValue" Click ="btnShowValue_Click" /> |
private void btnShowValue_Click(object sender, RoutedEventArgs e) { MessageBox .Show(lstbox.SelectedValue.ToString()); } |
1.4数据模板Data Templates
这是利用ListBox控件有一个ItemTemplate属性下面,他可以接受一个DataTemplate类实例,
该模板可以重复绑定到ListBox的每一个项目元素,注意DataTemplate只能指定一个孩子节点,所以一般使用容器控件来组织下面的布局。
<
ListBox
Grid.Row
="3"
Grid.Column
="1"
Name
="lstbox"
ItemsSource
="{
Binding
}">
            <
ListBox.ItemTemplate
>
            <
DataTemplate
>
            <
TextBlock
Text
="{
Binding
Path
=Name}">

的年龄是
<
TextBlock
Text
="{
Binding
Path
=Age}"></
TextBlock
>
            </
TextBlock
>
            </
DataTemplate
>
            </
ListBox.ItemTemplate
>
            </
ListBox
>
我本人不赞同书中这样的做法,添加一个StackPanel更舒服点。
|
1.5 列表改变List Changes
当我们改变列表的数据的时候,却出现如下现象:
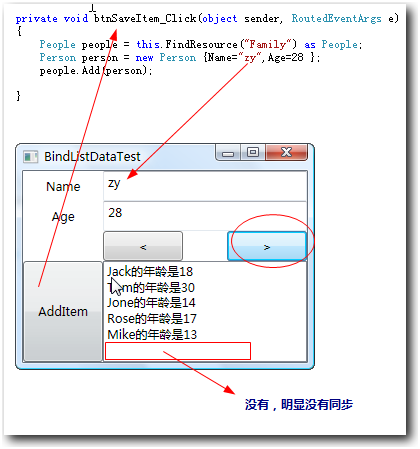
只是因为我们需要绑定的列表需要实现INotifyCollectionChanged接口:
namespace System.Collections.Specialized { public interface INotifyCollectionChanged { event NotifyCollectionChangedEventHandler CollectionChanged; } } |
namespace System.Collections.ObjectModel { public class ObservableCollection <T> : Collection <T>, INotifyCollectionChanged, INotifyPropertyChanged { ... } } |
欢呼雀跃吧,我们改变上面例题的代码,一切如我们想象的美好。
所有的一切就如此简单,简单代码改动:
//People类 class People : ObservableCollection <Person > { } |
![clip_image002[4]](http://images.cnblogs.com/cnblogs_com/NineFlowers/WindowsLiveWriter/BindingtoListData_1312D/clip_image002%5B4%5D.jpg)
1.6 排序Sorting
简单的代码还是足以繁杂的文字,让我们看如下方法:
private void btnSort_Click(object sender, RoutedEventArgs e) { ICollectionView view = GetView(); if (view.SortDescriptions.Count == 0) { view.SortDescriptions.Add(new SortDescription ("Name" , ListSortDirection .Ascending)); view.SortDescriptions.Add(new SortDescription ("Age" , ListSortDirection .Descending)); } else { view.SortDescriptions.Clear(); } } |
当然我们还可以自定义排序方式:
class PersonSorter :IComparer { public int Compare(object x, object y) { Person lhs = (Person )x; Person rhs = (Person )y; // Sort Name ascending and Age descending int nameCompare = lhs.Name.CompareTo(rhs.Name); if (nameCompare != 0) return nameCompare; return rhs.Age - lhs.Age; } } |
注意:WPF不使用System.Collection.Generic命名空间的泛型IComparer接口,而是使用System.Collection的。呵呵。
使用代码如下:
private void btnSort_Click(object sender, RoutedEventArgs e) { ListCollectionView view = (ListCollectionView )GetView(); if (view.CustomSort == null ) { view.CustomSort = new PersonSorter (); } else { view.CustomSort = null ; } } |
注意:ListCollectionView支持自定义和排序,其他的不支持。
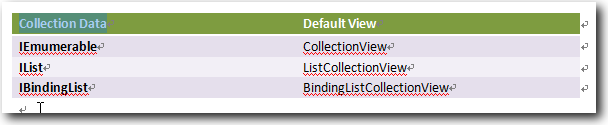
1.7 集合缺省视图类型Default Collection View
1.8 过滤 Filter
依然是我熟悉的表达方式:代码:
private void btnFilter_Click(object sender, RoutedEventArgs e) { ListCollectionView view = (ListCollectionView )GetView(); if (view.Filter == null ) { view.Filter = delegate (object item) { return ((Person )item).Age > 17; }; } else { view.Filter = null ; } } |
1.9 分组Grouping
分组的意思大家很明白就是按照某一个或几个关键属性进行分类。
进行分组很简单和sort类似,只需要以下几行代码:
ICollectionView view = GetView(); if (view.GroupDescriptions.Count == 0) { view.GroupDescriptions.Add(new PropertyGroupDescription ("Age" )); } else { view.GroupDescriptions.Clear(); } |
但这在UI层面并没有任何影响,这需要我们对ItemsControl类的控件(例如ListBox)设置GroupStyle属性,GroupStyle类缺省地提供了一个静态的属性实现,我们可以如下设置:
< ListBox Grid.Row ="3" Grid.Column ="1" Name ="lstbox" ItemsSource ="{ Binding }" IsSynchronizedWithCurrentItem ="True"> < ListBox.GroupStyle > < x : Static Member ="GroupStyle.Default"/> </ ListBox.GroupStyle > < ListBox.ItemTemplate > < DataTemplate > < TextBlock Text ="{ Binding Path =Name}"> 的年龄是 < TextBlock Text ="{ Binding Path =Age}"></ TextBlock > </ TextBlock > </ DataTemplate > </ ListBox.ItemTemplate > </ ListBox > |
但也许这并不是我们所喜欢的界面,简单得让人生厌,还好微软提供了这个对象的一个属性:HeaderTemplate用于定义分组的栏目的外观,微软总是为大家想得那么周到,养活那么多天才是需要钱的,希望大家不要老是讲微软的坏话。
< ListBox.GroupStyle > < GroupStyle > < GroupStyle.HeaderTemplate > < DataTemplate > < StackPanel Background ="Green" Orientation ="Horizontal"> < TextBlock Text ="{ Binding Name }"/> < TextBlock Text ="("/> < TextBlock Text ="{ Binding ItemCount }"/> < TextBlock Text =")"/> </ StackPanel > </ DataTemplate > </ GroupStyle.HeaderTemplate > </ GroupStyle > </ ListBox.GroupStyle > |
有这模板属性一切由你发挥,真是好也,然而即使这样解决了UI问题,但是如果我们还希望更进一步,能否实现范围内分组呢?呵呵,然也:
这时我们不需要去想着如何继承GroupStyle类,而是采用围魏救赵的方式,定义一个IValueConverter,
public class AgeRangeConvert : IValueConverter { public object Convert(object value, Type targetType, object parameter, CultureInfo culture) { int _value = (int )value; if (_value <= 10) return "10岁以下" ; else if (_value <= 20) return "20岁以下" ; else return "20岁以上" ; } public object ConvertBack(object value, Type targetType, object parameter, CultureInfo culture) { throw new NotImplementedException (); } } |
简单调整前面分组代码:
ICollectionView view = GetView(); if (view.GroupDescriptions.Count == 0) { view.GroupDescriptions.Add(new PropertyGroupDescription ("Age" ,new AgeRangeConvert ())); } else { view.GroupDescriptions.Clear(); } |
一切搞定,享受成果吧:

既然GroupDescripions是个集合类型,我们不妨看下面代码究竟是什么效果:
ICollectionView view = GetView(); if (view.GroupDescriptions.Count == 0) { view.GroupDescriptions.Add(new PropertyGroupDescription ("Age" ,new AgeRangeConvert ())); view.GroupDescriptions.Add(new PropertyGroupDescription ("Age" )); } else { view.GroupDescriptions.Clear(); } |
运行如下:
![clip_image002[1]](http://images.cnblogs.com/cnblogs_com/NineFlowers/WindowsLiveWriter/BindingtoListData_1312D/clip_image002%5B1%5D.jpg)
呵呵,这不正是有时你需要的效果吗?至于界面如何优化,模板如何定义更好看我们以后话题再说。


发表评论

-
RichTextBox 添加控件,被禁用如何处理 button
2010-11-01 18:45 1256WPF中RichTextBox的确非 ... -
归纳一下:C#线程同步的几种方法
2010-10-28 11:18 1285我们在编程的时候,有时会使用多线程来解决问题, ... -
关于WPF 数据绑定简单介绍及入门
2010-09-02 20:07 5320今天搞了一下午的数据绑定,由于以前用FLEX的数据绑定很 ... -
何为插件化系统,插件化系统有何优势
2010-08-10 14:28 2309当一个软件项目开� ... -
回调函数原理
2010-08-10 12:04 2181回调函数原理 声明CALLBACK 调用(call ... -
C#制作屏幕保护的方法 函数
2010-08-10 10:16 1433本文介绍使用C#制作屏� ... -
初探C# 异常处理
2010-08-03 10:39 1296一、基础 在C# 里,异 ... -
C#中使用try catch对系统性能的影响和处理机制的学习总结!
2010-08-03 10:31 2806问题1:当一段代码被try� ... -
C# WebClient上传下载时进度条显示,找了好久才找到的哦!
2010-07-23 11:05 76462、代码: using System; using Sys ... -
WinFrom通过WebClient上传下载文件(带进度条)
2010-07-23 10:48 4255(2009-09-27 12:18:09) 转 ... -
关于图片保存问题
2010-07-15 20:01 968如果你在用PngBitmapEncoder之类的 Save图片 ... -
Windows 7 任务栏开发 之 进度条(Progress Bar)
2010-07-12 14:33 1895上一篇 我们完成了“覆盖图标”(Overlay ... -
WPF 新弹出窗口抢焦点问题
2010-06-21 16:34 4058新弹出窗口抢了正在使用的窗口焦点,这个问题烦了好久,今天终于有 ... -
C# 第三方控件
2010-06-08 10:29 2979DevExpress,NetAdvantage 这两套算是最全 ... -
浅析C#中三层架构的实现
2010-06-02 16:14 1586本文讨论如何在C#中实现三层架构,使用MS Acces ... -
数据绑定
2010-05-31 18:42 807http://liutiemeng.blog.51cto.co ... -
C# 修改警告心得
2010-05-22 17:08 13871.(CA1031)如果有try catch最好不要捕获Exc ... -
C# log4net
2010-05-17 13:40 2150说明:本程序演示如何利用log4net记录程序日志信息。log ... -
C# 开机启动
2010-05-13 17:41 1623C# winform程序设置开机� ... -
Base64编码的字符串与图片的转换 C#
2010-04-28 15:05 2805using System; using System.Col ...
相关推荐
WPF ListView 数据项可编辑
WPF 使用 ListView 排序的程序例子
WPF的ListView简易操作示例,如何在代码中按需设置数据源、追加行或列。一个简单的示例说明,便于了解基本应用,供有需要的进行学习。
WPF 在listview中如何实现Combobox的下拉菜单绑定Demo C# WPF ListView
WPF ListView 漂亮样式,自己还可以根据自己的需求进行样式修改,表头、列表都可以根据注释进行拓展,很实用
wpf列表listview自动排序排列,初学专用
WPF前台代码实现数据绑定,Listview中使用数据模版,使用样式的例子,还是用了数据转换。
C#+WPF 支持模仿Tab+控件区域的设计和动态切换 支持TreeView动态修改数据 支持ListView动态修改数据,选定行变色,单个cell规则,支持Cell按钮, 支持xml解析,支持登录界面权限控制, 三层树形数据提供给TreeView ...
解决wpf ListView最小列宽问题
WPF ListView控件添加排序功能,即使绑定数据库主键,排序后,Listviewr控件正常识别
wpf listview 控件 滚动条宽度设置 和 自动排序的示例,欢迎下载
wpf listView分组排序 鉴于之前上传的代码不可运行,特地改了下,直接可运行。
程序演示了如何使用WPF的数据绑定,同步UI显示。
WPF ListView 控件增加附加属性 实现排序功能
wpf5种数据绑定方式示范 OneWayToSource OneWay TwoWay
WPF listView Style Group listview分组列表显示
wpf 数据绑定 经典 数据绑定 经典wpf 数据绑定 经典 数据绑定 经典wpf 数据绑定 经典 数据绑定 经典
WPF简单数据绑定demo,帮助新手了解如何进行数据绑定
WPF ListView如何分页困扰了我很久,百度搜索的结果几乎得不到满意的结果,而CSDN论坛上流传的资源包貌似是微软提供的例子,但是略显复杂。经过笔者一晚上的摸索,得到了一种比较简单的解决方案,在此贡献给大家。...