zfsn
- 浏览: 338398 次
- 性别:

- 来自: 北京
-

文章分类
最新评论
-
pacoson:
感谢楼主。请受小生一拜。
ANT预编译JSP -
zhuhongming123:
一楼的同学Lucene4.* 以上的 已经改成了Numeric ...
Lucene日期排序及组合查询 -
ywjk520:
RangeQuery在哪个包里?
Lucene日期排序及组合查询 -
willwen:
有个疑问,楼主,为何初始化bits 从txt读取已有的网址是直 ...
布隆过滤器(Bloom Filter)之java实例 -
yu_226528:
还不如没有呢
jFreeChart 在jsp页上实现简单的折线图、柱状图
优化LNMP架构采用“Website Baker”为小型公司创建高性能网站方案
参考图片:
1.
一、安装部署各种软件:
1.系统环境:
硬件:HP 360G4/2G
System:Centos 5.4
Web:nginx-1.1.6.tar.gz
FastCGI:php-5.3.8.tar.gz
DB:mysql-5.5.3-m3.tar.gz
2. 安装编译环境
#yum -y install gcc gcc-c++ autoconf automake openssl-devel zlib-devel pcre-devel //pcre让nginx支持正则
#yum -yt groupinstall "Developement Tools" "Development Libraries"
1.系统环境:
硬件:HP 360G4/2G
System:Centos 5.4
Web:nginx-1.1.6.tar.gz
FastCGI:php-5.3.8.tar.gz
DB:mysql-5.5.3-m3.tar.gz
2. 安装编译环境
#yum -y install gcc gcc-c++ autoconf automake openssl-devel zlib-devel pcre-devel //pcre让nginx支持正则
#yum -yt groupinstall "Developement Tools" "Development Libraries"
1.编译安装mysql
//a.编译安装mysql的优点:源码包的默认编译参数默认以dubgu模式)给mysql的性能带来很大的损失,
// 此处使用 --without-debug参数禁用debug模式
//b.以静态方式编译(比动态方式提高5%-10%的性能)
// 此处使用 --with-mysqld-ldflgs=--all-staic 和 --with-client-ldflds=--all-staic参数
//c.使用unix套接字链接提高7.5%性能
// 此处使用--with-unix-socket-path=/usr/local/mysql/tmp/mysql.sock
//d.允许使用汇编模式
// 此处使用 --enable-assembler (优化性能)
//e.至于 --pgcc 目前没有在生产上使用过(据说可以提高1%)
//f.编译安装,可以在同一台服务器上安装多个mysql(前提要保证存放位置、sock不同)
#groupadd mysql //为mysql创建用户组
#useradd -g mysql mysql //将mysql用户添加到mysql组中
#tar zxvf mysql-5.5.3-m3.tar.gz
#cd mysql-5.5.3-m3
./configure \
--prefix=/usr/local/mysql \
--without-debug \ //取消debug模式编译
--enable-assembler \
--with-mysqld-ldflags=-all-static \
--with-client-ldflags=-all-static \
--with-unix-socket-path=/usr/local/mysql/tmp/mysql.sock \
--with-extra-charsets=utf8,gbk
//如果没有问题则会显示
// Thank you for choosing MySQL!
// 以下时间将为很长,请为mysql创建配置文件或数据目录
#make && make install //如果编译安装没有问题则NEXT
#chmod 755 /usr/local/mysql
#chown -R mysql:mysql /usr/local/mysql //修改安装目录的用户和用户组为mysql
#mkdir -pv /mysql_data/{data,binlog,relaylog} //为mysql提供数据存放目录
#/usr/local/mysql/bin/mysql_install_db \ //推荐是用其它新分区,避免IO重读/分区
--basedir=/usr/local/mysql \
--datadir=/mysql_data --user=mysql
----------------------------------------------
//创建并优化my.cnf文件
#vi /mysql_data/my.cnf //创建后保存
[client]
character-set-server = utf8
port = 3306
socket = /usr/local/mysql/tmp/mysql.sock
[mysqld]
character-set-server = utf8
replicate-ignore-db = mysql
replicate-ignore-db = test
replicate-ignore-db = information_schema
user = mysql
port = 3306
socket = /usr/local/mysql/tmp/mysql.sock
basedir = /usr/local/mysql
datadir = /mysql_data/data
log-error = /mysql_data/mysql.error.log
pid-file = /mysql_data/mysql.pid
skip-locking //避免mysql外部锁定
open_files_limit = 10240
back_log = 384 //推荐小于512
max_connections = 5000
max_connect_errors = 6000
table_cache = 614
external-locking = FALSE
max_allowed_packet = 32M
sort_buffer_size = 1M
join_buffer_size = 1M
thread_cache_size = 300
query_cache_size = 512M
query_cache_limit = 2M
query_cache_min_res_unit = 2k
default-storage-engine = MyISAM
thread_stack = 192K
transaction_isolation = READ-COMMITTED
tmp_table_size = 246M
max_heap_table_size = 246M
long_query_time = 3
log-slave-updates
log-bin = /mysql_data/binlog/binlog
binlog_cache_size = 4M
binlog_format = MIXED
max_binlog_cache_size = 8M
max_binlog_size = 1G
relay-log-index = /mysql_data/relaylog/relaylog
relay-log-info-file = /mysql_data/relaylog/relaylog
relay-log = /mysql_data/relaylog/relaylog
expire_logs_days = 30
key_buffer_size = 256M //索引缓冲区为256M 或(4G内存可512M)
read_buffer_size = 1M
read_rnd_buffer_size = 16M
bulk_insert_buffer_size = 64M
myisam_sort_buffer_size = 128M
myisam_max_sort_file_size = 10G
myisam_repair_threads = 1
myisam_recover
interactive_timeout = 120
wait_timeout = 120
skip-name-resolve //避免做DNS 解析,提供IP地址连接
wait_timeout = 120
skip-name-resolve //避免做DNS 解析,提供IP地址连接
slave-skip-errors = 1032,1062,126,1114,1146,1048,1396
server-id = 1
server-id = 1
innodb_additional_mem_pool_size = 16M
innodb_buffer_pool_size = 512M
innodb_data_file_path = ibdata1:256M:autoextend
innodb_file_io_threads = 4
innodb_thread_concurrency = 8
innodb_flush_log_at_trx_commit = 2
innodb_log_buffer_size = 16M
innodb_log_file_size = 128M
innodb_log_files_in_group = 3
innodb_max_dirty_pages_pct = 90
innodb_lock_wait_timeout = 120
innodb_file_per_table = 0
[mysqldump]
quick
max_allowed_packet = 32M
quick
max_allowed_packet = 32M
#######################################
2.漫长的等待后启动mysql(SysV格式的脚本见附件)
#/usr/local/webserver/mysql/bin/mysql start
//管理mysql并修改密码和给新用户创建权限
#/usr/local/mysql/bin/mysql -u root -p -S /usr/local/mysql/tmp/mysql.sock
enter password: <Enter> //默认为空
#/usr/local/mysql/bin/mysqladmin -uroot -p paswword 'hanfeng' //创建新密码为hanfeng
--------------------------------------------------
3.编译安装PHP
// 为PHP安装 事件触发网络库
#tar zxvf libevent-2.0.15-stable.tar.gz
#cd libevent-2.0.15-stable
#./configure && make && make install
// 为PHP安装 字符编码转换
#tar zxvf libconv-1.13.1.tar.gz
#cd libconv-1.13.1
#./configure && make && make install
// 安装FastCGIのPHP
// 此处采用
#tar zxvf php-5.3.8.tar.gz
#cd php-5.3.8
#./configure \
--prefix=/usr/local/php \
--with-mysql=/usr/local/mysql \
--with-mysqli==/usr/local/mysql/bin/mysql_config \
--with-openssl \
--enable-fpm \ //一定要有
--with-libevent-dir=/usr/local/lib \
--enable-mbstring \
--disable-debug \ //取消掉debug,为增加性能
--with-freetype-dir \
--with-jpeg-dir \
--with-png-dir \
--with-zlib \
--with-libxml-dir=/usr \
--enable-xml \
--with-iconv-dir=/usr/local
--------------------------------------------------
4.随后将会看到
// Thank you for using PHP
#ln -s /usr/local/lib/libiconv.so.2 /usr/lib/libiconv.so.2 //做个连接防止make时缺少libiconv.so.2
#ln -s /usr/local/lib/libiconv.so.2 /usr/local/libiconv.so.2
#make ZEND_EXTRA_LIBS='-liconv' //iconv库问题
5.漫长时间后将会看到
// Build complete. Don't forget to run 'make test'
#make install
#cp php-5.3.8/php.ini-production /usr/local/php/etc/php.ini
#vi /usr/local/php/etc/php.ini 修改并保存
// 开启以下几项
pm.max_children = 50
pm.start_servers = 20
pm.min_spare_servers = 5
pm.max_spare_servers = 35
6. 使用nohup在后台启动 php-fpm 为防止tty终端关闭导致php-fpm 挂掉!推荐生产环境使用nohup将命令放于后台运行
#nohup /usr/local/php/sbin/php-fpm &
[1] 18198
nohup: appending output to `nohup.out'
[1]+ Done nohup /usr/local/php/sbin/php-fpm
//将命令加到开始启动
#echo "nohup /usr/local/php/sbin/php-fpm & > /dev/null" >> /ect/rc.local
7.//为nginx增加fastcgi_params 文件
#vi /etc/nginx/fastcgi.conf //修改后保存
// 将里面内容替换为
fastcgi_param GATEWAY_INTERFACE CGI/1.1;
fastcgi_param SERVER_SOFTWARE nginx;
fastcgi_param QUERY_STRING $query_string;
fastcgi_param REQUEST_METHOD $request_method;
fastcgi_param CONTENT_TYPE $content_type;
fastcgi_param CONTENT_LENGTH $content_length;
fastcgi_param SCRIPT_FILENAME $document_root$fastcgi_script_name;
fastcgi_param SCRIPT_NAME $fastcgi_script_name;
fastcgi_param REQUEST_URI $request_uri;
fastcgi_param DOCUMENT_URI $document_uri;
fastcgi_param DOCUMENT_ROOT $document_root;
fastcgi_param SERVER_PROTOCOL $server_protocol;
fastcgi_param REMOTE_ADDR $remote_addr;
fastcgi_param REMOTE_PORT $remote_port;
fastcgi_param SERVER_ADDR $server_addr;
fastcgi_param SERVER_PORT $server_port;
fastcgi_param SERVER_NAME $server_name;
# PHP only, required if PHP was built with --enable-force-cgi-redirect
fastcgi_param REDIRECT_STATUS 200;
##########################################
更新说明:2011-11-23
// 什么原因就不解释了,不能归咎与nginx ,因PHP PATH_INFO问题!
// 只采用方便的方式
// 在 fcgi.conf文件开头,添加一下内容,便于多个虚拟主机引用!
if ($request_filename ~* (.*)\.php) {
set $php_url $1;
}
if (!-e $php_url.php) {
return 403;
}
##########################################
8.为nginx 优化linux内核参数
vi /etc/sysctl.conf // 增加一下内容,并是修改生效
net.ipv4.tcp_max_syn_backlog = 65536
net.core.netdev_max_backlog = 32768
net.core.somaxconn = 32768
net.core.wmem_default = 8388608
net.core.rmem_default = 8388608
net.core.rmem_max = 16777216
net.core.wmem_max = 16777216
net.ipv4.tcp_timestamps = 0
net.ipv4.tcp_synack_retries = 2
net.ipv4.tcp_syn_retries = 2
net.ipv4.tcp_tw_recycle = 1
net.ipv4.tcp_tw.reuse = 1
net.ipv4.tcp_mem = 94500000 915000000 927000000
net.ipv4.tcp_max_orphans = 3276800
net.ipv4.ip_local_port_range = 1024 65535
##########################################
#sysctl -p //使其及时生效
--------------------------------------------------
9.编译安装nginx
#useradd -s /sbin/nologin -M nginx //添加nginx用户
#tar zxvf nginx-1.1.6.tar.gz
#cd nginx-1.1.6
#./configure \
--prefix=/usr/local/nginx \ //安装路径
--sbin-path=/usr/sbin/nginx \ //可执行文件路径
--conf-path=/etc/nginx/nginx.conf \ //最好定义到/etc下
--pid-path=/usr/local/nginx/nginx.pid \ //pid文件存放位置,后面管理时将会用到
--lock-path=/var/lock/nginx.lock \
--user=nginx \
--group=nginx \
--with-http_stub_status_module \ //以取得一些网页的运行状态
--with-http_ssl_module \ //支持https加密连接
--with-http_gzip_static_module \ //静态缓存、压缩模块
--with-http_realip_module \ //让nginx透明获取客户端IP
--http-client-body-temp-path=/var/tmp/nginx/client/ \ //指定http客户端请求缓存文件存放目录
--http-proxy-temp-path=/var/tmp/nginx/proxy/ \ //指定http反向代理缓存文件存放目录
--http-fastcgi-temp-path=/var/tmp/nginx/fcgi/ //指定FastCGI缓存文件存放目录
#make && make install //安装nginx
10.编写SystemV风格的启动脚本(可在本文附件下载后直接使用)
//如果需要请参考: http://linuxxx.blog.51cto.com/1824808/705590 有关nginxd脚本的编写
//使用说明,保存nginxd脚本,赋予执行权限,添加服务和开机启动
#chmod +x /etc/init.d/nginxd
#chkconfig --add nginxd
// 如果不支持,则添加一下2行即可
// # chkconfig: - 85 15 #为必须字符
// # description: nginx is a World Wide Web server. It is used to serve
#chkconfig --level 2345 nginxd on
11.第一次启动nginx
#service nginxd start //没问题的话就显示,也会看到Welcome to nginx!
Starting nginx: [ OK ]
在XP客户端访问一下 http://192.168.10.11 //服务器地址
--------------------------------------------------
12.优化配置nginx.conf 文件
user nginx nginx;
worker_processes 8; //我的服务器为双核双线程
pid /usr/local/nginx/nginx.pid; //PID 存在位置,和启用nginx.pid管理
events {
use epoll; //使用的网络IO模型,CeotOs或REAL推荐使用epoll
worker_connections 1024; //允许的连接数
}
use epoll; //使用的网络IO模型,CeotOs或REAL推荐使用epoll
worker_connections 1024; //允许的连接数
}
http {
include mime.types;
default_type application/octet-stream;
include mime.types;
default_type application/octet-stream;
log_format mylog '$remote_addr - $remote_user [$time_local] "$request" '
'$status $body_bytes_sent "$http_referer" '
'"$http_user_agent" "$http_x_forwarded_for"';
//mylog为自定义log_format的name,log_format用于定义log的格式
sendfile on;
tcp_nopush on;
keepalive_timeout 60; //连接保持时间
'$status $body_bytes_sent "$http_referer" '
'"$http_user_agent" "$http_x_forwarded_for"';
//mylog为自定义log_format的name,log_format用于定义log的格式
sendfile on;
tcp_nopush on;
keepalive_timeout 60; //连接保持时间
gzip on; //开启gzip压缩,为客户端访问节省更大的带宽,提高访问速度
gzip_min_length 1k;
gzip_buffers 4 8k; //安装原数据8K为单位的4倍申请内存
gzip_http_version 1.1; //http版本信息,目前为1.0和1.1
gzip_comp_level 4; //gzip 压缩比(与CPU处理速度相反)
gzip_types text/plain application/x-javascript text/css application/xml;
gzip_vary on;
fastcgi_intercept_errors on;
fastcgi_connect_timeout 300;
fastcgi_send_timeout 300;
fastcgi_read_timeout 300;
fastcgi_buffer_size 64k;
fastcgi_buffers 4 64k;
fastcgi_busy_buffers_size 128k;
fastcgi_temp_file_write_size 128k;
server {
listen 80;
server_name www.abc.com;
access_log logs/abc.access.log mylog; //用到了mylog,将日志定义为log_format格式
listen 80;
server_name www.abc.com;
access_log logs/abc.access.log mylog; //用到了mylog,将日志定义为log_format格式
location / {
root /usr/local/nginx/html/abc;
index index.php index.html index.htm;
}
error_page 404 = /404.html; //当访问不存在的页面时,提示用户重新访问主页
# redirect server error pages to the static page /50x.html
error_page 500 502 503 504 /usr/local/nginx/50x/50x.html; //各种错误页面
location = /50x.html {
root html;
}
# pass the PHP scripts to FastCGI server listening on 127.0.0.1:9000
location ~ \.php$ {
root html;
fastcgi_pass 127.0.0.1:9000;
fastcgi_index index.php; //fastcgi 索引页格式
fastcgi_param SCRIPT_FILENAME /scripts$fastcgi_script_name;
include fastcgi_params;
}
}
server {
listen 80;
server_name www.abcd.com;
access_log logs/abcd.access.log mylog;
location / {
root /usr/local/nginx/html/abcd;
index index.php index.html index.htm;
error_page 404 = /404.html;
error_page 500 502 503 504 /usr/local/nginx/50x/50x.html;
location = /50x.html {
root html;
location ~ \.php$ {
root /usr/local/nginx/html/abcd/wb;
fastcgi_pass 127.0.0.1:9000;
fastcgi_index index.php;
fastcgi_param SCRIPT_FILENAME /scripts$fastcgi_script_name;
include fastcgi_params;
}
}
}
}
############### This is nginx.conf ###############
--------------------------------------------------
13.使用PID信号来控制管理nginx进程
// pid 存放位置 /usr/local/nginx/nginx.pid
// kill - 信号类型 cat `/usr/local/nginx/nginx.pid`
// 信号类型说明
// TERM,INT 快速关闭nginx , 如以此kill掉8个进程是不是很悲剧
// OUT 从容关闭
// HUP 平滑重启,重新加载配置文件
// USR1 重新打开日志文件,在自动切割日志时比较使用
// USR2 平滑升级可执行程序
// WINCH 从容关闭进程,对于线上的nginx新旧版本更换
// 针对与上文的nginx.conf 修改此处使用HUP信号来控制
#kill -HUP cat `/usr/local/nginx/nginx.pid` //让修改立即生效
14.访问简单测试测试页面
#vi /usr/local/nginx/html/index.php
<?php
phpinfo();
?>
#kill -HUP cat `/usr/local/nginx/nginx.pid` //让修改立即生效
14.访问简单测试测试页面
#vi /usr/local/nginx/html/index.php
<?php
phpinfo();
?>
15.测试访问数据库
<?php
link=mysql_connect("localhost","root","hanfeng");
if(!$link) echo "ERROR!";
else echo "OK!";
phpinfo();
?>
--------------------------------------------------
二、安装“Website Baker”
1.安装部署Website Baker
// 采用nginx的虚拟主机为企业N个域名做网站部署
#unzip WebsiteBaker_2.8*.zip
#mv WebsiteBaker_2.8* /usr/local/nginx/html/abc
#cp -r /usr/local/nginx/html/abc /usr/local/nginx/html/abcd
#cd /usr/local/nginx/html/abc
#cp wb/modules/fckeditor/fckeditor/editor/filemanager/connectors/php/config.php ./
#cp config.php ../abcd/wb/
#chmod 777 /usr/local/nginx/html/abc
#chmod 777 /usr/local/nginx/html/abcd
2.为Website Baker的创建数据库用户
#/usr/local/mysql/bin/mysql -uroot -p
mysql> GRANT ALL PRIVILEGES ON abc.* TO 'abc'@'localhost' IDENTIFIED BY 'hanfeng';
mysql> GRANT ALL PRIVILEGES ON abcd.* TO 'abcd'@'localhost' IDENTIFIED BY 'hanfeng';
mysql>flush privileges;
3.通过浏览器访问并install 和admin
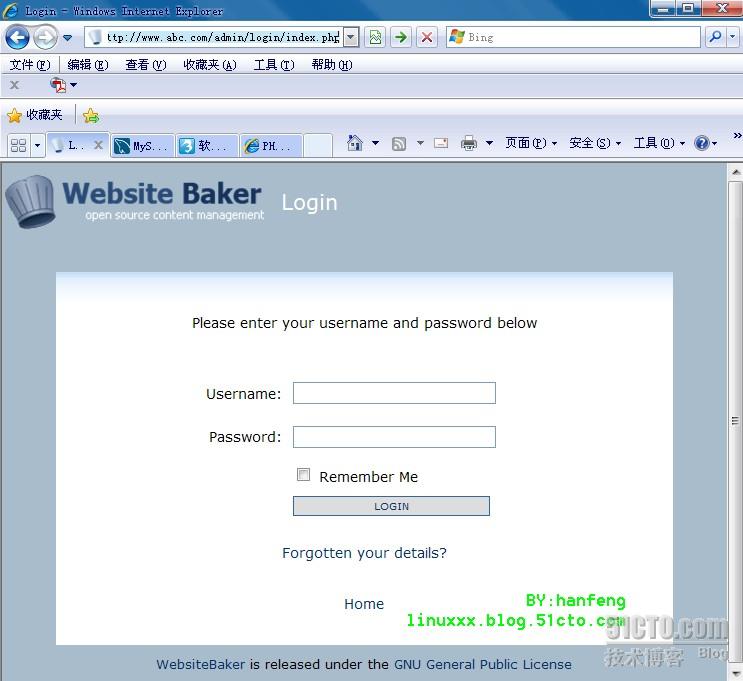
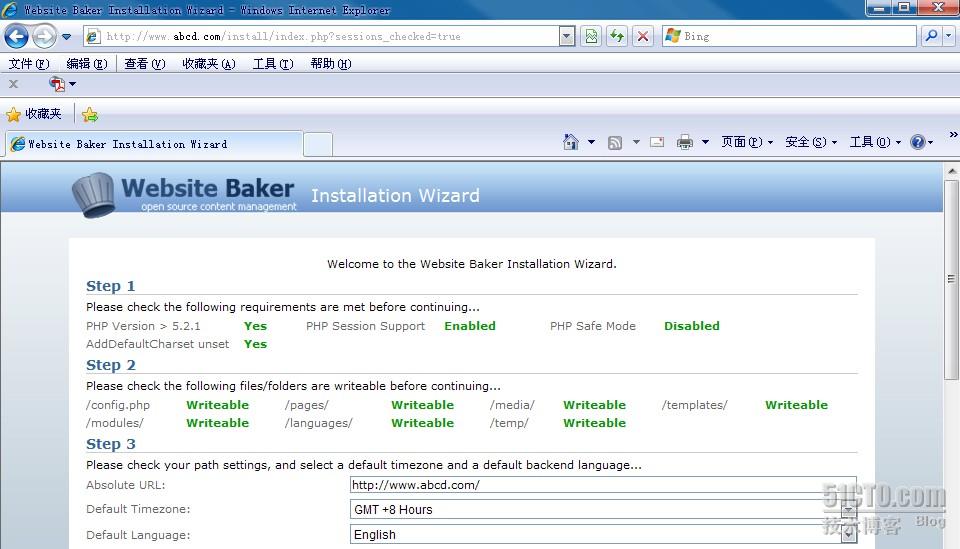
IE: http://www.abcd.com/install 安装 (abc.com同理)
//以下仅有图片提供
IE: http://www.abcd.com/admin 管理

//安装完后删除安装文件和upgrade-script.php文件
#rm -rf /usr/local/nginx/html/{abc,abcd}/{upgrade-script.php,install}
#rm -rf /usr/local/nginx/html/{abc,abcd}/{upgrade-script.php,install}
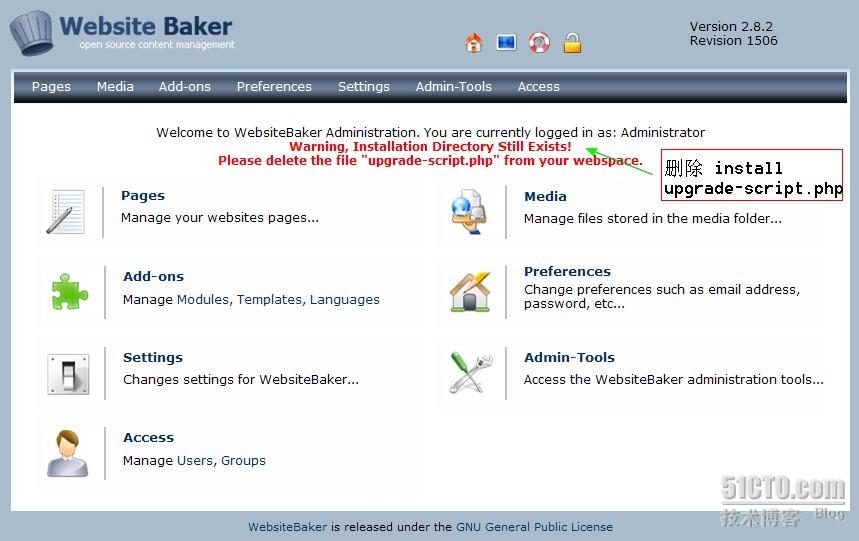
// admin进入界面请见文章开始
4.通过访问安装无误,证明基于LNMP下的“Website Baker”安装成功!
// 根据后台admin管理网站即可了!
说明:
// 根据后台admin管理网站即可了!
说明:
1.本文不只是为了构建LNMP安装“Website Baker”网站,而是将最近学习到东西给朋友提供实际生产中的应用!
2.nignx 日志切割、mysql数据备份已经配置为cron任务,并为编辑人员提供了bat文件自动上传和服务器状态查看!基本不需要专业运维人员管理,直接托付给IDC即可!
3.LNMP编译安装优化多学自抚琴煮酒《构建高可用linux服务器》和张宴《实战Nginx取代Apache的高性能Web服务器》并借鉴51CTO《运维趋势之服务器优化_13期》;
4.不在于编译安装LNMP,而是优化期架构在生产中的应用,根据最近观察服务运行良好!
5.文章提供技术支持,如有好的建议或安装问题 请 Send E-mail to linuxhzg#qq.com (请将#换为@) 如涉及隐私请通知寒枫(hanfeng)谢谢;
5.文章提供技术支持,如有好的建议或安装问题 请 Send E-mail to linuxhzg#qq.com (请将#换为@) 如涉及隐私请通知寒枫(hanfeng)谢谢;
本文出自 “寒枫” 博客,请务必保留此出处http://linuxxx.blog.51cto.com/1824808/719972
分享到:


发表评论

相关推荐
LNMP架构详细安装教程《博雅运维Linux全套笔记》
LNMP架构的搭建Discuz论坛的搭建LNMP架构的搭建Discuz论坛的搭建
LNMP架构搭建Discuz论坛教程
LNMP架构教程学习手册 内容简介: 1、LNMP简介 2、LNMP搭建
1.mysql tar zxf mysql-5.1.55.tar cd mysql-* ./configure --prefix=/usr/local/mysql --with-charset=utf8 --with-collation=utf8_general_ci --with-extra-charsets=gbk,gb2312 make && make install ...
实战企业级分布式LNMP高性能服务器
本次实验是在LNMP架构——php+nginx+mysql源码编译搭建lnmp环境基础上进行的,lnmp架构已经搭建好,接下来我将以搭建论坛并且客户使用论坛为例,演示整个过程。 文章目录一、前言二、搭建Discuz论坛实验环境实验 一...
这是我自己搭建时总结的经验。希望大家可以看看啊
LNMP架构下部署Discuz 2-2.md
Centos 7.4 Lnmp(源码安装) 架构(Nginx 1.15.9 PHP 7.1.31 Mysql 5.7.25) ,部署glpi 9.4.3
新浪微博-新时代下的微博LNMP架构.rar
我们为什么采用LNMP这种架构? 采用Linux、PHP、MySQL的优点我们不必多说。 Nginx是一个小巧而高效的Linux下的Web服务器软件,是由 Igor Sysoev 为俄罗斯访问量第二的 Rambler.ru 站点开发的,已经在一些俄罗斯的...
本期,我们将带大家了解该服务的打造团队,以及这个基于LNMP的企业级SaaS平台架构与调优。对比IaaS和PaaS,SaaS得到的关注显然要少一些。究其根本,不仅因为SaaS关注的是功能方面的探索,更偏向于某个领域或层面的...
鉴于一个局域网对外访问时都是共用同一个公网IP的,因此UV值一般要略大于独立ip值可以通过爱站网来查询这些参数值如果一个网站的uv,pv,独立ip变大,则会导致高的并发,这时要对网站分层布局架构,采用负载均衡。...
新手学习了redhat6.5安装lnmp架构之后总结的文档
LNMP代表的就是Linux下Nginx、MySQL、PHP这种网站服务器架构,相对地,LAMP代表Linux下Apache、MySQL、PHP这种网站服务器架构。 Nginx是一个小巧而高效的Linux下的Web服务器软件,已经在一些俄罗斯的大型网站上运行...
这篇文章从无到有的介绍了基于linux+mysql+nginx+php+memcache架构的Discuz论坛系统
一键部署lnmp平台脚本文件 用于部署lnmp架构平台
9.1: 服务器硬件 、 部署LNMP动态网站 、 总结和答疑.docx
搭建LNMP性能测试环境的详细步骤,包括centos虚拟机的安装