- 浏览: 957478 次
-

文章分类
最新评论
Eclipse Forms: 为胖客户端做的漂亮UI(翻译,第二部分)
增加一些内容
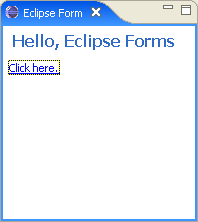
现在我们已经有一个view能够成功运行了.我们可以往里面增加一<wbr></wbr>些内容.Eclipse forms有一个body,我们可以这样创建内容.
public void createPartControl(Composite parent) {
toolkit = new FormToolkit(parent.getDisplay());
form = toolkit.createForm(parent);
form.setText("Hello, Eclipse Forms");
GridLayout layout = new GridLayout();
 form.getBody().setLayout(layout);
 Hyperlink link = toolkit.createHyperlink(form.getBody(),
"Click here.", SWT.WRAP);
Hyperlink link = toolkit.createHyperlink(form.getBody(),
"Click here.", SWT.WRAP);
 link.addHyperlinkListener(new HyperlinkAdapter() {
public void linkActivated(HyperlinkEvent e) {
System.out.println("Link activated!");
}
});
}
link.addHyperlinkListener(new HyperlinkAdapter() {
public void linkActivated(HyperlinkEvent e) {
System.out.println("Link activated!");
}
});
}
form的body是标题下面的可用空间.因为这个空间是一个SW<wbr></wbr>T Composite,它能做为其它组件的parent.在上面的代码里,![]() 我们为body设置了layout,
我们为body设置了layout,![]() 然后创建了一个超链接.超链接是由Eclipse Forms提供的为数不多的组件之一.我们可以为超链接
然后创建了一个超链接.超链接是由Eclipse Forms提供的为数不多的组件之一.我们可以为超链接![]() 增加监听器,这样能够在用户点击它时做出反应.
增加监听器,这样能够在用户点击它时做出反应.
超链接组(Hyperlink Groups)
Form tookit有一个"超链接组"对象.每个创建出的超链接都加入这个组对象中.超链接为多个角色服<wbr></wbr>务.它们定义了这个组中所有超链接在正常、hover、激活不同状态下的颜色.它们根据小组中链接不同的状态来改变颜色<wbr></wbr>.它们根据小组中链接不同的状态来改变下划线风格.
当你要改变超链接组对象的默认设置时,可以通过toolkit的g<wbr></wbr>etHyperlinkGroup()方法来获得超链接组对象.
<script type="text/javascript"><!-- D(["mb","创建普通组件</font></strong></p>/n<div>Eclipse Forms的一个设计目标就是让能够在编辑器/视图中创建普通SW<WBR>T组件.因为form的body是一个普通composite,你能够在它里面使用任何layout和组件.但是,记住"原生的"SWT组件有一个组件背景.我们现在通过它们的构造方法创建一些组<WBR>件.<br><pre> layout.numColumns /u003d 2;/n GridData gd /u003d new GridData();/n gd.horizontalSpan /u003d 2;/n link.setLayoutData(gd);/n Label label /u003d new Label(form.getBody(), SWT.NULL);/n label.setText("Text field label:");/n Text text /u003d new Text(form.getBody(), SWT.BORDER);/n text.setLayoutData(new GridData(GridData.FILL_HORIZONTAL));/n Button button /u003d new Button(form.getBody(), SWT.CHECK);/n button.setText("An example of a checkbox in a form");/n gd /u003d new GridData();/n gd.horizontalSpan /u003d 2;/n button.setLayoutData(gd);</pre><br>现在我们使用了两列,并且创建了一个标签(label)<WBR>,一个文本框(text field)和一个复选框(checkbox).结果如下:</div>/n<div></div>/n<div><img height/u003d/"183/" src/u003d/"http://www.eclipse.org/articles/Article-Forms/images/no-toolkit.gif/" width/u003d/"240/" border/u003d/"0/"><br>图4:一个拥有直接用它们的构造器创建出的SWT组件的form</div>/n<div></div>/n<div>这张图片怎么回事?我们创建的组件的背景直接和系统窗口背景相匹配<WBR>,而不是和form的背景匹配.另外,文本框看起来还好是因为这张截图是在Windows XP下截的.在其它操作系统上,它会看起来是有一个3D边框的空白条.为了解决这个问题,我们会用toolkit的工厂方法来创建这些组件:<br><pre> Label label /u003d toolkit.createLabel(form.getBody(), "Text field label:");/n Text text /u003d toolkit.createText(form.getBody(), "");/n text.setLayoutData(new GridData(GridData.FILL_HORIZONTAL));/n Button button /u003d toolkit.createButton(form.getBody(), "A checkbox in a form", SWT.CHECK);/n gd /u003d new GridData();/n gd.horizontalSpan /u003d 2;/n button.setLayoutData(gd);</pre></div>/n<div>这个视图现在会看来更好些了:</div>/n<div></div>/n<div><img height/u003d/"177/" src/u003d/"http://www.eclipse.org/articles/Article-Forms/images/with-toolkit.gif/" width/u003d/"233/" border/u003d/"0/"><br>图5:一个拥有用form toolkit的工厂方法创建出的SWT组件的form</div>/n<div><br>由form toolkit提供的工厂方法是为了方便.Toolkit没有函盖<WBR>所有情况,甚至是SWT组件集合,而且明显没有为你可能有的自己定制的组件提供这一便利<WBR>.当你需要使一个SWT组件与form统一时,你应该使用一个方法:FormToolkit.adapt(Control control, boolean trackFocus, boolean trackKeyboard).所有的工厂方法各自分别调用了这个<WBR>适配方法.</div>/n/n<p><strong><font size/u003d/"4/">达到"平滑"的视觉效果</font>",1] ); //--></script> 创建普通组件
  layout.numColumns = 2;
  GridData gd = new GridData();
  gd.horizontalSpan = 2;
  link.setLayoutData(gd);
  Label label = new Label(form.getBody(), SWT.NULL);
  label.setText("Text field label:");
  Text text = new Text(form.getBody(), SWT.BORDER);
  text.setLayoutData(new GridData(GridData.FILL_HORIZONTAL));
  Button button = new Button(form.getBody(), SWT.CHECK);
  button.setText("An example of a checkbox in a form");
  gd = new GridData();
  gd.horizontalSpan = 2;
  button.setLayoutData(gd);
现在我们使用了两列,并且创建了一个标签(label)<wbr></wbr>,一个文本框(text field)和一个复选框(checkbox).结果如下:
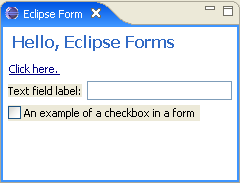
图4:一个拥有直接用它们的构造器创建出的SWT组件的form
  Label label = toolkit.createLabel(form.getBody(), "Text field label:");
  Text text = toolkit.createText(form.getBody(), "");
  text.setLayoutData(new GridData(GridData.FILL_HORIZONTAL));
  Button button = toolkit.createButton(form.getBody(), "A checkbox in a form", SWT.CHECK);
  gd = new GridData();
  gd.horizontalSpan = 2;
  button.setLayoutData(gd);
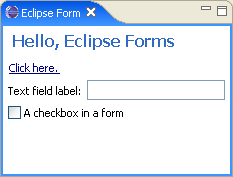
图5:一个拥有用form toolkit的工厂方法创建出的SWT组件的form
由form toolkit提供的工厂方法是为了方便.Toolkit没有函盖<wbr></wbr>所有情况,甚至是SWT组件集合,而且明显没有为你可能有的自己定制的组件提供这一便利<wbr></wbr>.当你需要使一个SWT组件与form统一时,你应该使用一个方法:FormToolkit.adapt(Control control, boolean trackFocus, boolean trackKeyboard).所有的工厂方法各自分别调用了这个<wbr></wbr>适配方法.
达到"平滑"的视觉效果 <script type="text/javascript"><!-- D(["mb","</strong></p>/n<p>一个在PDE编辑器中Eclipse Forms的可看出的属性是组件的"平滑"视觉效果.以前所有没有3D边框的组件在窗口中看起来不错,但是在编辑器或视图中就不行.这个支持写在FormToolkit<WBR>类中.但是,在一些系统上它是通过一些定制达到的.举个例子,看一下这张从PDE编辑器(2.1版本)中的截图:</p>/n<div><img height/u003d/"507/" src/u003d/"http://www.eclipse.org/articles/Article-Forms/images/plugin-dependencies.gif/" width/u003d/"545/" border/u003d/"0/"></div>/n<div>图片6:Eclipse 2.1中Eclipse Forms的平滑视觉效果.</div>/n<div><br>象表格,文本类,复选框等,是加上一个平滑的1个象素宽的边框.这些边框不是来自组件自己(SWT.BORDER风格没有用到).另外,如果设置一下,tookit会为每个组件的parent<WBR>增加一个paint监听器,在paint事件发生时为组件加上边框.要想这样的话,你需要为你创建的象文本,表格,树等组件的每个composit<WBR>e调用paintBordersFor(parent)<WBR>.每个parent只需要调用一次方法就足够了:不需要为每个组件<WBR>这样调用./n</div>/n<p>Form toolkit知道哪个组件需要一个定制的边框.但是,你可能新创建了一个不在原来名单中的组件,它也需要一个边框.你可以通过象下面这样的代码给toolkit一<WBR>个提示:</p><pre>Control myControl /u003d new MyControl(parent);/nmyControl.setData(FormToolkit.KEY_DRAW_BORDER, <strong>FormToolkit.TEXT_BORDER</strong>);/n// or myControl.setData(FormToolkit.KEY_DRAW_BORDER, <strong>FormToolkit.TREE_BORDER</strong>);/ntoolkit.paintBordersFor(parent);</pre>/n<p>你可以在上面这张图中看出,象树和表格这样的"结构化<WBR>(structural)"的组件有和文本区域不同的边框风格并且你可以选择和你的组件相符合<WBR>的那个.注意用toolkit的工厂方法创建出的组件不需要这样做.</p>/n<p><img height/u003d/"13/" src/u003d/"http://www.eclipse.org/articles/Article-Forms/images/win_only.gif/" width/u003d/"49/">因为Eclipse 3.0和在Windows XP上,当javaw.exe.manifest文件在Java虚拟机bi<WBR>n文件夹中时,没有边框产生出来.(这篇文章里我所有截图都是在Windows XP下截的).这个文件--你可以在<a href/u003d/"http://dev.eclipse.org/viewcvs/index.cgi/~checkout~/platform-swt-home/faq.html#xpthemes/" target/u003d/"_blank/" onclick/u003d/"return top.js.OpenExtLink(window,event,this)/">/nSWT home page</a>上下载--告诉toolkit为本地组件使用XP皮肤.用XP皮肤,象文本,表格和树是已经平滑的并且不需要再去调整.为了让你的代码拥有可移<WBR>植性,你可以总是调用paintBordersFor<WBR>(Composite)方法,让toolkit去根据不同操作系统<WBR>来决定该怎么做.</p>/n<p><strong><font size/u003d/"4/">定制布局(Custom layouts)</font></strong><br>Eclipse Forms在SWT layout的基础上增加了两个新的layout<WBR>.这些layout继承了SWT Layout基类并能够在任何SWT composite上使用,但是一般都是和Eclipse Forms联合使用的.</p>/n<div><strong><font size/u003d/"4/">TableWrapLayout</font></strong><br>现在我们知道如何来组合一个form,让我们先给一个悬念.我们会改变那个超链接文本使它加长一些:<br>link.setText("This is an example of a form that is much longer "+",1] ); //--></script>
一个在PDE编辑器中Eclipse Forms的可看出的属性是组件的"平滑"视觉效果.以前所有没有3D边框的组件在窗口中看起来不错,但是在编辑器或视图中就不行.这个支持写在FormToolkit<wbr></wbr>类中.但是,在一些系统上它是通过一些定制达到的.举个例子,看一下这张从PDE编辑器(2.1版本)中的截图:
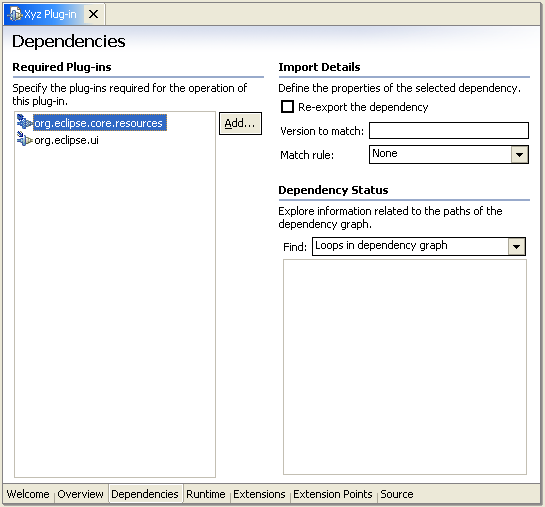
象表格,文本类,复选框等,是加上一个平滑的1个象素宽的边框.这些边框不是来自组件自己(SWT.BORDER风格没有用到).另外,如果设置一下,tookit会为每个组件的parent<wbr></wbr>增加一个paint监听器,在paint事件发生时为组件加上边框.要想这样的话,你需要为你创建的象文本,表格,树等组件的每个composit<wbr></wbr>e调用paintBordersFor(parent)<wbr></wbr>.每个parent只需要调用一次方法就足够了:不需要为每个组件<wbr></wbr>这样调用.
Form toolkit知道哪个组件需要一个定制的边框.但是,你可能新创建了一个不在原来名单中的组件,它也需要一个边框.你可以通过象下面这样的代码给toolkit一<wbr></wbr>个提示:
Control myControl = new MyControl(parent);
myControl.setData(FormToolkit.KEY_DRAW_BORDER, FormToolkit.TEXT_BORDER);
// or myControl.setData(FormToolkit.KEY_DRAW_BORDER, FormToolkit.TREE_BORDER);
toolkit.paintBordersFor(parent);
你可以在上面这张图中看出,象树和表格这样的"结构化<wbr></wbr>(structural)"的组件有和文本区域不同的边框风格并且你可以选择和你的组件相符合<wbr></wbr>的那个.注意用toolkit的工厂方法创建出的组件不需要这样做.
![]() 因为Eclipse 3.0和在Windows XP上,当javaw.exe.manifest文件在Java虚拟机bi<wbr></wbr>n文件夹中时,没有边框产生出来.(这篇文章里我所有截图都是在Windows XP下截的).这个文件--你可以在 SWT home page上下载--告诉toolkit为本地组件使用XP皮肤.用XP皮肤,象文本,表格和树是已经平滑的并且不需要再去调整.为了让你的代码拥有可移<wbr></wbr>植性,你可以总是调用paintBordersFor<wbr></wbr>(Composite)方法,让toolkit去根据不同操作系统<wbr></wbr>来决定该怎么做.
因为Eclipse 3.0和在Windows XP上,当javaw.exe.manifest文件在Java虚拟机bi<wbr></wbr>n文件夹中时,没有边框产生出来.(这篇文章里我所有截图都是在Windows XP下截的).这个文件--你可以在 SWT home page上下载--告诉toolkit为本地组件使用XP皮肤.用XP皮肤,象文本,表格和树是已经平滑的并且不需要再去调整.为了让你的代码拥有可移<wbr></wbr>植性,你可以总是调用paintBordersFor<wbr></wbr>(Composite)方法,让toolkit去根据不同操作系统<wbr></wbr>来决定该怎么做.
定制布局(Custom layouts)
Eclipse Forms在SWT layout的基础上增加了两个新的layout<wbr></wbr>.这些layout继承了SWT Layout基类并能够在任何SWT composite上使用,但是一般都是和Eclipse Forms联合使用的.
现在我们知道如何来组合一个form,让我们先给一个悬念.我们会改变那个超链接文本使它加长一些:
link.setText("This is an example of a form that is much longer "+ <script type="text/javascript"><!-- D(["mb","<br> "and will need to wrap.");/n<br>让我们看看结果:</div>/n<div></div>/n<div><img height/u003d/"177/" src/u003d/"http://www.eclipse.org/articles/Article-Forms/images/long-link.gif/" width/u003d/"233/" border/u003d/"0/"><br>图片7:一个使用GridLayout的form</div>/n<p>发生什么事了?记住我们使用的是GridLayout<WBR>.当它问这个超链接组件来计算它大小时,超链接告诉它文字在单独行里需要的长度.虽然我们告诉组件去包裹(wrap),它并没有这样做因为GridLayout需要组件返回它的长度<WBR>.超连接组件--和其它象Label一样的SWT组件,可以通过你传递它数值来决定<WBR>长和宽,但是GridLayout不会向组件传递数值参数.</p>/n<p>我们需要的是一个象HTML表格一样的layout<WBR>.我们希望内容去试图配合提供的客户空间,并且一行行地叠加.Eclipse Forms提供了一个这样的layout叫TableWrapLa<WBR>yout.GridLayout和TableWrapLayout<WBR>之间有许多共同点.都是用表格来组织parent的childre<WBR>n.都有layout data来告诉layout如何对待每个组件.都能够在需要占据所<WBR>有空间时等接受组件的提示.</p>/n<p>但是,它们在布局时完全不同.TableWrapLayout从列开始<WBR>.它计算每列的最小的,合适的,最大的宽度并用这个信息来占据空间.它也试图尽可能地公平地在各列<WBR>间分隔,这样有些组件就没有多余的空间.</p>/n<div>让我们使用TableWrapLayout来重新更改例子<WBR>(更改处高亮显示):</div>/n<div></div>/n<div><pre> public void createPartControl(Composite parent) {/n toolkit /u003d new FormToolkit(parent.getDisplay());/n form /u003d toolkit.createForm(parent);/n form.setText("Hello, Eclipse Forms");/n <b><font color/u003d/"#ff0000/">TableWrapLayout layout /u003d new TableWrapLayout();</font></b>/n form.getBody().setLayout(layout);/n Hyperlink link /u003d toolkit.createHyperlink(form.getBody(),"Click here.", SWT.WRAP);/n link.addHyperlinkListener(new HyperlinkAdapter() {/n public void linkActivated(HyperlinkEvent e) {/n System.out.println("Link activated!");/n }/n });/n link.setText("This is an example of a form that is much longer and will need to wrap.");/n layout.numColumns /u003d 2;/n <b><font color/u003d/"#ff0000/">TableWrapData td /u003d new TableWrapData();/n td.colspan /u003d 2;/n link.setLayoutData(td);</font></b>/n Label label /u003d toolkit.createLabel(form.getBody(), "Text field label:");/n Text text /u003d toolkit.createText(form.getBody(), "");/n <b><font color/u003d/"#ff0000/">td /u003d new TableWrapData(TableWrapData.FILL_GRAB);/n text.setLayoutData(td);</font></b>/n Button button /u003d toolkit.createButton(form.getBody(), "A checkbox in a form", ",1] ); //--></script>
"and will need to wrap.");
让我们看看结果:
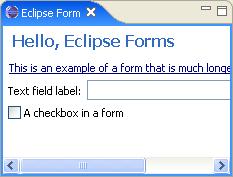
图片7:一个使用GridLayout的form
发生什么事了?记住我们使用的是GridLayout<wbr></wbr>.当它问这个超链接组件来计算它大小时,超链接告诉它文字在单独行里需要的长度.虽然我们告诉组件去包裹(wrap),它并没有这样做因为GridLayout需要组件返回它的长度<wbr></wbr>.超连接组件--和其它象Label一样的SWT组件,可以通过你传递它数值来决定<wbr></wbr>长和宽,但是GridLayout不会向组件传递数值参数.
我们需要的是一个象HTML表格一样的layout<wbr></wbr>.我们希望内容去试图配合提供的客户空间,并且一行行地叠加.Eclipse Forms提供了一个这样的layout叫TableWrapLa<wbr></wbr>yout.GridLayout和TableWrapLayout<wbr></wbr>之间有许多共同点.都是用表格来组织parent的childre<wbr></wbr>n.都有layout data来告诉layout如何对待每个组件.都能够在需要占据所<wbr></wbr>有空间时等接受组件的提示.
但是,它们在布局时完全不同.TableWrapLayout从列开始<wbr></wbr>.它计算每列的最小的,合适的,最大的宽度并用这个信息来占据空间.它也试图尽可能地公平地在各列<wbr></wbr>间分隔,这样有些组件就没有多余的空间.
public void createPartControl(Composite parent) {
toolkit = new FormToolkit(parent.getDisplay());
form = toolkit.createForm(parent);
form.setText("Hello, Eclipse Forms");
TableWrapLayout layout = new TableWrapLayout();
form.getBody().setLayout(layout);
Hyperlink link = toolkit.createHyperlink(form.getBody(),"Click here.", SWT.WRAP);
link.addHyperlinkListener(new HyperlinkAdapter() {
public void linkActivated(HyperlinkEvent e) {
System.out.println("Link activated!");
}
});
link.setText("This is an example of a form that is much longer and will need to wrap.");
layout.numColumns = 2;
TableWrapData td = new TableWrapData();
td.colspan = 2;
link.setLayoutData(td);
Label label = toolkit.createLabel(form.getBody(), "Text field label:");
Text text = toolkit.createText(form.getBody(), "");
td = new TableWrapData(TableWrapData.FILL_GRAB);
text.setLayoutData(td);
Button button = toolkit.createButton(form.getBody(), "A checkbox in a form", <script type="text/javascript"><!--
D(["mb","SWT.CHECK);/n <b><font color/u003d/"#ff0000/">td /u003d new TableWrapData();/n td.colspan /u003d 2;/n button.setLayoutData(td);</font></b>/n }</pre><pre><br><br>我们用了GridData相同的概念.一些变量拥有不同的名字(举个例子,colspan和rowspan,align和val<WBR>ign取自HTML TABLE的属性),但是你可以做相同的事--创建一个超链接和按钮占据两列的格子<WBR/>.因为空白(margins)和GridLayout是相同的<WBR>,结果会看起来一样,除了超链接现在会包裹起来:</pre><pre><img height/u003d/"177/" src/u003d/"http://www.eclipse.org/articles/Article-Forms/images/wrapped-link.gif/" width/u003d/"233/" border/u003d/"0/">/n<br>图片8:一个使用TableWrapLayout的form</pre></div>/n<p>TableWrapLayout和GridLayout的一个主要<WBR>的不同点是你应该停止去计算垂直的空间.在GridLayout里,你一般会让"不易变形的(rigid)"组件用自然的位置和大小<WBR>并让"可伸缩的(flexible)"组件去占据水平或垂直的空间.相反,TableWrapLayout是从上往下工作的<WBR>,并且它容下所有的组件,它的工作是完全的.占据水平空间的概念还存在(象上面展示一样).但是,垂直方向上,你只能在单元(cell<WBR>)比组件高时选择FILL单元,或选择TOP,MIDDLE或BO<WBR>TTOM垂直对齐./n<br>你也许会注意到一个地方和刚刚说的不符:TableWrapLay<WBR>out仍然有一个grabVertical变量.但是<WBR>,这里这个变量在这里有明确的目的:当一个设置了高度的组件占多行<WBR>时,它的高度会给出一个条件就是垂直dimension已经知道了<WBR>,组件需要去除它所在的多个单元之间的多余空间.</p>/n<p>为了用TableWrapLayout有好的结果<WBR>,确定组件可以接近风格(SWT.WRAP).Eclipse Froms提供的组合定制组件能够在box外面包裹<WBR>.这是通过实现ILayoutExtension接口实现的:<br>public interface ILayoutExtension {<br> /**<br> * Computes the minimum width of the parent. All widgets capable of word/n<br> * wrapping should return the width of the longest word that cannot be<br> * broken any further.<br> * <br> * @param parent the parent composite<br> * @param changed <code>true</code> if the cached information should be/n<br> * flushed, <code>false</code> otherwise.<br> * @return the minimum width of the parent composite<br> */<br> public int computeMinimumWidth(Composite parent, boolean changed);</p>/n<p> /**<br> * Computes the maximum width of the parent. All widgets capable of word<br> * wrapping should return the length of the entire text with wrapping<br> * turned off.<br> * <br> * @param parent the parent composite/n<br> * @param changed <code>true</code> if the cached information<br> * should be flushed, <code>false</code> otherwise.",1]
);
//--></script>SWT.CHECK);
td = new TableWrapData();
td.colspan = 2;
button.setLayoutData(td);
}
我们用了GridData相同的概念.一些变量拥有不同的名字(举个例子,colspan和rowspan,align和val<wbr></wbr>ign取自HTML TABLE的属性),但是你可以做相同的事--创建一个超链接和按钮占据两列的格子<wbr></wbr>.因为空白(margins)和GridLayout是相同的<wbr></wbr>,结果会看起来一样,除了超链接现在会包裹起来:
图片8:一个使用TableWrapLayout的form
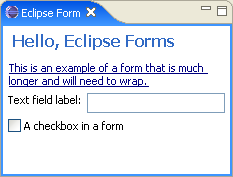
TableWrapLayout和GridLayout的一个主要<wbr></wbr>的不同点是你应该停止去计算垂直的空间.在GridLayout里,你一般会让"不易变形的(rigid)"组件用自然的位置和大小<wbr></wbr>并让"可伸缩的(flexible)"组件去占据水平或垂直的空间.相反,TableWrapLayout是从上往下工作的<wbr></wbr>,并且它容下所有的组件,它的工作是完全的.占据水平空间的概念还存在(象上面展示一样).但是,垂直方向上,你只能在单元(cell<wbr></wbr>)比组件高时选择FILL单元,或选择TOP,MIDDLE或BO<wbr></wbr>TTOM垂直对齐.
你也许会注意到一个地方和刚刚说的不符:TableWrapLay<wbr></wbr>out仍然有一个grabVertical变量.但是<wbr></wbr>,这里这个变量在这里有明确的目的:当一个设置了高度的组件占多行<wbr></wbr>时,它的高度会给出一个条件就是垂直dimension已经知道了<wbr></wbr>,组件需要去除它所在的多个单元之间的多余空间.
为了用TableWrapLayout有好的结果<wbr></wbr>,确定组件可以接近风格(SWT.WRAP).Eclipse Froms提供的组合定制组件能够在box外面包裹<wbr></wbr>.这是通过实现ILayoutExtension接口实现的:
public interface ILayoutExtension {
/**
* Computes the minimum width of the parent. All widgets capable of word
* wrapping should return the width of the longest word that cannot be
* broken any further.
*
* @param parent the parent composite
* @param changed <code>true</code> if the cached information should be
* flushed, <code>false</code> otherwise.
* @return the minimum width of the parent composite
*/
public int computeMinimumWidth(Composite parent, boolean changed);
/**
* Computes the maximum width of the parent. All widgets capable of word
* wrapping should return the length of the entire text with wrapping
* turned off.
*
* @param parent the parent composite
* @param changed <code>true</code> if the cached information
* should be flushed, <code>false</code> otherwise.
<script type="text/javascript"><!--
D(["mb","<br> * @return the maximum width of the parent composite<br> */<br>/n public int computeMaximumWidth(Composite parent, boolean changed);<br>}<br>TableWrapLayout本身实现了这个接口,这样让它处理当composites的layout是这个comp<WBR>osite的parent的children的情况<WBR>.另外的两个方法能够计算两种极端情况--当所有组件尽可能宽地布满时的显然的最小宽度和最大宽度<WBR>.两者的不同是使列之间的多余空间尽可能小时贡献出公平的空间./n</p>/n<div>让我们看清楚贡献空间是怎样的.我们会推荐我们到现在为止写的代码<WBR>并象下面这样做出修改:</div>/n<div></div>/n<div><pre> layout.numColumns /u003d 3;/n Label label;/n TableWrapData td;/n /n label /u003d toolkit.createLabel(form.getBody(), /n "Some text to put in the first column", SWT.WRAP);/n label /u003d toolkit.createLabel(form.getBody(),/n "Some text to put in the second column and make it a bit "+/n "longer so that we can see what happens with column "+/n distribution. This text must be the longest so that it can "+/n "get more space allocated to the columns it belongs to.", /n SWT.WRAP);/n td /u003d new TableWrapData();/n td.colspan /u003d 2;/n label.setLayoutData(td);/n label /u003d toolkit.createLabel(form.getBody(), /n "This text will span two rows and should not grow the column.", /n SWT.WRAP);/n td /u003d new TableWrapData();/n td.rowspan /u003d 2;/n label.setLayoutData(td);/n label /u003d toolkit.createLabel(form.getBody(), /n "This text goes into column 2 and consumes only one cell", /n SWT.WRAP);/n label.setLayoutData(new TableWrapData(TableWrapData.FILL_GRAB));/n label /u003d toolkit.createLabel(form.getBody(), /n "This text goes into column 3 and consumes only one cell too", /n SWT.WRAP);/n label.setLayoutData(new TableWrapData(TableWrapData.FILL));/n label /u003d toolkit.createLabel(form.getBody(), /n "This text goes into column 2 and consumes only one cell", /n SWT.WRAP);/n label.setLayoutData(new TableWrapData(TableWrapData.FILL_GRAB));/n label /u003d toolkit.createLabel(form.getBody(), /n "This text goes into column 3 and consumes only one cell too", /n SWT.WRAP);/n label.setLayoutData(new TableWrapData(TableWrapData.FILL));/n<img height/u003d/"13/" src/u003d/"http://www.eclipse.org/articles/Article-Forms/images/tag_1.gif/" width/u003d/"24/" align/u003d/"baseline/">",1]
);
//--></script>
* @return the maximum width of the parent composite
*/
public int computeMaximumWidth(Composite parent, boolean changed);
}
TableWrapLayout本身实现了这个接口,这样让它处理当composites的layout是这个comp<wbr></wbr>osite的parent的children的情况<wbr></wbr>.另外的两个方法能够计算两种极端情况--当所有组件尽可能宽地布满时的显然的最小宽度和最大宽度<wbr></wbr>.两者的不同是使列之间的多余空间尽可能小时贡献出公平的空间.
layout.numColumns = 3; Label label; TableWrapData td; label = toolkit.createLabel(form.getBody(), "Some text to put in the first column", SWT.WRAP); label = toolkit.createLabel(form.getBody(), "Some text to put in the second column and make it a bit "+ "longer so that we can see what happens with column "+ distribution. This text must be the longest so that it can "+ "get more space allocated to the columns it belongs to.", SWT.WRAP); td = new TableWrapData(); td.colspan = 2; label.setLayoutData(td); label = toolkit.createLabel(form.getBody(), "This text will span two rows and should not grow the column.", SWT.WRAP); td = new TableWrapData(); td.rowspan = 2; label.setLayoutData(td); label = toolkit.createLabel(form.getBody(), "This text goes into column 2 and consumes only one cell", SWT.WRAP); label.setLayoutData(new TableWrapData(TableWrapData.FILL_GRAB)); label = toolkit.createLabel(form.getBody(), "This text goes into column 3 and consumes only one cell too", SWT.WRAP); label.setLayoutData(new TableWrapData(TableWrapData.FILL)); label = toolkit.createLabel(form.getBody(), "This text goes into column 2 and consumes only one cell", SWT.WRAP); label.setLayoutData(new TableWrapData(TableWrapData.FILL_GRAB)); label = toolkit.createLabel(form.getBody(), "This text goes into column 3 and consumes only one cell too", SWT.WRAP); label.setLayoutData(new TableWrapData(TableWrapData.FILL));
这个创建了一些有不同长度文本的label.有些labels占据<wbr></wbr>多列,有些占据多行.为了让测试更加简单,
图片9:TableWrapLayout留下的多余空间
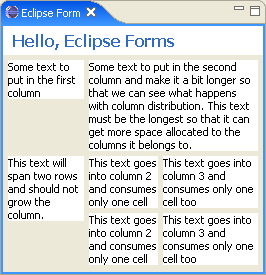
关键之处在于组件最小宽度和最大宽度相比较时.相差越多,结果越明显,会看到列中有很大的缝隙.占据的宽度是组件所需要的最小的宽度<wbr></wbr>.注意第3列比第2列稍微宽一点点,这是因为第3列中的文字长度比第2列中文字要长点<wbr></wbr>.如果需要阅读布局的相关理论,可以去这里W3C recommendations for HTML table auto-layout.
ColumnLayout
Eclipse Forms另外一个定制的layout是SWT RowLayout的变种.如果我们把RowLayout上的ch<wbr></wbr>ildren垂直放置时--按列-并且使同列中的所有组件拥有相同的宽度,我们会由组件的宽度得到多个列.但是,最后一列显然不是被填满的--这由组件的个数决定<wbr></wbr>.如果在form中,我们会仍然看到所有组件在一列中,因为RowLayout不能够<wbr></wbr>"垂直" 包裹.如果我们用GridLayout相替代的话,列的数量由我们自己决定.
在更加复杂的forms中我们需要列的数量按情况变化.换句话来说,我们希望数字按照form的宽度来改变--有可能需要更多的列,当宽度减小时则把数字减小.而且我们希望所有列的长度象报纸布局一<wbr></wbr>样相同.这些要求都能够通过ColumnLayout来达到.
与TableWrapLayout相比,ColumnLayout更加简单.不需要复杂的设置<wbr></wbr>.唯一需要你设置的就是列数的范围,默认是1到3.下面的例子演示了一个使用ColumnLayout<wbr></wbr>的有许多段落(sections)的form.初始时,只需要两列就可以放置所有段落了.如果我们把编辑器变窄一点,layout会使它们在同一列中.


发表评论

相关推荐
NULL 博文链接:https://jianshi-dlw.iteye.com/blog/1174555
Eclipse中用wsdl生成java客户端.pdf
Eclipse中用wsdl生成java客户端
svn1.8客户端+中文补丁+eclipse插件安装包, eclipse安装:Help-->Install New Software-->Add-->添加插件安装包进行安装
Eclipse根据wsdl文件逆向生成webservice客户端项目源码,包括wsdl文件,测试示例,测试webservice代码,包含备注信息
该教程主要介绍了怎么把spring整合到eclipse rcp的开发中去
Mqtt客户端(org.eclipse.paho.ui.app-1.0.2-win32.win32.x86_64.rar),结合文章:https://blog.csdn.net/weixin_42401291/article/details/102828779
eclipse.platform.ui, Eclipse 平台项目库( eclipse ...项目描述:平台UI为使用 Eclipse 构建的用户界面提供了基本的构建块。其中一些构成 Eclipse 富客户端平台( RCP ),可以用于任意富客户端应用程序,而另一些
Eclipse富客户端平台RCP程序使用的中文语言包。用于开发Eclipse插件或RCP富客户端平台使用。
MQTT客户端 org.eclipse.paho.ui.app-1.0.2-win32.win32.x86_64
是一本开发eclipse富客户端的教程
有些项目会用到service服务。service的原理和http请求一样,当服务器建好service服务后,客户端就可以通过一个具体的连接把service服务拉取下来,基本上会得到几个类,客户端只需要调用...客户端代码不需要过问这些。
使用eclipse创建spring cloud的eureka客户端和eureka服务端demo,参考地址: https://blog.csdn.net/qq_42382972/article/details/85843080
使用eclipse生成webService服务端与客户端全过程
需要jdk环境,包含 Mqtt客户端64位(org.eclipse.paho.ui.app-1.1.1-win32.win32.x86_64) Mqtt客户端32位(org.eclipse.paho.ui.app-1.1.1-win32.win32.x86_64)
Eclipse开发WebService服务端实例。开发客户端代码。超级简单易懂的实例。
Platform UI 为构建 Eclipse 的用户界面提供一个基本的构建模块。一些结构来自于 Eclipse 富客户端平台(RCP),并且能应用于任何富客户端的应用。Platform UI 代码库建立于 Eclipse 标准固件工具包(SWT)的顶层,...
在plugins org.eclipse.ui.workbench_3.3.1.M20070921-1200.jar下 打到org/eclipse/ui/internal/util/SWTResourceUtil.class 用winrar打开,同时也打开3.4的org.eclipse.ui.workbench_3.4.0.I20080606-1300.jar ...
下载 axis2 eclipse codegen wizard zip 和 axis2 eclipse service archiver wizard zip http: labs xiaonei com apache mirror ws axis2 1 5 axis2 1 5 war zip 下载 axis2 1 5 war zip 2 .解压插件 $ECLIPSE ...
将org.eclipse.cdt.ui_6.6.100.201911141456.jar改为org.eclipse.cdt.ui_6.6.100.201911141456.jar.bak 4.改名替换 将本补丁名字改成你安装的org.eclipse.cdt.ui的名字(我的是org.eclipse.cdt.ui_6.6.100....