- 浏览: 13634529 次
- 性别:

- 来自: 洛杉矶
-

文章分类
- 全部博客 (1994)
- Php / Pear / Mysql / Node.js (378)
- Javascript /Jquery / Bootstrap / Web (435)
- Phone / IOS / Objective-C / Swift (137)
- Ubuntu / Mac / Github / Aptana / Nginx / Shell / Linux (335)
- Perl / Koha / Ruby / Markdown (8)
- Java / Jsp (12)
- Python 2 / Wxpython (25)
- Codeigniter / CakePHP (32)
- Div / Css / XML / HTML5 (179)
- WP / Joomla! / Magento / Shopify / Drupal / Moodle / Zimbra (275)
- Apache / VPN / Software (31)
- AS3.0/2.0 / Flex / Flash (45)
- Smarty (6)
- SEO (24)
- Google / Facebook / Pinterest / SNS (80)
- Tools (22)
最新评论
-
1455975567:
xuezhongyu01 写道wocan23 写道我想问下那个 ...
Mysql: LBS实现查找附近的人 (两经纬度之间的距离) -
xuezhongyu01:
wocan23 写道我想问下那个111.1是怎么得来的我也看不 ...
Mysql: LBS实现查找附近的人 (两经纬度之间的距离) -
18335864773:
试试 pageoffice 在线打开 PDF 文件吧. pag ...
jquery在线预览PDF文件,打开PDF文件 -
青春依旧:
opacity: 0.5; 个人喜欢这种方式!关于其他css特 ...
css透明度的设置 (兼容所有浏览器) -
July01:
推荐用StratoIO打印控件,浏览器和系统的兼容性都很好,而 ...
搞定网页打印自动分页问题
One question that often appeared in my mailbox or on the forums regarded creating a text scroller that worked when text was loaded from an external text file. I had told users that it was not possible to create that effect until a user (Ged) e-mailed me with a link to Macromedia's tech note (no: 16142). In his link, I found out how to create the text scroller and make it work easily. So, here is the tutorial to help you out!
The following is an example of the animation you will have created by the end of this tutorial:
[ the text in the scroll box was loaded from a location on the server ]
http://www.kirupa.com/developer/mx/animation/dynamic_scroller.swf
Creating the Text Scroller:
-
Create a new movie by
going
to File | New. Set the width and height of your
movie to
anything you choose.
- Click the Text Tool icon from the left. The Properties panel should appear. Select Dynamic Text from the drop-down menu on the bottom-left:
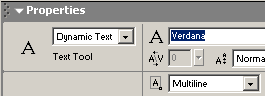
[ select Dynamic Text ]
- After you have selected "Dynamic Text", draw your text box. Make the text box large enough to contain several lines of text:
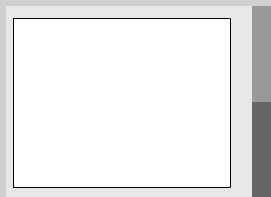
[ the white rectangle above is the text box ]
- Now that your text box is drawn, select the text box with your mouse pointer. In the Properties Panel, replace <instance name> on the left with the word scroller :

[ set the instance name of the dynamic text to scroller ]
From the Properties panel, make sure you select Multiline for the line type. That ensures your text wraps as opposed to displaying in one huge horizontal line.
-
Now, make sure your Components panel is visible.
To
display the Components panel, go to Window |
Components or
press Ctrl + F7. The Components panel will be
visible on
the right.
- From the Components panel, drag and drop the Scrollbar Component on top of the text box you just created. The scrollbar will automatically resize and snap to your text box:
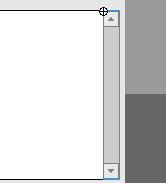
[ the scrollbar automatically snaps to the text box ]
- The final step to our Flash movie involves adding the action. Right click on a keyframe on your timeline and select Actions. The Actions dialog box will appear. Copy and paste the following code into the Actions dialog box:
[ copy and paste the above code into the Actions dialog box ]
- You are done with the Flash animation, but you have yet to create the text file from which all the text will be loaded from. The next section will help you to do just that: create the text file.
Creating the Text File:
-
Open up an ASCII text
editor.
I will be using Notepad because I am on a
Windows-based
PC.
- Copy and paste the following text into Notepad:
[ copy and paste the above text into Notepad ]
- Now, the text should be visible in Notepad. Place your mouse cursor before the word "Hello" on the first line and press Enter or Return. Now, type the words kirupatext= :
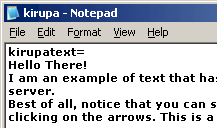
[ enter the words "kirupatext=" above the words "Hello There!" ]
-
Now, save this text
file as
kirupa.txt
and place it in the SAME folder
as that
of your Flash animation.
- Preview the Flash animation in your browser. You will now see the text that you pasted into Notepad display in your text box. Best of all, the scrollers work!
ActionScript Explained
Not to leave you in the dark, I
will
briefly summarize what the major
lines of ActionScript stand for. For
reference purposes, here is the copy of the code you
pasted
in Flash:
In the first line, I am creating a loadVars function to loadText, and in the next line I initialize loadText to load kirupa.txt when the variable first gets loaded (.load). With that, I tell Flash to load the variables, the content, from the file kirupa.txt.
In the next segment of code, I create a new function and apply the variables stored in loadText (from the kirupa.txt file) to the text scroller. Remember, that the text property of a text box specified what is displayed in the text box. Therefore, the the content in scroller.text equals what the variable kirupatext equals.
Remember that kirupa.txt is the name of the Text file you saved. The variable kirupatext is the text you added to the file in your ASCII Editor (notepad).
You have just
completed the tutorial! As
always, I have provided the source code for you to
take a
closer look at. Click the download source link below
to download
the Flash MX Flash File (FLA) for this effect.
![]()
download
source for flash mx
I hope the information helped. If you have any questions or comments, please don't hesitate to post them on the kirupa.com Forums . Just post your question and I, or our friendly forum helpers, will help answer it.
另一篇:

It has a lot of new features plus a new syntax and ease of use.
DOWNLOAD THE PACKAGE (A Flash8 fla, an swf and the Scrollbar class)
Here is an example.
http://www.fuoridalcerchio.net/flashexamples/scrollbarAs2.swf
New properties system is object oriented. Simply add the property to the object and then pass it to the setScrollbar method.
Mandatory properties:
- content : the clip to drag
- ruler : the scrollbar ruler (the object to drag to move the content)
- background : the scrollbar background (needed to define the whole length of the scrolling, simply turn to transparent if not needed)
- mask : the mask clip (it can be a timeline mask or a mask set via setmask)
Non-mandatory properties:
- blurred , define if the text should be blurred when moved, turn to false if the scrolling is too slow
- pixelhinting , define if the scrolled content must move ONLY on integer pixels (i.e. for pixel fonts)
- rulerAdjust , define if the scrollbar ruler height should be adjusted when the content changes
- cached , define if the content must be set to cacheAsBitmap
- scrollFactor , define the speed of the scroll
- blurFactor , define the amount of blurring when moving
General implementation:
scrollbar.setScrollbar({
     content: content,
     ruler: scrollbar.ruler,
     background: scrollbar.background,
     mask: scrollmask,
     scrollFactor: 10,
     blurred: true,
     blurFactor: 15,
     pixelhinting: false,
     cached: true
});
scrollbar.start();
Enjoy!
- dynamic_scroller.zip (37.3 KB)
- 下载次数: 5
- AS2ScrollbarV2.rar (46.5 KB)
- 下载次数: 5


发表评论

-
iPhone、iPad 如何播放网页调用优酷视频?
2013-09-26 14:30 17680在线视频一般都是基� ... -
flashAndPHP 简单交互
2010-06-17 01:53 1929第一章: flash,php 和 mysql ... -
交互动画按钮
2010-06-16 23:44 3669交互动画按钮 按钮元件是 Flash 的基本 ... -
引导路径动画 (2)
2010-06-16 23:41 17554.实例2——海底世界 ... -
引导路径动画 (1)
2010-06-16 23:31 3510引导路径动画(1) 在前面几节里,我们已经给大家介 ... -
动画基础
2010-06-16 23:22 1577动画的舞台结构及道具组合(1) 动画是一种动态 ... -
逐帧动画与夸张表情动画
2010-06-16 23:18 6437夸张表情动画的制作(1) (转之ET动画学堂) ... -
形状补间动画
2010-06-16 23:15 5433形状补间动画(1) ... -
逐帧动画与人运动动画制作
2010-06-16 23:11 4998人走路动画制作 ... -
动作补间动画
2010-06-16 23:07 4622动作补间动画(1) ... -
遮罩动画
2010-06-16 22:55 3539遮罩动画(1) ... -
Popup window ActionScript3 VS ActionScript2
2010-06-09 04:17 2631A common ... -
加载loader (How to Load External Images in Actionscript 3.0)
2010-05-28 02:18 1809Using the flash.display.Lo ... -
元件变色 change movieclip's color
2010-05-28 01:34 1872// This line defines a varia ... -
Flash AS3获取PHP数据(ActionScript3 + php + email)送ActionScript2
2010-04-23 21:11 5787一,AS3部分[下载 ] package { ... -
flex与flash元件交互
2010-01-30 04:31 1890前一段时间发了flex与JavaScript的数据交互 ,现 ... -
FLEX里的CSS样式设置教材
2010-01-29 00:38 2354FLEX3中应用 CSS完全详解 ... -
flex 扇形菜单
2010-01-29 00:27 9181在继 auzn经典Flex教程–KingnareStyle ... -
flex 画线
2010-01-29 00:23 3495实例1: <?xml version=" ... -
Flex 中 12 个简单实用的小技巧
2010-01-26 06:32 16371. 复制内容到剪贴板 System.setCli ...
相关推荐
you can know how to scrolling text with C#
An application which places scrolling text on your desktop.
Description RGB dot-matrix scrolling text display with Arduino UNO
The top and bottom of the text can be set to fade out. The colours of the fade are customizable to blend with your page. The amount of fading can be defined to suit your content. 演示-http:

6种基于js Scrolling的滚动面板
cd deezer-scrolling-text yarn install 运行/开发 ember serve 访问您的应用程序,为 。 访问。 代码生成器 利用许多生成器生成代码,尝试使用ember help generate更多详细信息 运行测试 ember test ember test...
VB平滑文字滚动,上下左右滚动示例VB smooth text scrolling, scroll up and down around the sample
本程序教你如何在状态栏上显示滚动文本。对想掌握如何使用状态栏的你会有帮助的。
创造firefox的丝滑浏览感受。 平滑滚动,比opera更加流畅。 适用于firefox3.5和3.6
Comment Scrolling.rp
text-and-scrolling-view
谷歌插件自动滚动网页,网页到达底部能自动转换到下一标签,只需要切换插件状态即可,操作简单,看小说使用方便,不用一直手动翻
无缝滚动scrolling.rar
Scrolling Tricks介绍: 实现滑动视图(ScrollView)中的头部两种滑动效果。一种是向上滑动View时,头部也向上滑动并且消失,当向下滑动时,头部马上出现,所以叫做Quick Return(如效果图1);一种是无论向上或者...
<iframe src="show.asp" frameBorder="0" width="500" scrolling="no" height="230"></iframe>
今天早上刚破解玩3067版本,可是到了美国时间的今天(2015年2月3日),sublime text又更新了。我了个娘的。这软件,平时不更新,一更新就隔个2,3天更新一次。真是麻烦。。。 这是更新内容: Build 3069 Release Date...
LinqListGridBind_Scrolling_cs.zip LinqListGridBind_Scrolling_cs.zipLinqListGridBind_Scrolling_cs.zipLinqListGridBind_Scrolling_cs.zip